
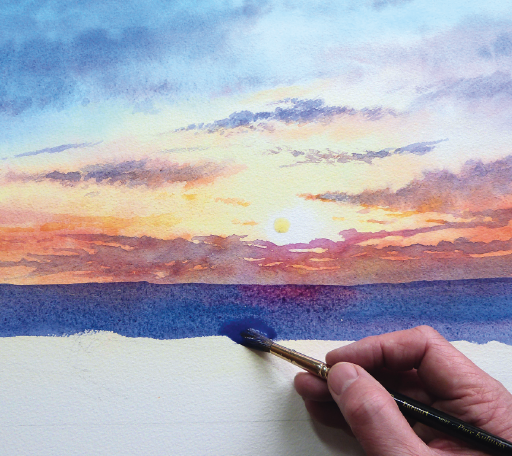
Learning how to paint is mostly learning how to see, and then learning how your materials behave. You do not need natural talent, an expensive studio, or a closet of supplies. You need a few good basics, a handful of core skills practiced in the right order, and the patience to make some bad paintings on the way to good ones. Every painter has a stack of those.
Quick answer: To learn how to paint, choose one medium (acrylic is the easiest starting point), buy a small set of quality basics: a few primary colors plus white, three brushes, and canvas panels or heavy paper. Start with simple exercises: value scales, color mixing charts, and brush stroke practice. Then paint simple subjects from life or photos, working from big shapes to small details and dark to light (or light to dark in watercolor). Paint short sessions often, and study each painting to see what to improve next.
This beginner guide covers choosing a medium, the minimum supplies you need, essential techniques, a step-by-step first painting, a practice plan, and the mistakes nearly every beginner makes. It focuses on fine-art painting with acrylic, watercolor and oil, not house painting.
Step 1: Choose Your First Medium
Each paint has a different personality. Pick one to start; you can always try others later.
| Medium | Drying time | Cleanup | Forgiveness | Good for |
|---|---|---|---|---|
| Acrylic | Fast (minutes) | Water and soap | High; paint over mistakes | Most beginners; bold color, many surfaces |
| Watercolor | Fast | Water | Low to medium; hard to cover mistakes | Portable, luminous, loose styles |
| Gouache | Fast; reactivates with water | Water | Medium; opaque | Illustration, flat graphic color |
| Oil | Slow (days) | Solvent or solvent-free methods | High; long blending time | Realism, rich color, blending |
| Water-mixable oil | Slow | Water and soap | High | Oil look without traditional solvents |
Acrylic is the most common recommendation for absolute beginners because it is affordable, cleans up with water, dries quickly so you can layer, and covers mistakes easily. Watercolor is wonderful but less forgiving. Oil is beautiful and blends easily, but involves longer drying times and more care with ventilation and cleanup.
Step 2: Gather the Essential Supplies
More supplies do not make better paintings. A short list of decent-quality materials beats a huge set of low-quality ones.
Paint
A limited palette teaches mixing and keeps costs down:
- Titanium white (buy a larger tube; you will use the most of it)
- A warm yellow, such as cadmium yellow medium or a hue
- A cool red, such as alizarin crimson or quinacridone magenta, and/or a warm red, such as cadmium red light
- A blue, such as ultramarine
- Optional: burnt sienna or burnt umber for earthy darks
Student-grade paint is fine for learning, but very cheap craft paint can make mixing frustrating because it has less pigment. A mid-range student line is a good balance.
Brushes
- A 1-inch flat for backgrounds and large areas
- A medium filbert or flat (around size 8 to 10) for most painting
- A small round (size 2 to 4) for details
Synthetic brushes work well for acrylic and watercolor. Hog bristle or stiff synthetics are traditional for oil.
Surfaces
- Acrylic and oil: Canvas panels or canvas paper are affordable for practice. Stretched canvas for finished pieces.
- Watercolor: 140 lb (300 gsm) watercolor paper. Cotton paper behaves better than cellulose, but cellulose is fine for practice.
Other basics
- A palette (a plate, a sheet of glass, or a disposable palette pad)
- A palette knife for mixing
- Two water jars (one for rinsing, one clean) for water-based paints
- Paper towels or rags
- Pencil and eraser
- A tabletop easel or a board propped at an angle
Step 3: Learn the Core Skills
Value
Value means lightness and darkness. It is the single most important element for making paintings read clearly. Paint a value scale: a row of nine squares from white to black, mixing gray steps between. Then practice squinting at subjects to simplify them into light, middle and dark shapes.
Color mixing
Mix secondary colors (orange, green, violet) from your primaries. Then make a chart that mixes each color with each other color and with white. You will learn which combinations give bright results and which go muddy.
Color temperature
Colors lean warm (toward orange) or cool (toward blue). Warm colors tend to feel closer; cool colors recede. Even within one color, there are warm and cool versions.
Brush control
Practice strokes on scrap paper: thin lines, thick lines, dabs, dry brush, smooth blended areas, and tapered strokes using pressure. Ten minutes of brush practice at the start of a session builds control fast.
Edges
Hard edges draw attention; soft edges let areas recede. Varying edges is one of the simplest ways to make a painting look more sophisticated.
Composition
Where you place your subject matters. Avoid placing the main subject dead center or touching the edges awkwardly. The rule of thirds, which places key elements along imaginary lines dividing the canvas into thirds, is a useful starting guideline.
Essential Painting Techniques for Beginners
| Technique | What it is | Use it for |
|---|---|---|
| Blocking in | Painting large, flat shapes of color first | Establishing the composition |
| Wet-on-wet | Adding paint to a wet surface | Soft blends, skies, backgrounds |
| Wet-on-dry | Painting over dry paint | Crisp edges and details |
| Dry brushing | Little paint on a dry brush, dragged lightly | Texture: grass, wood, rough surfaces |
| Glazing | Thin, transparent layer over dry paint | Deepening color, adjusting tone |
| Scumbling | Thin, broken opaque layer | Atmosphere, softening areas |
| Impasto | Thick paint that holds brush marks | Highlights, texture, energy |
| Gradient blending | Smooth transition between colors | Skies, rounded forms |
Step 4: Your First Painting, Step by Step
A simple still life, such as a single apple or a mug on a table, makes an ideal first painting. Light it with one lamp from the side so shadows are clear.
- Tone the canvas (acrylic or oil). Brush a thin wash of a mid-tone, like burnt sienna diluted with water or medium. It removes the intimidating white and makes values easier to judge.
- Sketch the big shapes. Use a pencil or a thin brush with diluted paint. Draw the outline of the object, its shadow, and the table edge. No details.
- Block in darks. Paint the shadow side of the object and its cast shadow.
- Block in mid-tones. Paint the main color of the object and the background.
- Add lights. Paint the lit side of the object.
- Refine edges and transitions. Soften the edges where the form turns from light to shadow; keep the edge of the cast shadow sharper near the object.
- Add highlights and details last. A small, bright highlight on the apple or mug rim brings it to life.
- Step back. Look from across the room, squint, and fix the biggest problem first.
- Stop before overworking. Many beginner paintings were best about 15 minutes before the artist stopped.
For watercolor, reverse the value order: work from light to dark, leaving the white of the paper for the brightest highlights.
Step 5: Build a Practice Routine
Short, frequent sessions improve skills faster than occasional marathon sessions. Here is a simple four-week plan:
| Week | Focus | Exercises |
|---|---|---|
| 1 | Materials and value | Value scale, brush stroke sheet, monochrome painting of a simple object |
| 2 | Color mixing | Color wheel, mixing chart, limited-palette fruit studies |
| 3 | Light and form | Sphere, cube and cylinder studies; single-light still life |
| 4 | Putting it together | A simple landscape and a still life with two or three objects |
Try to paint for 20 to 45 minutes, three to five times a week. Keep your paintings, date them, and compare them each month to see progress.
Setting Up a Simple Painting Space
You do not need a dedicated studio. A corner of a table works if it is organized. Place your palette on the side of your dominant hand so you are not reaching across wet paint. Keep the water jar and paper towels on the same side. Position your easel or board so light falls evenly on it without glare; daylight from a window is ideal, and a daylight-balanced bulb helps in the evening, since warm household bulbs make colors look different than they will in daylight. Protect the table with a plastic cloth or newspaper, and keep a small box for supplies so setup and cleanup take only a couple of minutes. The easier it is to start, the more often you will paint.
Simple Subjects for Beginners
- A single piece of fruit with a strong light
- A sunset sky with a dark silhouette
- A simple landscape: sky, distant hills, field
- A cup, bowl or bottle
- A single flower in a vase
- A tree against the sky
- Clouds, painted as quick studies
- An abstract color study with three colors
Common Beginner Mistakes
| Mistake | Why it happens | Fix |
|---|---|---|
| Starting with details | Details feel productive | Block in big shapes first |
| Muddy colors | Over-mixing or too many pigments | Mix two or three colors at a time; clean brushes |
| Values too similar | Not squinting or comparing | Do value studies; push darks darker |
| Brushes too small | Feels more controlled | Use the largest brush that fits the area |
| Too little paint on the palette | Saving paint | Squeeze out enough to mix freely |
| Overworking | Not knowing when to stop | Step back often; set a time limit |
| Painting from imagination only | Lack of reference | Use life or photo references while learning |
| Copying photos too literally | Treating the photo as truth | Simplify shapes and adjust colors |
Painting Safety and Studio Habits
- Work in a well-ventilated area, especially with oil paints, solvents and spray varnishes.
- Read labels; some pigments, such as cadmiums and cobalts, carry warnings. Avoid eating while painting and wash hands afterward.
- Do not pour paint water or solvents down the drain. Let water-based paint settle and dispose of solids with household trash per local guidelines; follow local hazardous waste rules for solvents.
- Clean brushes immediately after each session to keep them in good shape.
- Store oil-soaked rags safely; some oils can heat as they dry. Lay them flat to dry outdoors or store them in a sealed metal container with water.
Caring for Brushes and Paintings
Rinse brushes thoroughly, wash them with mild soap, reshape the tips and dry them flat or upright with bristles up. Never leave brushes standing in water. Let finished paintings dry fully before stacking or framing: acrylics are dry to the touch within an hour but cure over days, and oils can take weeks or months to cure fully before varnishing.
How to Keep Improving
- Study painters you admire. Look at how they handle value, color and edges.
- Do master copies. Copying a painting as a private study teaches decisions you would not discover alone.
- Paint from life. Observing real objects, people and places trains your eye better than photos alone.
- Take a class or join a group. Feedback speeds learning.
- Critique your own work. After each painting, write one thing that worked and one thing to improve.
FAQs
What is the easiest paint for beginners?
Acrylic is widely considered the easiest. It dries quickly, cleans up with water, works on many surfaces and lets you paint over mistakes.
What supplies do I need to start painting?
A few colors (white, yellow, red, blue, plus an optional earth tone), three brushes in different sizes, canvas panels or watercolor paper, a palette, a palette knife, water jars and paper towels.
How long does it take to learn to paint?
You can complete simple paintings in your first week. Building solid skills in value, color and composition usually takes months of regular practice, and painters keep improving for years.
Should I paint from photos or real life?
Both are useful. Real life trains your observation and color perception; photos are convenient and good for complex subjects. A mix of both works well.
Why do my paintings look flat?
Usually because values are too similar. Increase contrast, add clear light and shadow, vary edges and include warm and cool temperature shifts.
How do I avoid muddy colors?
Mix only two or three pigments at a time, keep brushes and water clean, avoid over-blending on the canvas, and let layers dry before painting over them with a new color.
Final Thoughts
Learning how to paint starts with one medium, a short list of materials, and a few core skills: value, color mixing, brush control and composition. Paint simple subjects often, work from big shapes to small details, and treat every painting as practice. Progress comes faster than most beginners expect once those habits are in place.
Pick one exercise from this guide, such as a value scale or a single apple under a lamp, and paint it today. The next painting will be better because of it.



One Comment