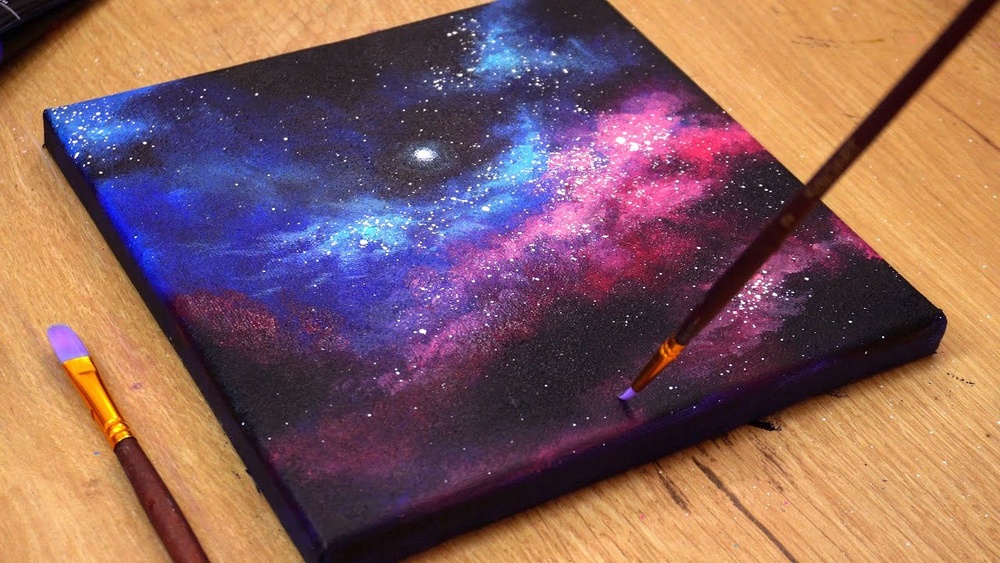
Quick answer: To paint galaxies with acrylic paint, cover the surface in black or a very dark blue, then sponge or dry-brush clouds of purple, magenta and blue in a sweeping band, keeping their edges soft and irregular. Add lighter, smaller patches of the same colors inside the band, then a little white mixed with a hint of color at the brightest center. Finish by spattering stars with thinned white paint from an old toothbrush and adding a few larger stars with a fine brush.
Galaxy paintings look like they need airbrushes and years of practice. In reality they are one of the most approachable subjects in acrylic because the shapes are vague, mistakes blend away, and the stars cover a multitude of sins. What separates a striking galaxy from a smudgy purple mess is layering and value control.
This guide explains how to paint galaxies with acrylic paint using sponges and brushes, with a full step-by-step demonstration, color recipes, star techniques, variations like nebulae and spiral galaxies, and a troubleshooting section.
What Makes a Galaxy Painting Work
Most galaxy art people admire is actually closer to a nebula or a Milky Way band than a true spiral galaxy. The common visual ingredients are:
- A very dark base. Space is the darkest value in the painting, and color only glows against it.
- Soft-edged color clouds. Purples, blues, magentas and teal fading into darkness with no hard lines.
- A bright core or band. One area clearly lighter than the rest, which gives the eye somewhere to land.
- Stars at several sizes. Thousands of tiny dots, dozens of medium ones and just a few large, bright stars.
Layering from dark to light is critical. Each new layer of color should be smaller and lighter than the one beneath it, so the galaxy appears to glow from within.
Supplies for Painting Galaxies
| Supply | Recommendation |
|---|---|
| Base color | Mars black, or a mix of phthalo blue and burnt umber for a deep blue-black |
| Galaxy colors | Dioxazine purple, quinacridone magenta, phthalo blue, ultramarine blue, phthalo turquoise or teal, titanium white |
| Applicators | Natural or makeup sponges, a 1-inch soft flat brush, a fan brush |
| Detail tools | Old toothbrush, size 0 or 1 round brush, liner, dotting tool or toothpick |
| Surface | Canvas or canvas panel, 8×10 to 16×20 inches; galaxy art also works on paper, wood and stone |
| Extras | Paper towels, palette, water, optional glazing medium and iridescent or metallic paint |
The intensity of galaxy colors depends heavily on pigment. Phthalo blues and quinacridone magentas are strong, transparent pigments that stay vibrant when glazed, while low-cost “hue” versions can look chalky as soon as white is mixed in. If your purples keep fading to gray, our guide on which acrylic paints keep their color intensity is worth a look.
Galaxy Color Recipes
You do not need dozens of tubes. A handful of mixes covers most galaxy palettes.
| Color | Mix | Where to use it |
|---|---|---|
| Deep space | Phthalo blue plus burnt umber, or black plus a touch of purple | Base layer and outer edges |
| Royal purple | Dioxazine purple plus a little ultramarine | Outer galaxy clouds |
| Hot magenta | Quinacridone magenta, straight or with a touch of white | Inner clouds and accents |
| Electric blue | Phthalo blue plus white | Contrast clouds next to magenta |
| Teal glow | Phthalo turquoise or phthalo blue plus a touch of yellow and white | Highlights and cool accents |
| Core light | Titanium white tinted with a dot of magenta or blue | The brightest area only |
Avoid mixing yellow directly into purple; they are complements and will turn brown. Keep warm and cool areas slightly separated, or let them overlap only in thin glazes over dry paint.
How to Paint Galaxies With Acrylic Paint: Step-by-Step
This demonstration uses a sponge for clouds and a toothbrush for stars on an 11×14-inch canvas. Total time is around 45 to 75 minutes.
Step 1: Paint the Dark Base
Cover the canvas with your deep space mix. Two thin coats give better coverage than one thick coat. Let it dry completely; sponging into wet black muddies every color that follows.
Step 2: Plan the Galaxy Path
Decide where the band of the galaxy will run. A diagonal from one corner toward the opposite side feels dynamic. You can mark it with a few faint chalk dots, but avoid drawing outlines; the edges need to be soft.
Step 3: Sponge the Purple Foundation
Dampen a sponge, squeeze it almost dry, then dab it into purple and blot once on a paper towel. Dab lightly along the galaxy path in an irregular, wide band. Vary pressure so some areas are dense and others are barely tinted. Let some black show through.
Step 4: Add Blue and Magenta Clouds
With a clean section of sponge, dab blue along one side of the band and magenta along the other, overlapping the purple. Where they meet, a little overlapping produces natural purple transitions. Keep these clouds slightly smaller than the purple layer.
Step 5: Blend Edges
While the paint is still slightly damp, use a soft, dry flat brush to lightly feather the outer edges of the clouds into the dark background. A circular, light touch prevents hard lines.
Step 6: Build Lighter Layers
Mix each galaxy color with a little white. Sponge these lighter tints in smaller patches inside the band, focusing on the center. Each layer should cover less area than the one below. This stacking is what creates depth and the sense of light.
Step 7: Add the Core
Using the tinted white, dab a small, bright area in the densest part of the band. Soften it gently so it glows rather than looking like a spot. Keep it to a small fraction of the galaxy area.
Step 8: Darken Dust Lanes (Optional)
Real galaxies and the Milky Way have dark dust lanes running through them. With a small brush and thinned deep space mix, paint a few irregular, wispy dark streaks through parts of the band. This adds realism and contrast.
Step 9: Spatter Stars
Thin titanium white with water to the consistency of milk. Dip an old toothbrush, tap off excess, and run your thumb across the bristles over the canvas. Practice on paper first to judge spray size. Spatter more stars around the galaxy band and fewer at the edges of the canvas.
Step 10: Paint Feature Stars
With a fine round brush or toothpick, add a handful of larger stars. For a few of the brightest, paint a small dot and then a thin cross of fine lines radiating from it to suggest a starburst. Five to ten feature stars is usually plenty.
Sponge vs. Brush: Which Technique to Use
| Method | Strengths | Limitations |
|---|---|---|
| Sponge | Fast, naturally cloudy texture, forgiving for beginners | Visible sponge pattern if overused; less control at edges |
| Dry brush | Wispy, streaky clouds; good for spiral arms | Can look scratchy if too much paint is loaded |
| Wet blending | Smoothest gradients | Acrylic dries quickly, so it requires speed or retarder |
| Glazing | Rich, deep color shifts | Slower; needs drying time between layers |
| Pouring | Organic, cell-like nebula effects | Less predictable composition |
Many artists combine methods: sponge for the base clouds, dry brush for wisps and glazing for final color adjustments.
Galaxy Painting Variations
Spiral Galaxy
Paint a bright, small core, then use a dry fan or flat brush to sweep curved arms outward in a spiral. Keep the arms thin near the core and wider and fainter as they extend. Add tiny stars clustered along the arms.
Nebula
Instead of a band, build a large, irregular cloud shape with several color zones. Pinks and magentas next to teal and blue create the classic nebula look. Dark dust lanes through the cloud increase depth.
Galaxy Silhouette Scene
Paint a galaxy sky, then add a black silhouette in the foreground: mountains, pine trees or a person standing on a hill. The silhouette anchors the composition and makes the sky feel vast.
Galaxy on Rocks, Shoes or Wood
The same sponging method works on small surfaces. Prime porous surfaces first, use smaller sponges, and seal finished pieces with a clear acrylic varnish suitable for the surface and its use.
Advanced Effects: Inks, Metallics and Glazes
Acrylic inks are highly fluid and intensely pigmented, which makes them useful for glowing color washes and fine star trails. Our Daler-Rowney acrylic ink review covers how inks layer over dark grounds. A thin glaze of iridescent or interference medium over the core can add a subtle shimmer that changes as you walk past the painting, though it reads best in person rather than in photos.
Composition Tips for Galaxy Paintings
A galaxy is mostly soft texture, so composition decides whether it feels dramatic or random. A few principles help:
- Avoid the dead center. Place the brightest core roughly a third of the way in from one edge, not in the exact middle.
- Use a diagonal. A band running corner to corner creates motion; a horizontal band feels calmer and more like a Milky Way over a landscape.
- Leave quiet space. Keep at least one area of the canvas mostly dark with only scattered stars. Contrast between busy and empty areas gives the eye a rest.
- Repeat colors. Echo a small amount of the core color elsewhere, such as a faint magenta patch in a far corner, so the palette feels unified.
Drying and Layering Timeline
Galaxy paintings move quickly, but rushing between layers is the most common cause of mud. A rough timeline on an 11×14 canvas looks like this: the dark base needs 20 to 40 minutes to dry between two coats, sponged cloud layers usually dry in 10 to 15 minutes each, and spattered stars should sit for at least 30 minutes before you add feature stars, so a stray touch does not smear them. Humidity and paint thickness change these times, so test with a light knuckle touch in an inconspicuous corner before moving on.
Common Mistakes and How to Fix Them
- Muddy purple-brown areas. Caused by mixing complementary colors while wet. Let layers dry before overlapping warm and cool hues.
- Hard cloud edges. Feather edges with a dry brush while damp, or glaze over them with thinned dark color.
- Too much white. A galaxy that is mostly pale loses its glow. Keep white for small, central areas.
- Uniform star field. Vary star size and density. Clusters near the galaxy band look more natural.
- Toothbrush blobs. Paint was too thick or the brush was overloaded. Thin the paint and tap off excess before spattering.
- Repetitive sponge marks. Rotate the sponge often and use different sides.
Tips by Skill Level
Beginner
Stick to three colors plus white and black. Practice on paper or a small canvas panel. Focus on getting soft edges and a bright center.
Intermediate
Add dust lanes, silhouettes and feature stars. Experiment with glazes to deepen color without adding opacity.
Advanced
Study reference photographs from public astronomy image archives for realistic structures, then interpret them with your own palette. Try fluid acrylics and inks for finer wisps.
FAQs
What colors do you need to paint a galaxy?
A basic galaxy palette includes black or a deep blue-black, dioxazine purple, quinacridone magenta, phthalo blue and titanium white. Teal or turquoise adds a cool accent.
Can beginners paint a galaxy with acrylics?
Yes. Galaxies are forgiving because their shapes are soft and irregular. A sponge and a toothbrush make the process accessible even without strong brush skills.
How do you make stars in a galaxy painting?
Spatter thinned white paint with an old toothbrush for tiny stars, then add larger stars individually with a fine brush, toothpick or dotting tool.
Should the background be black or dark blue?
Both work. Pure black gives maximum contrast; a deep blue-black or purple-black can look richer and more natural, especially in lighter galaxy palettes.
Why does my galaxy look flat?
Flat galaxies usually lack value range. Build several layers, each smaller and lighter, with a clearly bright core, and keep the outer areas dark.
How do I seal a galaxy painting?
After it has dried for at least 24 hours, apply a clear acrylic varnish in gloss or satin. Gloss tends to deepen dark colors, which suits space scenes well.
Final Thoughts
Painting galaxies with acrylic paint is about patience with layers. A dark base, soft overlapping clouds, progressively lighter and smaller layers, a bright core and a varied star field will produce a convincing result every time. Once that process feels comfortable, nebulae, spiral galaxies and night-sky landscapes are natural next steps.
Vibrant, transparent pigments make space scenes glow, so paint choice has a visible effect here. Explore our ranking of acrylic paint brands with saturated, lightfast color before stocking up on purples and blues.