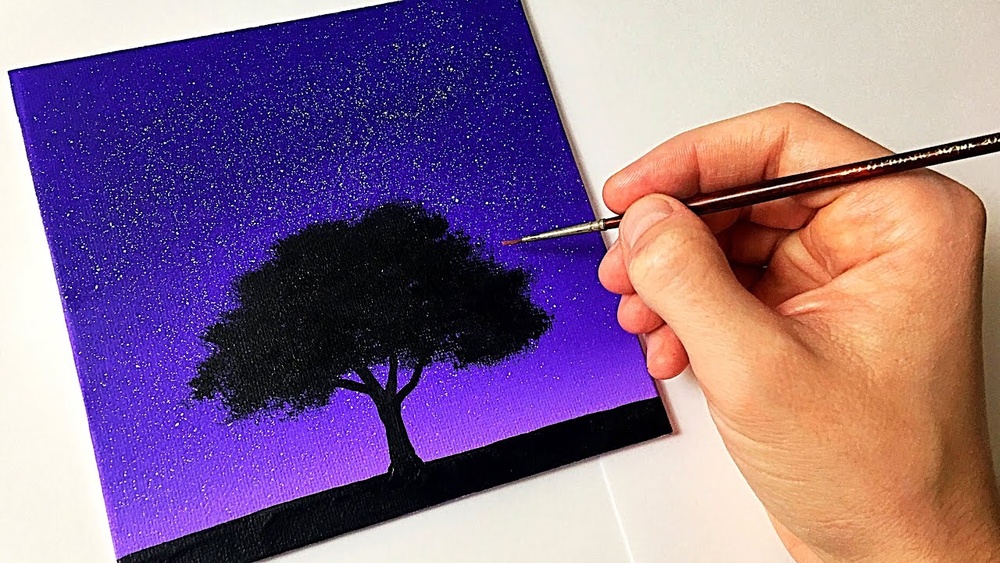
Quick answer: The best night sky painting ideas in acrylic start with a smooth dark gradient (black or Payne’s gray into ultramarine, phthalo blue or purple), then add stars by flicking thinned white paint off a stiff brush, and finish with a silhouette such as trees, mountains or a lone figure. Popular variations include the Milky Way, aurora borealis, a full moon over water, a galaxy splatter and a starry sky above a campfire. Work wet-into-wet on the gradient, let it dry fully, and only then add stars and silhouettes.
Night skies are one of the most forgiving subjects in acrylic. The fast drying time that frustrates portrait painters works in your favor here: you can lay a gradient, let it set in minutes, and then splatter stars without worrying about smearing anything. And because the sky is mostly dark, small blending imperfections disappear.
Below are a dozen night sky painting ideas in acrylic, from a 30-minute beginner silhouette to a layered aurora, plus a full step-by-step method for the core starry sky that every idea builds on. Rich, highly pigmented darks make a big difference in this subject, so if your blacks and blues look chalky, our guide to acrylic paints with strong pigment load is worth a look.
What You Need to Paint a Night Sky With Acrylics
Colors
- Dark base: Mars black, ivory black or Payne’s gray
- Blues: ultramarine blue (warm, slightly purple) and phthalo blue (cool, intense)
- Purples and magentas: dioxazine purple and quinacridone magenta for galaxy and twilight tones
- Accent: phthalo green or a turquoise for auroras
- Titanium white: for stars, moons and mixing
- Optional: a warm yellow or orange for moonlight, campfires or city glow
Tools
- A 1-inch flat or wide hake brush for gradients
- A small round or liner brush for silhouettes and big stars
- An old toothbrush or stiff bristle brush for star splatter
- A sponge or crumpled paper towel for nebula textures
- Canvas panel, stretched canvas or heavy mixed-media paper (8×10 or 11×14 inches is a comfortable size)
- Painter’s tape for crisp edges and a spray bottle to keep paint workable
How to Paint a Night Sky With Acrylics: The Core Method
Every idea later in this article starts with these steps. Practice them once on a small panel and the variations become easy.
- Plan the light source. Decide where the brightest part of the sky will be: near the horizon, around a moon, or along the Milky Way band. Everything gets darker as it moves away from that point.
- Mix three values before you start. A near-black (black plus a touch of blue), a mid-tone (blue plus a little black), and a lighter tone (blue plus white or blue plus purple). Mixing first matters because acrylic dries too quickly to mix as you go.
- Lay the darkest color at the top. Use horizontal strokes across the top third of the canvas.
- Add the mid-tone below while the top is wet. Overlap the two bands by an inch and blend with light, criss-cross strokes.
- Add the lightest tone near the horizon. Blend upward into the mid-tone. Mist lightly if the paint starts to drag.
- Soften the transitions. Use a clean, dry, soft brush with almost no pressure, sweeping side to side across the blend lines.
- Let it dry completely. Give it 20 to 30 minutes for a normal layer. A second gradient coat often looks smoother and more opaque.
- Add stars using the splatter technique below.
- Paint the silhouette last in pure black or a very dark blue.
How to Paint a Starry Night Sky With Acrylics
Convincing stars come from variety in size and brightness. Real skies have a few bright stars and thousands of faint ones.
- Thin the white. Mix titanium white with water to the consistency of milk. Too thick and it will not flick; too thin and it vanishes into the dark.
- Test on paper. Dip a toothbrush, tap off the excess and run your thumb across the bristles over scrap paper.
- Splatter the faint stars. Hold the brush 6 to 10 inches from the canvas for fine mist. Move it around so stars do not cluster.
- Add medium stars. Hold the brush closer, about 3 to 4 inches, or tap a loaded round brush against your finger.
- Hand-paint a few bright stars. Use the tip of a liner brush to dot a handful of larger stars. For a twinkle, pull four tiny lines outward from the center.
- Clean up mistakes. Dab a blob immediately with a damp cotton swab, or let it dry and paint over it with the background color.
Cover areas you want to keep clear, like a moon or the foreground, with paper or tape before splattering.
12 Night Sky Painting Ideas in Acrylic
Each idea lists the skill it teaches and roughly how long it takes on an 8×10 or 11×14 canvas.
1. Pine silhouette under stars (beginner, 30 to 45 minutes)
A blue-to-black gradient, star splatter, and a row of pine trees along the bottom. Paint each tree as a vertical line with short downward-angled dabs that get wider toward the base. This is the best first project for anyone searching for night sky acrylic painting for beginners.
2. Full moon over water (beginner, 45 minutes)
Trace a circle with a jar lid and paint the moon in white with a touch of yellow. Below the horizon, mirror the sky colors and add a vertical streak of broken horizontal white dashes for the reflection. The key is keeping the reflection directly below the moon.
3. The Milky Way band (intermediate, 1 to 1.5 hours)
After the base gradient dries, sponge a diagonal band of lighter blue, purple and a hint of warm pink across the sky. Dab, do not wipe. Then concentrate dense star splatter along the band and fewer stars outside it. A dark foreground of rocks or hills grounds it.
4. Aurora borealis (intermediate, 1 hour)
Paint a deep blue-black sky. Using a flat brush and phthalo green mixed with a little white, drag vertical curtain strokes upward from a curving baseline. Soften the tops into the sky with a dry brush. Touch in a bit of magenta at the top edges for color variation, then add stars and a snowy treeline.
5. Galaxy splatter (beginner, 30 minutes)
Skip the neat gradient. Sponge patches of purple, magenta, blue and black randomly, blending only lightly at the edges. Splatter stars heavily. This is a great acrylic idea for beginners because there is no right answer for where colors go.
6. Crescent moon and clouds (intermediate, 1 hour)
Paint the crescent, then glaze thin, soft clouds over parts of the sky using a gray-blue mixed with plenty of glazing medium. Light the edges of clouds closest to the moon with a pale gray. This teaches transparent layering.
7. Campfire under stars (intermediate, 1 to 1.5 hours)
Combine a dark sky with a warm glow at the bottom. Paint the fire with yellow at the center, orange, then red outward, and scumble a faint warm halo onto the surrounding ground and nearby silhouettes. The contrast between cold sky and warm fire makes the piece pop.
8. Mountain range at twilight (intermediate, 1 hour)
For a twilight sky, let the horizon glow orange or pink before shifting to blue and then near-black at the top. This bridges a sunset and a night sky, so it is a natural next step if you have learned how to paint a sunset sky in acrylic. Layer mountains from light and hazy in the distance to dark and crisp in front.
9. Shooting star over a field (beginner, 40 minutes)
Add a single streak with a liner brush: start with a bright dot and pull a tapering line behind it. Soften the tail with a dry brush. A field of grass flicked upward in black finishes it.
10. City skyline at night (intermediate, 1.5 hours)
Paint a slightly lighter, hazier sky near the horizon to suggest light pollution. Use painter’s tape to block out building shapes, then paint them black and dot windows in warm yellow. Fewer stars make it more realistic.
11. Lone figure stargazing (beginner to intermediate, 45 minutes)
A small silhouette of a person or a couple on a hill adds a story. Keep the figure tiny compared with the sky for a sense of scale.
12. Acrylic paint marker constellations (beginner, 30 minutes plus drying)
Once a simple gradient is dry, use a fine white acrylic paint marker to dot constellations and connect them with thin lines. This is one of the easiest acrylic paint marker ideas and works well as a kids’ or classroom project.
Color Recipes for Different Night Skies
| Mood | Top of sky | Middle | Horizon |
|---|---|---|---|
| Classic deep night | Black + touch of ultramarine | Ultramarine + little black | Ultramarine + white |
| Cool winter night | Payne’s gray | Phthalo blue + black | Phthalo blue + white |
| Purple galaxy | Black + dioxazine purple | Purple + magenta | Magenta + white |
| Twilight | Ultramarine + black | Purple + ultramarine | Orange to pink |
| Aurora | Black + phthalo blue | Dark teal | Phthalo green + white curtains |
How to Paint a Night Sky for Beginners: Tips That Help Most
- Mix more than you think. Running out of a dark blend halfway through means re-mixing a slightly different color and a visible band.
- Work fast and in one direction. Horizontal strokes keep gradients smooth.
- Use two coats. Darks often look streaky after one coat. A second pass evens them out.
- Keep whites clean. Use a separate water cup for star paint so it stays bright.
- Silhouettes go in last. Painting trees or mountains first means you would have to paint the sky around them.
- Don’t over-splatter. Add stars in rounds and step back between them.
Common Problems and Fixes
| Problem | Likely cause | Fix |
|---|---|---|
| Visible bands in the gradient | Paint dried between colors | Mist the canvas, work in smaller sections, or add slow-dry medium |
| Gray, dull sky | Too much black or white muddying the blue | Use less black; deepen with the blue itself or with Payne’s gray |
| Stars are giant blobs | Paint too thick or brush too loaded | Thin the white and tap off excess before flicking |
| Stars disappear | Paint too watery | Add a little more white; build up in two passes |
| Streaky darks | Low-pigment paint or single thin coat | Apply a second coat once dry |
| Silhouette edges look soft | Painting into wet sky | Let the sky dry fully first |
How to Color a Night Sky in Other Media
The same principles apply if you are drawing a night sky with pastels or colored pencils: dark at the top, lighter near the horizon or light source, and stars added last. With pencils, you can reserve star spots by pressing them into the paper with an embossing tool before coloring, or lift them afterward with an eraser. With pastels, a white gel pen or white acrylic dot works well for bright stars.
FAQs
How do you paint a night sky with acrylics for beginners?
Blend a gradient from black at the top to blue near the horizon, let it dry, flick thinned white paint off a toothbrush for stars, and finish with a black silhouette of trees or hills. A small canvas and a limited palette make it easier.
What colors make a realistic night sky?
Ultramarine or phthalo blue, a dark base like Mars black or Payne’s gray, and titanium white cover most night skies. Purple and magenta add galaxy tones, and a little phthalo green suggests an aurora.
How do you paint a night sky with stars without a toothbrush?
Tap a loaded round brush against a pencil or your finger above the canvas, or dot stars individually with a liner brush, a toothpick or a fine white paint marker.
How do you paint a night sky easy and fast?
Try the galaxy splatter idea: sponge purple, blue and black patches, splatter white stars, and you are done in about 30 minutes. No careful gradient is required.
Should I paint the stars or the silhouette first?
Stars first, silhouette last. That way the trees or mountains cover any stray splatter along the bottom.
Why does my night sky look flat?
Usually because the value range is too narrow. Make the top darker and the area near the light source lighter, vary star sizes, and add a silhouette for depth.
Final Thoughts
Night skies reward a simple process: mix values ahead of time, blend while wet, let it dry, splatter thoughtfully and finish with a strong silhouette. Once that core method feels comfortable, every idea on this list, from moonlit water to aurora curtains, is a small variation rather than a new skill.
Fluid acrylics and inks are especially handy for galaxy washes and aurora glows; the Daler-Rowney acrylic ink review covers how inks behave in this kind of work. For deep, saturated darks and clean whites that make stars stand out, see our breakdown of top acrylic paint brands for vivid color.