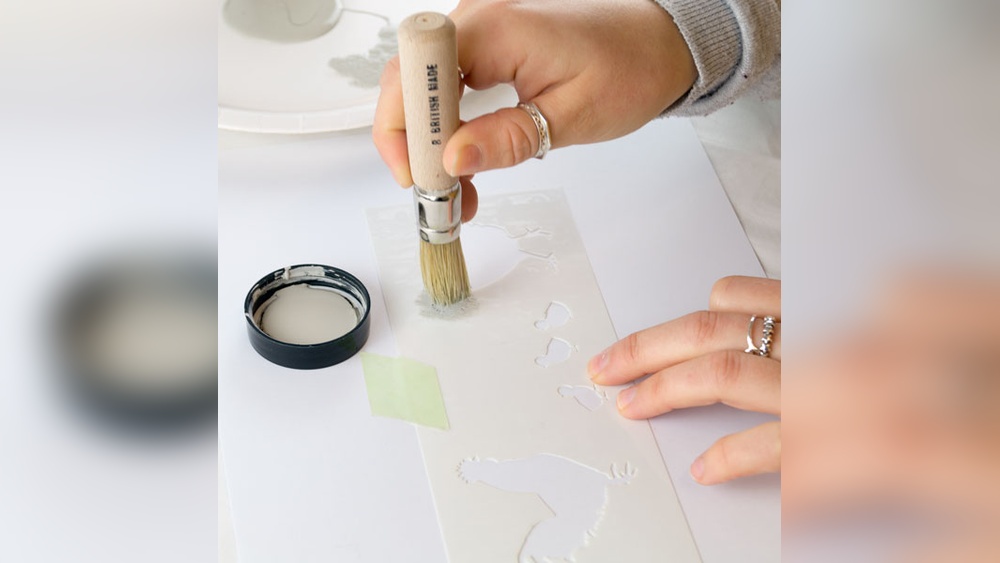
Quick answer: Here is how to use a stencil brush correctly: load only the very tips of the bristles, then offload almost all of the paint onto a paper towel until the brush feels nearly dry. Hold the brush straight up at 90 degrees to the surface and apply color with an up-and-down pouncing motion or small circular swirls, working from the stencil edge inward. Build color in several light layers instead of one heavy one, and lift the stencil straight up once you finish.
Stenciling looks simple: put a template down, add paint, lift it off. The trouble usually shows up at the moment of the reveal, when soft fuzzy edges or puddles of paint have crept under the template and spoiled the design.
Nearly every one of those problems comes back to how the brush is loaded and moved. A stencil brush is built for a dry, controlled technique, and once you understand why, crisp results become routine. This guide walks through how to use a stencil brush correctly, from choosing the right size to fixing bleed and blotches, for canvas, paper, mixed media, fabric and wood.
What Makes a Stencil Brush Different
A stencil brush has a round ferrule packed with short, dense bristles that are cut flat across the top. That flat face is the key feature. Instead of drawing a line like a pointed brush, the whole circular face meets the surface at once, depositing a thin, even film of paint.
The dense bristles hold paint in a controlled way and release it gradually. The stiffness lets you pounce or swirl without the hairs splaying sideways and pushing paint under the stencil’s edge. Standard soft brushes do the opposite: they flex, hold a lot of fluid and tend to flood the template.
Bristle types
- Natural hog bristle: Stiff and durable. Works well for pouncing and for heavier paint on textured surfaces such as wood or rough canvas.
- Synthetic bristle: Usually softer and smoother. Good for swirling and for fine gradients on paper or smooth panels, and easy to clean after acrylic.
- Foam pouncers: Not a brush, but often used for the same job. They give a smooth, solid fill but can leave a slightly stippled texture and are less precise around tight shapes.
Choosing a Stencil Brush Size
Brush size should match the size of the stencil openings. A brush that is too big will hit the template’s bridges and overflow small areas. A brush that is too small leaves blotchy patches and takes far longer.
| Brush diameter (approx.) | Best for |
|---|---|
| 1/4 inch | Small details, lettering, fine patterns, art journal stencils |
| 1/2 inch | Medium motifs, most craft and mixed media stencils |
| 3/4 to 1 inch | Larger designs, borders, backgrounds |
| 1 1/4 inch and up | Large wall or furniture stencils and broad fills |
A small set of two or three sizes covers most projects. Keep a separate brush for each color if you use several colors in one design, since switching wet brushes slows the process and can muddy colors. If you are building a broader brush collection beyond stenciling, our guide to the best paint brushes for artists explains which shapes cover most needs.
Can you use a round paint brush for stencils?
You can, with care. A short, stiff round brush with a blunt tip (such as a worn bristle round, or a scrubber-style round) can stand in for a stencil brush, especially for small openings. The risk with a normal pointed round is that it holds too much wet paint and the point slips under the template. If you try it, offload thoroughly and use a straight up-and-down dabbing motion rather than strokes.
Materials You Need
- Stencil brush (sized to your design)
- Stencil (mylar, plastic or cut cardstock)
- Paint suited to the surface (see table below)
- Paper towels or a folded cloth for offloading
- A flat palette or paper plate
- Low-tack tape or repositionable spray adhesive
- Optional: a clean, dry cotton swab and a small brush for touch-ups
| Surface | Common paint choice | Notes |
|---|---|---|
| Canvas and panels | Heavy body or soft body acrylic | Prime first; paint should be creamy, not runny |
| Paper and art journals | Acrylic, gouache, stencil ink | Very dry brush to avoid cockling |
| Fabric | Fabric paint or acrylic with fabric medium | Place card behind the fabric; heat-set per instructions |
| Wood | Acrylic or chalk-style paint | Sand lightly and seal raw wood first if needed |
How to Use a Stencil Brush Correctly: Step by Step
1. Prepare the surface
Clean and dry surfaces give the best adhesion. Prime canvas or raw wood, and make sure any background color is fully dry. Wet or tacky paint underneath will lift or stick to the stencil.
2. Secure the stencil
Tape all edges with low-tack tape, or apply a light mist of repositionable adhesive to the back of the stencil. The stencil must lie completely flat, especially around small details and thin bridges. Any gap lets paint creep under.
3. Put a small amount of paint on the palette
Pour a coin-sized puddle. Stenciling uses very little paint, and a large puddle tempts you to overload.
4. Load just the tips
Dip only the flat face of the brush into the paint. Avoid pushing the bristles deep into the puddle, which fills the base of the brush with paint you cannot control.
5. Offload until nearly dry
This is the step most people skip. Swirl or pounce the brush on a folded paper towel until the bristles leave only a faint, dry-looking print. It will feel like there is not enough paint left. That is correct.
6. Hold the brush vertically
Grip the handle like you would hold a pencil, but upright, with the flat face parallel to the surface. A 90-degree angle keeps the bristles from pushing sideways under the template.
7. Pounce or swirl
There are two main techniques:
- Pouncing (stippling): A straight up-and-down tapping motion. Gives a soft, textured, slightly speckled finish and is safest for intricate designs with fine bridges.
- Swirling: Small, tight circles with light pressure. Gives a smoother, more solid finish and is useful for gradients and shading. Keep circles small near edges.
Start at the edges of each opening, moving from the stencil toward the center. Starting at the edge with the brush mostly dry gives the cleanest line.
8. Build in layers
Go back for more paint as needed, offloading every time. Two or three thin passes produce stronger, crisper color than one heavy pass. Let acrylic set for a minute between passes if it starts to feel tacky.
9. Lift the stencil straight up
Lift slowly and vertically, without sliding. If you are repeating a pattern, check the back of the stencil and wipe any paint off before placing it again.
10. Touch up while the stencil is off
Use a small detail brush to fill gaps left by bridges if you want a continuous design, and correct minor smudges with a damp cotton swab before the paint dries.
Shading and Gradients with a Stencil Brush
The dry-brush nature of stenciling makes gradients easy. A few approaches:
- Edge shading: Apply more passes around the edges of a shape and fewer in the center. This gives a rounded, dimensional look, common in floral and leaf stencils.
- Two-color blend: Pounce one color on one side and a second color on the other, overlapping lightly in the middle with a third, clean brush or the first brush nearly dry.
- Ombre backgrounds: Swirl a darker color heavily at one end and gradually reduce pressure across the stencil.
Troubleshooting Common Stenciling Problems
| Problem | Cause | Solution |
|---|---|---|
| Paint bleeding under edges | Too much paint, brush angled, stencil not flat | Offload more, hold brush vertical, secure stencil with adhesive |
| Blotchy, uneven fill | Uneven loading or brush too small | Use a larger brush and build color in multiple light layers |
| Fuzzy edges | Swirling too close to the edge with a wet brush | Pounce at edges; swirl only in the centers |
| Paper cockling or warping | Too much moisture | Use a drier brush, heavier paper or acrylic instead of watery paint |
| Stencil sticking to surface | Base layer not fully dry | Wait longer before stenciling; test with a finger |
| Paint dried on the brush mid-project | Acrylic drying in the bristles | Keep a damp cloth nearby; clean brushes during long sessions |
Stenciling on Canvas for Fine Art and Mixed Media
Stencils are not only for crafts. Many painters use them for repeated motifs, text, backgrounds and layered textures in abstract and mixed media work.
- Background texture: Pounce a light value through a pattern stencil, then glaze over it for subtle texture.
- Layered stencils: Apply one stencil, let it dry, then overlap a second in a different color for depth.
- Negative stenciling: Place a mask instead of an open stencil and pounce color around it to leave a reserved shape.
- Text and lettering: Use a small brush and very little paint to keep letters crisp.
Heavy body acrylic can be pushed through a stencil with a palette knife for raised texture, but that is a different technique from brush stenciling. Use the brush for flat or shaded color and the knife for dimension.
Planning a Multi-Color Stencil
Designs with several colors go faster and cleaner with a little planning. Work from the lightest color to the darkest, because a dark that strays into a light area is much harder to hide than the reverse. Use one brush per color and lay them out in order on a paper towel so you never pick up the wrong one.
For designs where colors sit next to each other in the same opening, such as a leaf that shifts from yellow-green to deep green, mask the area you are not painting with a scrap of paper or low-tack tape. Pounce the first color, let it dry for a few minutes, then move the mask and apply the second. Layered stencils with registration marks make this easier: line up the marks each time so every layer lands exactly where it should.
Common Mistakes to Avoid
- Skipping the offload. The brush should feel almost dry.
- Using brush strokes. Sideways strokes push paint under the template.
- Loading the whole brush. Paint near the ferrule is hard to control and ruins the brush over time.
- Rushing the layers. Patience gives solid color and crisp edges.
- Letting acrylic dry in the bristles. It stiffens and splays the brush.
Cleaning and Storing Stencil Brushes
Clean stencil brushes right after use. Dense bristles hide paint near the ferrule, so work soap into the base, not just the tips.
- Wipe excess paint on a paper towel.
- Rinse in lukewarm water.
- Lather with mild soap or brush cleaner, pressing the bristles against your palm.
- Rinse until the water runs clear.
- Squeeze out water, reshape the flat top and let the brush dry upright or flat. Make sure it is fully dry before the next project, since a damp brush dilutes paint and causes bleed.
Synthetic stencil brushes generally dry faster and handle acrylic cleanup well. If you want to know more about how synthetic fibers behave and hold their shape, the Princeton synthetic brush review discusses synthetic filament performance in more detail.
FAQs
Why is my stencil paint bleeding?
Bleeding is usually caused by too much paint on the brush, a stencil that is not lying flat, or brushing sideways instead of pouncing. Offload more paint, secure the stencil firmly and keep the brush upright.
Should a stencil brush be wet or dry?
Dry. Start with a clean, completely dry brush and load it lightly with paint. Water in the bristles thins the paint and encourages bleeding.
What is the difference between pouncing and swirling?
Pouncing is a vertical tapping motion that gives a textured finish and protects delicate stencil areas. Swirling uses small circles for a smoother, more solid finish and works well for shading.
Can I use a sponge instead of a stencil brush?
Yes. Foam pouncers or makeup sponges work, especially for smooth fills. They are less precise in small areas and can leave a stippled texture, so many artists use both.
What kind of paint is best for stenciling on canvas?
Acrylic paint with a creamy, not runny, consistency is the most common choice. It dries quickly, which lets you layer and lift the stencil sooner.
How do I stencil on fabric without bleeding?
Use fabric paint or acrylic mixed with fabric medium, place a piece of cardboard inside or under the fabric, use a very dry brush and pounce rather than swirl. Follow the paint’s heat-setting instructions.
Final Thoughts
The secret to using a stencil brush correctly is restraint: less paint, more passes and a vertical brush. Once you trust that a nearly dry brush can build strong color, bleed and fuzzy edges largely disappear.
A brush that has lost its flat shape or sheds bristles will undo even perfect technique. When you are ready to upgrade, browse our top picks for brushes across every shape and medium to find reliable options for stenciling and the rest of your painting.