Quick answer: To make your own paint brushes, gather a bundle of fibers (synthetic doll or wig hair, craft fur, or natural materials like grasses and feathers), tie the bundle tightly at the base with thread, and glue it into a ferrule such as brass or aluminum tubing, heat-shrink tubing or a hollow bamboo stem. Insert a wooden dowel or stick as the handle, let the glue cure for 24 hours, then trim and shape the tip. DIY brushes are ideal for texture and experimental marks; for precise detail work, manufactured brushes are hard to match.
Making paint brushes by hand is part craft project, part mark-making experiment. A homemade brush rarely matches a well-made sable round for precision, and that is not really the point. DIY brushes leave marks you cannot get from a store-bought set: the scratchy energy of a pine-needle brush, the ragged softness of a feather, the broad sweep of a fur brush you sized for one specific painting.
This guide walks through materials, four practical construction methods, how to make miniature paint brushes, and when it makes more sense to buy than build.
The Anatomy You Are Recreating
Every brush has three parts, and a DIY brush needs a version of each:
- The head: the fibers that hold and release paint.
- The ferrule: whatever binds the fibers together and connects them to the handle.
- The handle: something comfortable to hold, balanced to the size of the head.
The single most important step is binding the fibers tightly at the base with glue that soaks into the bundle. Weak binding is why most first attempts shed. It helps to examine a manufactured brush before you start; comparing the tapered heads and crimped ferrules in a guide to quality artist paint brushes shows exactly what a well-built head looks like.
Materials for DIY Paint Brushes
Fibers for the Head
| Fiber | Feel | Best for | Notes |
|---|---|---|---|
| Synthetic doll or wig hair | Soft to medium, springy | General acrylic and watercolor brushes | Easy to source, uniform, holds shape fairly well |
| Craft fur or faux fur | Soft and dense | Wide wash and mop brushes | Cut a strip including the backing for easy binding |
| Shed pet hair or your own trimmed hair | Varies | Experimental soft brushes | Wash and dry thoroughly; mixed lengths shed more |
| Pine needles | Stiff, spiky | Grass, fur, rough texture | Fresh needles are flexible; dry ones snap |
| Dried grasses or straw | Stiff to medium | Expressive lines, sumi-e style marks | Unpredictable and lively |
| Feathers | Very soft, splayed | Clouds, foliage, soft texture | Use whole or bundle several |
| Twine or rope fibers | Coarse | Stippling and dry brush | Unravel sisal or jute for a scrubby head |
If you prefer natural animal hair, use shed or ethically sourced hair rather than buying harvested fur. Synthetic fibers work well and avoid the question altogether.
Ferrules and Binding
- Brass or aluminum hobby tubing (found in craft and model shops)
- Heat-shrink tubing (electrical aisle), which grips as it shrinks
- A hollow bamboo stem or section of plastic straw
- Strong thread, waxed linen or dental floss for whipping
- Two-part epoxy or a strong craft glue; wood glue for attaching handles
Handles
- Wooden dowels (1/4 inch suits most small to medium brushes)
- Chopsticks
- Bamboo skewers for miniature brushes
- Sturdy twigs, sanded smooth
Tools
- Sharp scissors and a craft knife
- Fine-toothed comb
- Pliers for crimping metal tubing
- Sandpaper, masking tape and a clothespin to hold work while glue sets
How to Make a Paint Brush: Method 1, Classic Ferrule Brush
This produces the closest thing to a store-bought round or flat.
- Cut the fibers to roughly twice the length you want sticking out of the ferrule. Part of the length goes inside.
- Align the tips. Gather the bundle, tips together, and tap the tip end gently on the table so the ends sit level. For a pointed round, let the natural tips form the point. Do not cut the tip end.
- Tie the base. Wrap thread tightly around the cut end several times and knot it. Pull firmly; this is your first line of defense against shedding.
- Glue the base. Dip the tied end into a small amount of mixed epoxy so it soaks into the bundle about 1/4 inch. Do not let glue wick toward the tip.
- Insert into the ferrule. Slide the glued end into a section of tubing about 3/4 to 1 inch long, leaving the desired length exposed.
- Fit the handle. Add glue to the end of the dowel and push it into the other end of the tubing until it meets the fiber bundle.
- Crimp or shrink. Crimp metal tubing gently with pliers in two spots, or heat heat-shrink tubing with a hair dryer until it grips tightly.
- Let cure 24 hours standing hairs-up so glue does not run into the head.
- Wash and shape. Rinse in lukewarm soapy water, pull out loose fibers, reshape and dry.
For a flat brush, flatten the ferrule end with pliers before inserting the fibers, or spread the bundle into a flat ribbon and bind it between two strips of thin card before gluing.
Method 2: Thread-Bound Brush, No Ferrule Needed
This simpler method suits expressive, calligraphic brushes in the spirit of East Asian ink brushes.
- Choose a hollow bamboo section or a dowel with a groove cut around one end.
- Arrange the fibers around the end of the handle, overlapping it by about an inch.
- Whip strong thread tightly around fibers and handle together, starting near the end and winding toward the head.
- Coat the thread wrap with glue or clear nail polish to lock it.
- Trim the tail ends neatly behind the binding once dry.
Bamboo is ideal here because you can push the bundle into the hollow center, glue it, then wrap the outside for extra grip.
Method 3: Nature Brushes for Texture
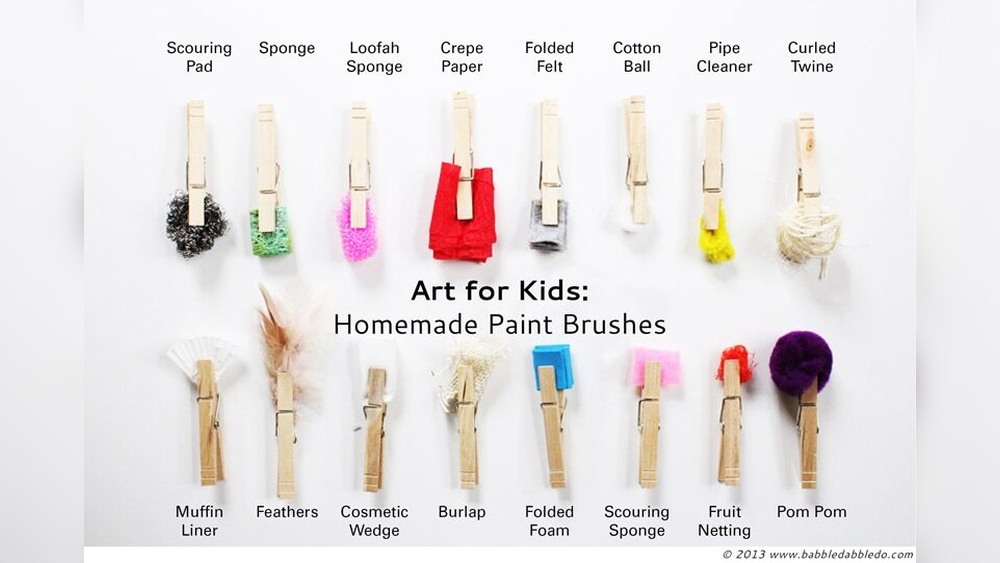
Nature brushes are quick, fun and great for kids and outdoor painting sessions.
- Collect a handful of pine needles, grass stems, small leafy sprigs or a feather.
- Lay them against the end of a stick or clothespin.
- Bind tightly with string, rubber bands or tape.
- Trim to an even length or leave ragged for wilder marks.
Try stamping, dragging and flicking with each. Pine needles make convincing grass. Feathers dragged lightly suggest wispy clouds. Leafy sprigs stamped in layers can build foliage textures.
Method 4: A Wide Flat Brush From Craft Fur
Wide, soft brushes for washes, varnishing and backgrounds are easy to make and can be surprisingly useful.
- Cut a strip of craft fur or faux fur 1 to 3 inches wide, depending on the brush you want. Cut from the back of the fabric with a craft knife so you slice the backing, not the fibers.
- Comb the fibers so they all lie in one direction and trim them to an even length if needed.
- Cut a flat paint stirrer, a strip of thin plywood or a piece of wooden ruler for the handle.
- Coat the end of the handle with glue and fold the fur strip around it, backing side in, so fibers extend past the end.
- Clamp with binder clips over a scrap of card until the glue sets, then bind the joint with thread or tape and seal it with glue.
- Wash, comb out loose fibers and let the brush dry flat.
The result works much like a hake brush: soft, broad and good at laying large areas of thin color. Expect a few loose fibers at first, especially with cheaper fur, and comb the brush out well before each of the first few uses.
How to Make Miniature Paint Brushes
Fine brushes for miniatures or tiny details are the hardest to make, because a few hairs out of place ruin the point.
- Use the finest, most uniform synthetic fibers you can find, such as fine doll hair.
- Gather only 20 to 50 strands, depending on the size you want.
- Align tips carefully, using a drop of water to draw them together.
- Tie with a single strand of fine thread and seal with a tiny dot of thin superglue at the very base.
- Insert into a short piece of fine metal tubing or the cut tip of a ballpoint pen refill tube, cleaned out.
- Glue into a bamboo skewer handle.
- Shape with a damp finger and test on paper.
Expect some trial and error. If precision matters for your work, a manufactured detail brush will likely outperform a homemade one. Our guide to the best paint brushes for detail and everyday painting is a quicker route if you need a reliable point.
Shaping, Trimming and Finishing
- Comb before trimming. Comb fibers straight, wet them, and see the brush’s natural shape before cutting anything.
- Trim stray fibers at their base rather than cutting across the tip, which blunts the brush.
- For a flat edge, lay the wet brush on a cutting mat and slice straight across with a sharp craft knife.
- Sand and seal handles. A coat of varnish or wax keeps water out of raw wood.
- Label your brushes with the fiber used, so you can repeat the ones you like.
Testing Your Homemade Brush
- Wash in lukewarm water with mild soap and tug gently to remove loose fibers.
- Load with thinned acrylic or watercolor and paint lines, dots and broad strokes on scrap paper.
- Check whether the head springs back after pressure.
- Note whether it holds a point or edge when wet.
- Clean and dry flat or hairs-down, the same as any brush.
How to Make Paint Brushes Soft Again (Homemade or Store-Bought)
Synthetic doll hair and craft fur can stiffen after paint dries in them. To soften:
- Soak only the head in warm soapy water for 10 to 15 minutes and work out any paint.
- For dried acrylic, soak the head in rubbing alcohol, then wash.
- Work in a little hair conditioner, leave a few minutes, rinse lightly and reshape.
Do Paint Brushes Make a Difference?
Yes, quite a lot. Manufactured artist brushes are built with carefully graded fiber lengths so the head tapers evenly, hairs sit deep in a glue plug, and the ferrule is crimped tight. Those details let a good round snap back to a point and release paint smoothly stroke after stroke. DIY brushes generally cannot match that consistency.
Where homemade brushes shine is in variety and character. They let you test unusual fibers, build brushes in sizes you cannot easily buy, and introduce happy accidents into your work. Many painters use both: manufactured brushes for control, homemade ones for texture.
| Factor | DIY brush | Manufactured artist brush |
|---|---|---|
| Precision and point | Low to moderate | High in quality brushes |
| Consistency between brushes | Low | High |
| Unique marks and texture | High | Moderate |
| Durability | Varies with glue and binding | Generally good |
| Cost | Very low with scrap materials | Varies widely |
How to Make Your Own Art Supplies Beyond Brushes
Brush-making often leads to other DIY supplies. Painters commonly make their own palettes from glass or plastic trays, stay-wet palettes from a container with damp paper towel and baking paper, simple brush holders from jars and binder clips, and even homemade easels from wood scraps. These save money and teach a lot about how materials behave, though commercial products tend to offer more consistency where that matters.
Safety Tips
- Work with epoxy and superglue in a ventilated space and keep them off skin.
- Cut tubing with a tube cutter or fine saw, and file sharp edges smooth.
- Avoid cutting soda cans for ferrules with children; the edges are very sharp.
- Wash collected natural materials and let them dry fully to avoid mold.
FAQs
What can I use to make a homemade paint brush?
Synthetic doll or wig hair, craft fur, feathers, pine needles, grasses or unraveled twine for the head, a dowel or chopstick for the handle, and tubing or thread with glue to bind them.
How do you keep a DIY brush from shedding?
Tie the fiber bundle tightly with thread and soak the base in epoxy before inserting it into the ferrule. Wash the finished brush and tug out loose fibers before use.
How to make paint brushes for kids?
Nature brushes are easiest: bind pine needles, leaves or feathers to a stick or clothespin with rubber bands or tape. No glue or sharp tools needed.
Can you make a fine detail brush at home?
You can, using a small bundle of fine synthetic fibers in thin tubing, but getting a reliable point takes practice. Manufactured detail brushes are usually more consistent.
What glue is best for making paint brushes?
Two-part epoxy is a common choice because it is strong and water-resistant once cured. Thin superglue works for tiny brushes. Wood glue suits attaching the ferrule to the handle.
Do homemade brushes work with oil paint?
They can, but solvents may weaken some glues and synthetic fibers. Use epoxy, test with your solvent, and clean promptly.
Final Thoughts
Making your own paint brushes is an inexpensive way to expand your mark-making and understand how brushes actually work. Start with a nature brush for instant results, then try a ferrule brush with synthetic hair. Keep store-bought brushes for the jobs that need control. When you are ready to add or upgrade those, our guide to top paint brushes for acrylic, watercolor and oil compares the options, and our Princeton paint brush set review looks at one widely available all-round set.