The best first paintings are not the most ambitious ones. They are the ones that teach a single skill and still look good on the wall. This list of simple easy paintings is organized by what each one teaches, so you can build real ability while finishing something you are happy to keep.
Quick answer: Simple easy paintings for beginners include a sunset silhouette, a moon over water, abstract color blocks, a single flower, a mountain range in layers, a cactus in a pot, a starry night sky and a lemon or other fruit study. These subjects rely on big shapes, a few colors and forgiving edges. Most can be finished in one to two hours with acrylic paint on a small canvas, using three brushes and five or six colors.
What Makes a Painting “Simple and Easy”?
A painting feels easy when it avoids the hardest parts of representation: precise drawing, complex perspective and small details. The subjects that work best share a few traits.
- Big, flat shapes that can be painted with a large brush.
- Silhouettes that remove the need for detailed form.
- Gradients that look impressive but only require blending two or three colors.
- Organic subjects like trees, clouds and flowers, where imperfections look natural.
- Few colors, which keeps the result harmonious.
If cost is a concern, these subjects also use very little paint. Our list of affordable easy acrylic painting ideas for beginners collects more budget-friendly projects with simple supplies.
What You Need to Start
- Surface: An 8 x 10 or 9 x 12 inch canvas panel or stretched canvas. Small surfaces are quicker to cover and less intimidating.
- Paint: Acrylic in titanium white, black (or a dark blue), a primary red, primary yellow and primary blue. Add one or two extras such as a magenta or a burnt sienna.
- Brushes: A 1-inch flat for backgrounds, a medium filbert or round, and a small round or liner for details.
- Palette: A plastic palette, paper plate or tear-off palette paper.
- Extras: Water jar, paper towels, painter’s tape, pencil.
12 Simple Easy Paintings for Beginners
1. Sunset silhouette
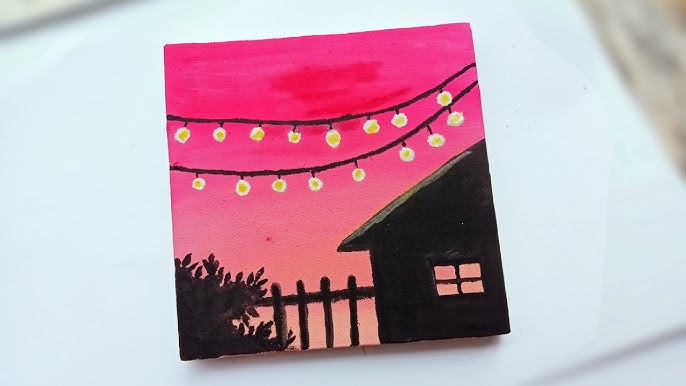
Teaches: blending a gradient. Paint horizontal bands of yellow, orange, pink and purple from bottom to top, blending each edge while wet. Once dry, paint a black silhouette of palm trees, hills or a lone tree along the bottom. Silhouettes need no shading, so they always look clean.
2. Full moon over water
Teaches: value contrast. Paint a dark blue-to-black sky, a large white circle for the moon, and horizontal white streaks on the water below it that get shorter and thinner further from the moon. The strong light-dark contrast does all the work.
3. Layered mountains
Teaches: atmospheric perspective. Mix one blue with increasing amounts of white. Paint the palest mountain range at the back, then each closer range a little darker. The value shift alone creates depth.
4. Abstract color blocks
Teaches: color relationships. Divide the canvas with painter’s tape into rectangles and fill each with a different color from a limited palette. Peel the tape for crisp white lines. Choosing colors that share a theme, such as warm earth tones or soft pastels, makes it look designed.
5. Single sunflower or daisy
Teaches: brush-shaped marks. Use a filbert brush to press petal shapes outward from a center circle. Each press of the brush becomes a petal, so no drawing is needed.
6. Starry night sky
Teaches: splatter and wet blending. Blend navy, purple and touches of magenta, then flick white paint from a toothbrush or stiff brush for stars. Add a few larger stars with a small round brush and a pine tree silhouette at the bottom.
7. Cactus in a terracotta pot
Teaches: basic form. Paint a terracotta pot shape, then a green oval cactus with a lighter stripe on one side for highlight. Add tiny white lines for spines.
8. Ocean wave
Teaches: dry brushing. Paint blue water and a curved wave shape, then dry-brush white along the crest so it breaks up into foam.
9. Lemon or orange study
Teaches: light and shadow on a simple form. Paint one fruit on a plain background with a cast shadow below it. Adding a darker tone on the shadow side and a small highlight makes it look round.
10. Birch trees
Teaches: tape resist and scraping. Place strips of tape vertically for trunks, paint the background, peel the tape and add black marks with the edge of a card for the bark.
11. Hot air balloon
Teaches: clean shapes. A soft blue sky with white clouds and a single colorful striped balloon. Painting each stripe a different color adds visual interest without complexity.
12. Heart or geometric pattern
Teaches: repetition. Fill the canvas with repeating hearts, circles or triangles in rotating colors. Great for practicing brush control.
Comparing the Projects
| Painting | Time | Colors | Main skill | Difficulty |
|---|---|---|---|---|
| Sunset silhouette | 45–60 min | 5 | Blending | Very easy |
| Moon over water | 45 min | 3 | Contrast | Very easy |
| Layered mountains | 60 min | 2–3 | Value steps | Easy |
| Abstract color blocks | 60–90 min | 4–6 | Color choice | Very easy |
| Single flower | 45 min | 4 | Brush marks | Easy |
| Starry sky | 60 min | 4 | Splatter, blending | Easy |
| Cactus | 45 min | 4 | Simple form | Easy |
| Ocean wave | 60–90 min | 3 | Dry brushing | Moderate |
| Fruit study | 60 min | 4 | Light and shadow | Moderate |
| Birch trees | 60 min | 3–4 | Tape resist | Easy |
Step-by-Step: Simple Easy Painting for Beginners (Layered Mountains)
- Sky. Paint the top half of the canvas with a very pale blue or a soft peach-to-blue gradient. Let it dry for 10–15 minutes.
- Mix four values. On the palette, prepare four piles of the same blue: one with lots of white, one with some white, one with a little white, and one pure or darkened with a touch of black or burnt sienna.
- Back range. Using the palest mix, paint a jagged mountain line about a third of the way down and fill below it.
- Middle ranges. Paint the next range slightly lower and darker, overlapping the first. Repeat with the third value.
- Foreground. Use the darkest mix for the closest hills, or paint a row of pine tree silhouettes.
- Accents. Optional: add a pale sun or moon in the sky, or a few birds as small “v” shapes.
The whole painting relies on value steps, and that same principle will improve every landscape you ever paint.
Tips That Make Easy Paintings Look Better
Paint backgrounds first
Working back to front, sky first, then distant elements, then foreground, means you never have to paint carefully around objects.
Let layers dry
Acrylic dries fast, but painting over a layer that is still tacky lifts and smears it. A short wait of 10–15 minutes, or a hair dryer on low, keeps edges crisp.
Use painter’s tape for borders
Taping the edges of a canvas panel before painting creates a clean white border that makes even simple work look finished.
Add one highlight and one dark accent
A tiny highlight on the focal point and a small dark accent near it bring a painting to life with almost no effort.
Keep brushes wet while working
Rest brushes in water between uses during a session and wash thoroughly with soap afterward. Acrylic dried in bristles is very hard to remove.
How to Fix Mistakes on an Easy Painting
Acrylic is forgiving, and that is one of its biggest advantages for new painters.
- Wrong color: Let the area dry and paint over it. Light colors over dark may need two or three coats, or a coat of white first.
- Wobbly silhouette: Once dry, repaint the background color along the edge to reshape it.
- Muddy blend: Let it dry, then repaint the two colors and blend only where they meet, with fewer strokes.
- Too much detail: Glaze a thin, semi-transparent layer of the surrounding color over busy areas to quiet them.
- Splatter in the wrong place: Wipe it immediately with a damp cotton swab, or paint over it after it dries.
Common Beginner Mistakes
- Using small brushes for everything: Leads to streaky backgrounds and tired hands. Use the largest brush that fits the area.
- Overblending: Blending too long turns gradients muddy and lifts underlying paint. Blend just the edges, then stop.
- Too much water: Watery acrylic looks thin and patchy. Add water sparingly.
- Too many colors: Five or six well-chosen colors look better than a dozen random ones.
- Comparing to finished artists: Compare your painting to your last one instead.
Where to Find Reference Images
Simple paintings still benefit from a reference. Your own phone photos of sunsets, plants or fruit on the kitchen table are ideal because there are no copyright concerns. Public-domain image libraries are another option. When choosing a reference, look for strong light and shadow and a single clear subject; squint at it, and if you can still read the main shapes, it will make a good simple painting.
Simple Easy Paintings for Kids and Groups
Sunset silhouettes, starry skies, sunflowers and abstract color blocks work well for kids and paint-night groups because everyone ends up with a successful result even with very different skill levels. For young children, washable tempera can be used instead of acrylic and heavy paper instead of canvas.
A Four-Week Practice Plan Using These Paintings
Working through the list in a deliberate order helps each painting build on the last.
| Week | Paintings | Skill focus |
|---|---|---|
| 1 | Sunset silhouette, abstract color blocks | Blending and color choice |
| 2 | Moon over water, layered mountains | Value contrast and value steps |
| 3 | Single flower, cactus, birch trees | Brush-shaped marks and simple form |
| 4 | Ocean wave, fruit study, starry sky | Texture, light and shadow, splatter |
At the end of the month, repaint your first painting. Comparing the two versions side by side is one of the most motivating things a beginner can do.
Choosing Colors for Simple Paintings
A small set of colors is easier to control and produces more harmonious paintings. Three approaches work especially well for beginners.
- Analogous colors: Neighbors on the color wheel, such as yellow, orange and red for a sunset, or blue, teal and green for the sea. They blend smoothly and rarely clash.
- Complementary accent: A painting that is mostly blue with a small orange focal point, such as a boat or the sun, gets instant impact.
- Monochrome: One color plus white and black. This is the fastest way to learn value, and the results often look surprisingly elegant.
When mixing, add dark colors into light ones a little at a time. A tiny amount of blue changes white quickly, while it takes a lot of white to lighten blue.
How to Display and Protect Your Paintings
Once acrylic is fully dry, usually after a day or two for thin layers, a coat of acrylic varnish evens out the sheen and protects against dust. Small canvas panels look polished in simple frames, and stretched canvases with painted edges can hang without one. Grouping three small paintings with a shared color scheme makes an attractive wall arrangement.
FAQs
What is the easiest thing to paint for a beginner?
A sunset with a black silhouette, a moon over water or abstract color blocks. They need little drawing and rely on big shapes and simple blending.
What should I paint first as a beginner?
Start with a subject that teaches one skill, such as a gradient sky or layered mountains, on a small canvas.
Is acrylic paint good for simple paintings?
Yes. It dries quickly, cleans up with water and lets you paint over mistakes easily, which makes it ideal for beginners.
How long does a simple painting take?
Most of the projects above take 45 minutes to an hour and a half, including short drying breaks.
What size canvas is best for easy paintings?
An 8 x 10 or 9 x 12 inch surface is large enough for big brushstrokes but small enough to finish in one session.
How can I make a simple painting look more professional?
Use a limited palette, add one strong highlight and a dark accent, keep edges clean with tape and finish with a coat of varnish.
Next Step
Choose one project from the list, gather five colors and three brushes, and finish it in a single sitting. Then try the next subject that teaches a different skill. When you are ready for more ideas that will not strain your budget, browse our collection of low-cost acrylic projects made for new painters.