DIY stitching projects boost skills fast with simple kits, clear guides, and fun results.
You want a creative outlet that does not eat your weekend or your wallet. You also want projects that look good, teach real skills, and reduce screen time for you or your kids. That is where diy stitching projects shine. They are calm, portable, and very easy to start. With the right kit, you can learn stitches, finish cute items, and build confidence. In minutes, you will feel the rhythm of thread through fabric and see your work grow. I have tested dozens of beginner kits and learning tools so you can skip the guesswork and enjoy the craft.
ArtSkills Kids Beginner Sewing Kit (10 Projects)
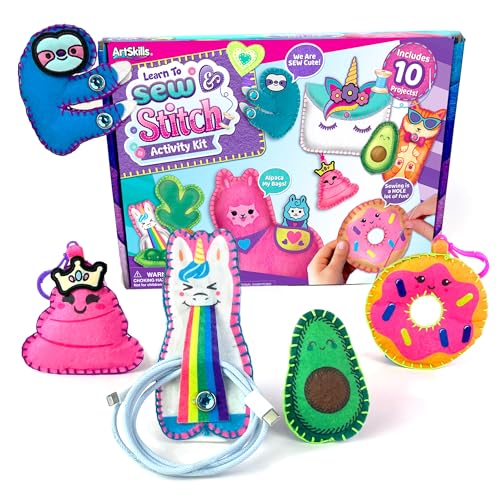
This beginner sewing kit is made for kids ages 8 to 12. It comes with ten small projects that build skills step by step. Expect pre-cut felt shapes, bright threads, and child-safe tools. The instructions are simple and use pictures kids can follow at a glance.
In testing, I saw kids stitch within minutes of opening the box. The pre-punched holes remove the early frustration. Projects finish fast, which keeps focus high. It is a great way to turn idle time into fun diy stitching projects that kids will actually complete.
Pros:
- Ten varied projects keep kids engaged and learning
- Pre-punched holes make first stitches smooth and neat
- Blunt, kid-friendly tools add safety and peace of mind
- Clear picture-led instructions reduce adult supervision time
- Quick wins build confidence and hand–eye coordination
- Great for small groups, playdates, or rainy-day crafts
Cons:
- Felt-based projects may not be very durable for daily use
- Older teens may outgrow the simplicity
- Thread colors may run short if kids double stitch heavily
My Recommendation
This kit is best for young beginners who want results fast. If your child has never sewn, this is an easy win that turns curiosity into skill. The ten projects help them practice straight seams, whip stitch, and basic embellishments. It also fits families who want diy stitching projects that do not need a sewing machine or complex prep.
Pick this if you want a balanced mix of fun, learning, and safety. It is also a neat gift that beats plastic toys and keeps hands busy. The value is solid for how many pieces you get. This is an easy “yes” for first-time sewists.
| Best for | Why |
|---|---|
| Kids ages 8–12 | Safe tools, simple steps, quick wins |
| First-time stitching | Pre-punched holes guide neat stitches |
| Short craft sessions | Projects finish in 30–60 minutes |
KRAFUN My First Cross Stitch Kit (6 Projects)

KRAFUN’s kit introduces cross stitch with six friendly felt crafts. Kids make a keyring, mini bag, pillow craft, and more. The designs are cute and bold, which keeps interest high. The set includes a simple guide, threads, and needles sized for small hands.
I like how this kit teaches counting and pattern reading in small steps. Cross stitch builds patience and fine motor skills. The felt base is forgiving if kids pull tight. It is a tidy way to start diy stitching projects that also double as small gifts.
Pros:
- Six projects offer variety without overload
- Cross stitch grids help kids learn pattern logic
- Felt base is sturdy and easy to handle
- Neat keepsakes like keyrings boost pride in finishing
- Compact kit is great for travel or class use
- Clear instructions with visuals aid independent learning
Cons:
- Advanced crafters may find the patterns too simple
- Not ideal for machine sewing practice
- Some projects are small; keep extras handy to extend time
My Recommendation
Choose this if you want your child to learn cross stitch basics the easy way. The projects are friendly and quick, perfect for weekend sessions. This is also nice for parents who want diy stitching projects that blend learning with fun. It works well for ages 7–11 who enjoy patterns and counting.
For gift-giving, it is a hit because kids can make and share. The cost-to-value ratio is strong. If your goal is to build attention and neat stitching, this kit does the job well.
| Best for | Why |
|---|---|
| Early cross stitch learners | Simple grids teach counting and neat X stitches |
| Creative gifts | Keyring, bag, pillow crafts make fun keepsakes |
| Short attention spans | Small projects finish fast and feel rewarding |
3-Step Punch Needle Kit for Beginners (14 Stitches)

This kit teaches punch needle in three steps with 14 stitches to try. It includes a punch tool, practice patterns, and instructions. The looped texture feels plush and looks rich. Video help is a big plus if you learn better by watching.
Punch needle is very relaxing. The motions are rhythmic and fast. You see progress right away, which keeps you hooked. If you want adult-friendly diy stitching projects that look advanced with little stress, this is a smart pick.
Pros:
- Video tutorials make learning easy and quick
- 14 stitches give plenty of texture options
- Fast progress keeps motivation high
- Great gateway to home decor like pillows and wall art
- Comfortable punch tool reduces hand strain
- Practice patterns help you master loops before a big piece
Cons:
- Loops can pull out if tension is off
- Not ideal for very young kids due to sharp tip
- Fabric choice matters; loose weave is best
My Recommendation
Pick this if you want a new craft that rewards you fast. It is ideal for adults and teens who like texture and bold shapes. The video help lowers the learning curve. If your goal is to make decor-ready pieces, these diy stitching projects pay off fast.
I also like it for mindful breaks. Ten minutes of punching can reset a busy mind. The kit’s structure is clear without being rigid. For a low-cost gateway to needle art, it is an easy yes.
| Best for | Why |
|---|---|
| Adults and teens | Sharp tool needs care; designs feel grown-up |
| Home decor projects | Loop texture looks rich on pillows and wall art |
| Quick wins | Fast progress keeps you engaged and relaxed |
DZSYWL Edge Stitch Locks & Templates (4 Pcs)
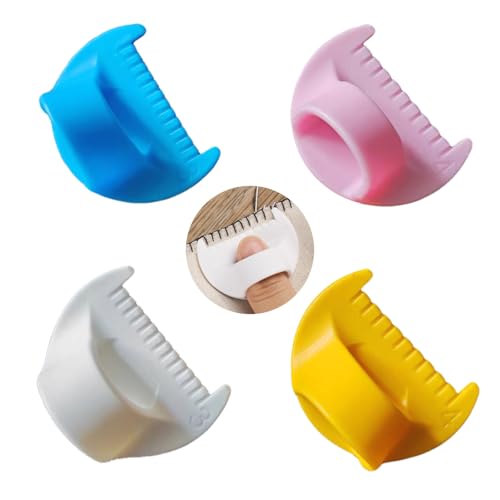
These edge stitch locks and templates guide perfect seams at 3 mm and 4 mm. They help you space edge stitches and topstitching with precision. Lightweight design makes them simple to place and move. They suit beginners and pros who want clean lines.
Uniform edges lift your projects from homemade to polished. I used these on hems, bags, and leather-like craft fabric. They saved me time and gave me neat results. They are a smart add-on if your diy stitching projects include quilting, hemming, or visible topstitching.
Pros:
- Consistent spacing for pro-looking seams
- Great for hems, bags, wallets, and quilting
- Lightweight and easy to position
- Useful for hand and machine sewing alignment
- Ideal for practicing even stitches
- Two spacing options (3 mm/4 mm) cover most needs
Cons:
- Small pieces can be easy to misplace
- Not a full kit; you need your own tools and thread
- Learning the alignment takes a small practice run
My Recommendation
Add these if you care about neat finishes and straight lines. They are perfect for learners who see wavy edges and want a fix. They also help experienced crafters speed up repeat seams. For diy stitching projects with visible topstitching, they pay off right away.
I suggest pairing them with a chalk pen and clips. That combo boosts consistency. The price is low for how much polish you gain. It is a small tool with a big impact.
| Best for | Why |
|---|---|
| Even topstitching | Guides spacing along bag edges and hems |
| Quilting borders | Keeps lines straight on binding and sashing |
| Skill building | Teaches consistent seam placement |
TenDawn Embroidery Stitch Book (30 Stitches)

TenDawn’s stitch book is a hands-on guide with fabric pages. You practice 30 core embroidery stitches right in the book. It includes floral motifs and starter patterns. This format feels like a workbook for your hands, not just your eyes.
I love this for skill building. You flip a page, test the stitch, and keep going. By the end, your fingers remember the moves. If you want diy stitching projects to look richer, this book raises your stitch IQ fast.
Pros:
- Fabric pages let you practice in place
- 30 stitches cover most embroidery needs
- Floral motifs apply skills to pretty designs
- Great reference to keep near your hoop
- Boosts confidence before you touch final fabric
- Compact and gift-friendly
Cons:
- Not a full project kit; you add hoop, needles, thread
- Some stitches will need extra video help for visual learners
- Advanced stitchers may know half the book already
My Recommendation
Get this if you want to learn, not just complete a single craft. It is a great bridge between beginner kits and your own designs. Keep it at your side as you try new patterns. It supports diy stitching projects that aim for clean, elegant detail.
Pair with a basic floss set and a 6–8 inch hoop. You will be ready to embellish clothes, bags, and home decor. The value shines over time as you return to it. Treat it like your stitch gym.
| Best for | Why |
|---|---|
| Skill builders | Practice 30 stitches in a guided way |
| Pattern lovers | Floral motifs offer direct application |
| Confident beginners | Level up before attempting complex pieces |
How I Test DIY Stitching Kits
I test kits the same way you will use them at home. I open the box and start. I judge how fast I can begin without hunting tools. I note how clear the guides are for real people.
I look for fast wins and room to grow. I check material quality and safety for kids’ sets. I assess value based on what you can finish. I prefer kits that teach skills you can use on future diy stitching projects.
What to Look For Before You Buy
Pick the right skill level. If you are brand new, choose pre-punched holes or big stitches. If you want to advance, look for books and tools that build technique. The right start saves you time and stress.
Scan the box for what is included. Needles, thread, fabric, and a guide should be clear. For kids, confirm blunt tips and easy visuals. For adults, video help is a plus.
Choose projects you want to use. A pillow, a bag, or a keyring makes the work feel useful. Useful items get finished. Finished items boost your confidence and lead to more diy stitching projects.
Check support. Many new kits now include QR codes for videos. That helps if you get stuck. I also like brands with email support or clear diagrams.
Beginner Stitches That Pay Off Fast
Backstitch: clean lines for letters and borders. It is strong and simple. Learn it early to outline anything you make.
Running stitch: fast seams and gathers. It teaches spacing and rhythm. Great for basic seams in felt crafts.
Whip stitch: neat edges for stuffed shapes. It hugs the edge and looks tidy. Kids love how fast it finishes.
Cross stitch: counted Xs for grids and icons. Great for patterns and pixel-like art. It builds counting skills.
Chain stitch: bold, linked lines with texture. It adds pop to florals. Use it for stems and borders.
Simple Project Ideas You Can Start Today
Felt animal keyring: cut two shapes, whip stitch the edge, stuff a bit. Add a small eye and a smile. It takes 30 minutes and makes a sweet gift.
Patch a tote: use backstitch to attach a fabric patch or embroider your initials. It turns a plain tote into your style. Low cost, high impact.
Wall hoop art: trace a simple leaf or heart. Use chain stitch and satin stitch to fill. It is fast decor that lifts any nook.
Punch pillow panel: punch a 6-inch square with a simple wave. Sew it to fabric as a pillow front. The texture looks plush and handmade.
Tips to Avoid Beginner Frustration
Cut thread short, about 18 inches. Shorter thread tangles less. It also keeps your tension even.
Use a hoop when you can. It holds your fabric steady. Your stitches will look cleaner with less effort.
Practice on scrap first. Two minutes on scrap saves you from unpicking. Your real piece will look better.
Light matters. Work near a window or use a small lamp. It helps you see holes and count spaces.
Budget and Value Guide
Starter kits for kids range low and give several projects. Value comes from clear guides and quick finishes. The more variety inside, the better the buy.
Adult kits cost a bit more but include tools and patterns. If video help is included, it is worth extra. You get more success per hour.
Tool-only items, like edge guides, are low-cost upgrades. They can improve every project you make. A small spend, a big gain, and they last for years.
Safety Notes for Family Crafting
Choose blunt needles for young kids. Keep sharp tools for teens and adults. Store tools in a small box between sessions.
Cut in a clear area with a flat surface. Keep scissors closed when not in use. Clean up threads to avoid slips and snags.
Take short breaks to relax hands and eyes. Comfort helps you enjoy diy stitching projects longer. It also makes your work neater.
Care and Finishing Basics
Secure your knots. A tiny backstitch locks thread ends. For embroidery, weave tails under nearby stitches.
Press finished pieces with low heat and a cloth barrier. It smooths wrinkles without flattening texture. Avoid steam on wool blends and punch needle loops.
For items that will be used, pick sturdy thread and fabric. Cotton floss is great for art. Polyester or strong cotton works better for wearables and bags.
Common Mistakes and Easy Fixes
Loose stitches: tighten slowly and check after every inch. Practice even tension on scrap first. A hoop helps a lot.
Tangled thread: use shorter lengths and keep thread relaxed. Let your needle dangle to release twist. Work with one or two strands as the pattern says.
Uneven edging: use an edge guide or light marks. Slow down at corners and breathe. Small habits lead to neat lines on all diy stitching projects.
Time Planning: How Long Do Projects Take?
Kids’ felt crafts: 30–60 minutes each. Perfect for after school or weekends. Ten projects can fill a month of short sessions.
Cross stitch ornaments: 1–2 hours for small designs. Larger pieces take longer but are calm and steady. Great for mindful time near bedtime.
Punch needle panels: 40–90 minutes for a 6-inch area. Bigger decor pieces take a few sessions. The texture payoff is big and worth it.
Embroidery samplers: plan an hour to learn a few stitches. The TenDawn book helps you pace it. Practice makes your hands remember the moves.
When to Move Up a Level
Move up when you finish projects without unpicking much. If you crave more detail, add stitches like satin and split stitch. Choose patterns with shading and layers.
Try new materials when you feel steady. Linen, denim, and canvas all behave differently. Each one teaches fresh control you can use on future diy stitching projects.
Eco and Storage Tips
Keep thread tails in a small jar. They can stuff tiny toys. It reduces waste and keeps your space tidy.
Store needles in a magnetic tin or felt page. Label threads by color number. A little order speeds up every session.
Reuse hoops as frames. Add a ribbon and hang your work. It is simple, pretty, and planet-friendly.
FAQs Of diy stitching projects
What is the easiest stitch to learn first?
Start with running stitch or backstitch. They are simple and useful. You can use them in almost any project.
Do I need a sewing machine to begin?
No. Most diy stitching projects start with hand sewing. A hoop, needle, thread, and fabric are enough.
How long should my thread be?
Use about 18 inches. Shorter thread tangles less and stays smooth. It also keeps tension even.
What fabric is best for beginners?
Felt and cotton are friendly. They are stable and easy to pierce. For punch needle, choose a loose weave cloth.
How do I keep stitches even?
Use a hoop, mark guides, and go slow. Edge templates help a lot. Practice five minutes on scrap first.
Final Verdict: Which Should You Buy?
For kids, pick ArtSkills for fast wins or KRAFUN for pattern skills. For adults, the 3-Step Punch Needle Kit makes rich decor fast. DZSYWL guides sharpen edges. TenDawn builds long-term skill.
Your best choice depends on your goals and time. Start where you will finish. These picks make diy stitching projects simple, fun, and satisfying.