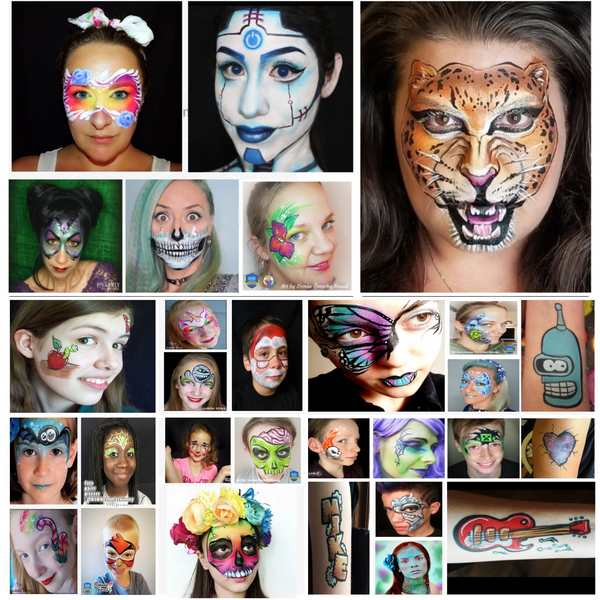
Quick answer: Popular face painting ideas include animals (tiger, leopard, unicorn, dragon), fantasy looks (fairy, mermaid, galaxy), superhero masks, Halloween designs (skull, witch, spider), sports team stripes, and arm or cheek art for adults. Most designs are built in three stages: a sponged base, black linework with teardrops and swirls, and white highlights or cosmetic glitter. Choose designs by time available, age, and event theme, and always use cosmetic-grade face paint.
Great face painting is less about artistic genius and more about structure. Professional face painters tend to build designs from the same layers in the same order: a soft sponged base, a split-cake or one-stroke flourish, crisp black linework, then highlights. Once you see designs that way, even elaborate looks become a sequence of manageable steps, and you can invent your own variations.
This guide collects face painting ideas by theme, explains the three-layer structure behind them, gives detailed steps for four signature designs, and covers planning, tools, and hygiene for events. If you are organizing a children’s party or school event, our guide to face painting for kids at parties focuses on setup and crowd management.
The Anatomy of a Face Painting Design
Nearly every design follows this layered order. Learning it makes copying, adapting, and inventing designs much easier.
| Layer | Purpose | Tools | Time |
|---|---|---|---|
| 1. Base | Large shapes of color, soft edges | Damp sponge, split cake or single colors | 1–2 min |
| 2. Shapes and strokes | Petals, feathers, stripes, scales | Round brush, flat or filbert brush, one-stroke cakes | 1–3 min |
| 3. Linework | Definition, swirls, teardrops, outlines | Fine round brush (size 1–2) with black or dark paint | 1–3 min |
| 4. Highlights and accents | Sparkle, dimension, polish | White paint, cosmetic glitter, face gems | Under 1 min |
A split cake is a single cake with several colors arranged in stripes. Loading a sponge or flat brush across it lays down a rainbow or gradient in one stroke, which saves time on busy event days.
Animal Face Painting Ideas
Animals are consistently among the most requested designs, especially with younger children.
- Tiger: Orange base, white muzzle and brows, black tapering stripes from the outer face inward.
- Leopard or cheetah: Yellow-gold base with brown and black open rosettes or solid spots, white muzzle, and a dark nose.
- Dog or puppy: White muzzle, a brown patch over one eye, floppy ear shapes along the sides of the face.
- Bunny: White cheeks and muzzle, pink nose, whiskers, two teeth on the chin below the lip.
- Butterfly: Sponged wings around the eyes, body down the nose, detailed with swirls and dots.
- Owl: Feather shapes around the eyes in browns, a small beak on the nose, white highlights.
- Panda: White face base with black eye patches tilted downward, black nose, small ears near the hairline.
- Snake (arm or cheek): A curving green body with scale texture made by stamping netting over the paint.
Fantasy and Magical Ideas
- Unicorn: A spiral horn on the forehead in gold or white, a rainbow mane flowing down one side, flowers and stars.
- Fairy: Delicate swirls around the eyes, small flowers at the temples, plenty of glitter.
- Mermaid: Teal and purple scales on the cheeks (sponge through fishnet or paint small “U” shapes), shells and pearls at the temples.
- Dragon: Scales along one side of the face, a horned brow, flames curling from the cheek.
- Galaxy: Sponged navy, purple, and pink across the eye area with white stars and a planet.
- Princess or queen: A crown on the forehead with jewels, swirls extending down the temples.
- Snow queen: Pale blue and white sponged around the eyes with snowflakes and icicle shapes.
Superhero and Character-Inspired Ideas
Generic hero designs let kids feel heroic without copying any specific copyrighted character design too closely.
- Classic mask: A solid mask shape around both eyes in any color with a bold black outline.
- Spider-web mask: Red base with thin radiating web lines from the nose outward.
- Lightning hero: A yellow bolt across one eye with blue or red accents.
- Space explorer: Planets, rockets, and stars on one cheek and temple.
- Robot: Silver base with geometric panels, bolts, and small circuit lines.
Halloween Face Painting Ideas
- Sugar skull: White base, colorful flowers around the eyes, decorative patterns on the chin and forehead.
- Simple skull: White face, black eye sockets and nose, teeth drawn over the lips area.
- Witch: Green base, a small hat on the forehead, spider web corner, dark lips line.
- Pumpkin: Orange cheeks with carved jack-o’-lantern features.
- Bat mask: Black bat wings spanning both eyes with purple sponged background.
- Spider cheek: A black spider dangling from a thin web line at the temple.
Sports, Events, and Adult Ideas
Older kids and adults usually prefer smaller, more subtle designs.
- Team stripes: Two or three bold stripes under each eye in team colors.
- Flag swoosh: A curved flag design on the cheek.
- Festival dots: Graphic dot patterns along the cheekbones and brows, often with metallic or neon colors.
- Floral vine: A slim vine with small flowers tracing from the temple down the cheek.
- Arm art: Bracelets, small dragons, or flowers on the forearm, which suits those who prefer not to have their face painted.
Step-by-Step: Four Signature Designs
Rainbow Unicorn
- Load a sponge with a pastel split cake and dab an arc from the brow on one side, over the forehead, and down the temple to form the mane.
- Paint a spiral horn in white or gold in the center of the forehead, narrowing to a point.
- Add flowing hair strands over the mane with curved teardrop strokes.
- Paint two or three small flowers at the base of the horn.
- Outline the horn with thin black or dark lines and add swirls along the mane.
- Finish with white dots, stars, and cosmetic glitter.
Fierce Tiger
- Sponge orange over the face, leaving the eye area, around the nose, and the mouth area lighter.
- Sponge white on the eyebrows, around the mouth, and on the chin.
- Paint a black nose tip and a line down to the upper lip.
- Add black stripes using teardrop strokes from the hairline, sides, and jaw toward the center.
- Add whisker dots and a few thin whiskers on the white muzzle.
Galaxy Mask
- Sponge navy blue across both eyes in a mask shape.
- Dab purple and pink in patches over the navy, blending the edges.
- Add a small planet on one temple with a ring.
- Flick or dot white stars in different sizes.
- Add a few four-point star sparkles with thin crossing lines.
Sugar Skull
- Sponge white over the face, leaving the eye areas.
- Paint colorful petals around each eye socket, using blue, pink, or orange.
- Paint the nose tip black in an upside-down heart shape.
- Draw a line across the lips with small vertical stitches.
- Add decorative swirls, dots, and a small flower on the forehead and chin.
Planning a Design Menu for Events
A well-planned menu keeps lines moving and children happy. Consider these factors:
| Factor | Recommendation |
|---|---|
| Number of guests | Large crowds: mostly cheek art and 2–3 minute designs |
| Age range | Toddlers: small cheek designs; older kids: full faces; teens and adults: subtle or arm art |
| Event theme | Match designs to the party, such as under the sea, superheroes, or a holiday |
| Menu size | 6–10 designs is usually enough to offer choice without slowing decisions |
| Time per face | Plan an average time and display it so families know what to expect |
For the fastest, simplest options to fill out your menu, see our collection of easy face paint ideas.
How to Adapt Any Design
Once you know the layered structure, you can turn one base design into many. This is how experienced painters build large menus without learning dozens of separate techniques.
- Change the colors: A butterfly in pink and purple becomes a fall butterfly in orange and gold, or a superhero butterfly in red and blue.
- Change the placement: A full-face tiger can shrink to a tiger-stripe eye design or a small tiger on the cheek.
- Swap the accents: Replace flowers on a crown with stars, snowflakes, or hearts to fit an event theme.
- Combine elements: Mermaid scales plus a galaxy base create a cosmic mermaid; a unicorn horn on a galaxy mask becomes a space unicorn.
- Simplify for speed: Remove one layer, such as detailed linework, when the line is long.
Practicing Before an Event
Face painting skills improve fastest with deliberate practice on a forearm, a practice board, or a willing family member. Paint each menu design at least three times before an event and time yourself. Photograph each attempt so you can compare proportions and linework. Practice the one or two strokes that appear most often in your menu, usually teardrops and swirls, until they are consistent. Building a laminated menu board from photos of your own practice designs also shows families exactly what you can deliver.
Tools and Products
- Cosmetic-grade, water-activated face paint: The standard for most face painting; easy to apply and remove.
- Split cakes and one-stroke cakes: Create multicolor effects quickly.
- High-density sponges: For smooth base layers; petal-shaped sponges reach around eyes and noses.
- Brushes: Fine rounds for linework, flats or filberts for petals and one-stroke designs.
- Cosmetic glitter: Only use glitter made for skin; craft glitter can scratch.
- Stencils: Speed up complex patterns like scales, stars, or webs.
- Face gems: Adhesive jewels designed for skin, used sparingly and kept away from eyes.
Matching Designs to Skin Tones
Face paint colors can look different depending on skin tone. Bright, opaque colors and white highlights show clearly on most skin tones, while very pale pastels may appear faint on deeper skin. A thin white base under pastel areas can help colors read brighter. Metallic gold, silver, and vivid jewel tones are versatile choices that tend to stand out well across a wide range of complexions.
Taking Care of Your Kit
A clean, organized kit makes events smoother and helps paints last. Let cakes air-dry with lids off after use so they do not grow mold, wash sponges in mild soap and hot water and dry them fully, and clean brushes gently, reshaping the tips before drying. Store glitter in closed containers and keep a separate set of clean sponges ready for each event.
Hygiene and Safety Reminders
- Use paints and glitter made specifically for skin, and check ingredient lists if allergies are a concern.
- Do not paint over cuts, rashes, cold sores, or irritated skin.
- Use a fresh or thoroughly cleaned sponge for each person.
- Keep paint outside the lash line and off lips unless products are labeled for those areas.
- Recommend gentle removal with soap and water, or a mild makeup remover for stubborn colors.
Common Mistakes
- Skipping the base. Linework alone often looks unfinished. A sponged base gives designs body.
- Thick, wobbly outlines. Use a fine brush and teardrop strokes, and hold the brush upright.
- Too wet or too dry paint. Aim for a creamy consistency; test on your hand.
- Oversized designs on small faces. Scale designs to fit the child.
- Too many details. Clean, bold designs read better from a distance and in photos.
FAQs
What are the most popular face painting ideas?
Tigers, butterflies, unicorns, superheroes, puppies, spider-web masks, and princess crowns are consistently popular, along with seasonal designs like sugar skulls and pumpkins.
What is a split cake in face painting?
A split cake is a face paint cake with several colors side by side. Loading a sponge or brush across the stripes applies multiple colors in a single stroke.
How do professionals make face painting look clean?
They work in layers (base, strokes, linework, highlights), use fine brushes for teardrops and swirls, keep paint at a creamy consistency, and finish with white highlights.
What face painting ideas work for adults?
Adults often prefer subtle designs like festival dots, floral vines, team stripes, metallic accents, or small arm designs rather than full faces.
How long does a full face design take?
Full-face designs typically take 5 to 10 minutes depending on detail and experience. Cheek designs can take 1 to 3 minutes.
Is glitter safe for face painting?
Use only cosmetic-grade glitter made for skin. Craft glitter is not designed for skin use and can be sharp. Keep glitter away from the eyes.
Final Thoughts
Thinking in layers turns even impressive face painting designs into simple sequences you can practice and repeat. Start with a few themes you love, build a small menu, and add new designs as your linework improves. For party-specific advice on supplies, setup, and keeping kids entertained while they wait, head to our guide to kids’ face painting at parties.