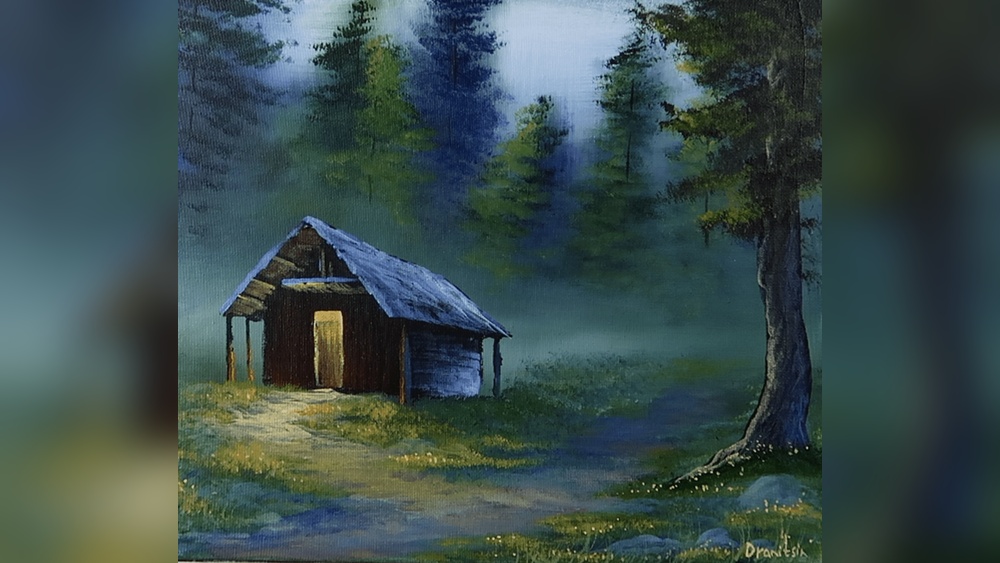
Imagine bringing the peaceful charm of a cabin in the woods to life right on your canvas. Painting this serene scene with acrylics can be both relaxing and rewarding.
Whether you’re new to acrylics or looking to improve your technique, this guide will show you step-by-step how to create your own cozy cabin artwork. By the end, you’ll have the skills to paint a vibrant, inviting scene that captures the beauty of nature and the warmth of a hidden retreat.
Ready to transform your blank canvas into a woodland escape? Let’s get started!
Choosing The Right Supplies
Choosing the right supplies is the first step to painting your cabin in the woods with acrylics. Good materials make your work easier and your painting better. Picking the right paint, brushes, and surface helps you enjoy the process and get great results.
Selecting Acrylic Paints
Choose high-quality acrylic paints for bright and lasting colors. Look for paints with rich pigments and smooth texture. Basic color sets work well, but add a few extra colors for variety. Avoid cheap paints that can be thin or dull.
Picking Brushes And Tools
Use brushes with synthetic bristles made for acrylic paint. Different sizes help create details and broad strokes. Flat brushes cover large areas, while round brushes add fine lines. Have a palette knife for mixing or creating texture.
Preparing Your Canvas Or Surface
Make sure your surface is clean and dry before painting. Use a canvas or wooden panel for best results. Prime the surface with gesso to help paint stick and prevent peeling. Let the primer dry fully before starting your work.

Credit: briansloanartist.com
Planning Your Cabin Scene
Planning your cabin scene sets the foundation for a great acrylic painting. It helps you organize ideas and create a clear vision. This step saves time and guides your brush strokes. Start with simple shapes, choose your colors, and think about light. Each part shapes the mood of your artwork.
Sketching The Basic Shapes
Begin with light pencil lines to outline the cabin and trees. Use simple shapes like rectangles and triangles for the cabin. Sketch the ground and sky as broad areas. Keep lines soft and easy to change. This sketch acts as a map for your painting.
Deciding On The Color Palette
Pick colors that fit the forest and cabin well. Use natural greens, browns, and blues for a realistic look. Limit your palette to a few colors to keep harmony. Test colors on paper before painting. Choose shades that work well together and feel right.
Setting The Mood With Lighting
Think about the time of day and weather. Soft morning light feels calm and fresh. Warm sunset light creates a cozy, inviting scene. Dark shadows add mystery and depth. Plan where light hits the cabin and trees. Lighting changes the whole mood of your painting.
Painting The Background
Painting the background sets the mood and depth for your cabin scene. It creates a base that supports the main subjects. Focus on simple shapes and colors first. This helps build a strong foundation for your acrylic painting.
Creating The Sky
Start with a clean, dry canvas. Use a large brush for smooth strokes. Choose light blues, soft pinks, or warm oranges for the sky. Apply paint in horizontal strokes from top to bottom. Leave space for the sun or clouds. Keep the colors light and soft to create distance.
Adding Forest Elements
Use darker greens and browns for trees and bushes. Paint simple shapes like triangles or blobs to show forest areas. Vary the size and color for a natural look. Start with the farthest trees and layer closer ones on top. Avoid too much detail; focus on shapes and shadows.
Blending Colors Smoothly
Work quickly before the paint dries. Use a clean, dry brush to blend edges gently. Soft transitions between colors make the scene look real. Avoid harsh lines between sky and trees. Blend colors with light, gentle strokes to keep a smooth finish.
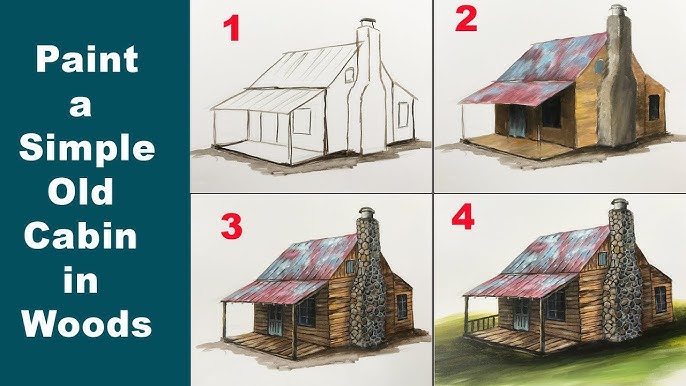
Building The Cabin Structure
Building the cabin structure is the first key step in your acrylic painting. It sets the base for the entire scene. Focus on getting the shapes right before adding details. This helps create a strong foundation for your artwork.
Start simple and work your way up. Painting a cabin involves showing the wooden texture and the play of light and shadow. Each part adds depth and realism to your painting.
Blocking In The Main Shapes
Begin by sketching the main outline of the cabin. Use broad brush strokes to fill in the large shapes. Paint the roof, walls, and foundation with solid colors. Keep shapes basic and clear. Avoid small details at this stage. Focus on size and position instead. This step builds a clear structure for later work.
Adding Texture To Wood
Wood has a rough, natural look. Use short, thin brush strokes to mimic wood grain. Mix different browns and ochres for variety. Paint along the wood’s length to show its texture. Add knots and lines to make the wood feel real. Layering paint helps create depth and roughness. This step brings life to the cabin walls.
Highlighting Details And Shadows
Light and shadow add drama and shape to the cabin. Choose a light source direction first. Paint shadows on the opposite side using darker tones. Add highlights with lighter colors on the sunlit edges. Use a fine brush for window frames, door outlines, and roof edges. These details make the cabin pop. Shadows add a three-dimensional feel to the painting.
Enhancing The Surroundings
Enhancing the surroundings in your acrylic painting of a cabin in the woods brings the scene to life. It creates depth and makes the cabin feel part of the natural world. Small details can change the mood and add interest. Focus on trees, ground elements, and even wildlife to enrich your artwork.
These parts help connect the cabin to its environment. They make the painting more inviting and realistic. Each brushstroke can show the quiet beauty of the woods.
Painting Trees And Foliage
Start with simple shapes for tree trunks and branches. Use different shades of green to show leaves and needles. Mix light and dark colors to create shadows and highlights. Paint leaves with short, quick strokes for texture. Add variety by painting different tree types around the cabin. This gives a natural, wild feel.
Incorporating Ground Elements
Paint the forest floor with browns, greens, and yellows. Use small dots or strokes to show grass, fallen leaves, and dirt. Add rocks or roots near the cabin base for more detail. Show patches of sunlight or shadows on the ground. This makes the scene feel alive and real.
Adding Wildlife Or Extra Features
Include small animals like birds, squirrels, or deer to add life. Use simple shapes and soft colors for these creatures. Paint a bird on a branch or a deer in the distance. You can also add extra features like a fence, a small path, or flowers. These details tell a story and invite viewers into the scene.

Credit: www.youtube.com
Final Touches And Finishing
After completing the main parts of your acrylic painting of a cabin in the woods, the final touches bring your artwork to life. These steps help polish your painting and prepare it for display or sale. Taking time for finishing details ensures your work looks its best and lasts longer.
Refining Details
Look closely at your painting. Add small highlights or shadows to enhance depth. Use a fine brush to sharpen edges and details. Fix any spots that seem uneven or dull. Small changes can make a big difference. Take breaks to see your work with fresh eyes. This helps catch areas needing improvement.
Applying Varnish For Protection
Varnish protects your painting from dust, dirt, and sunlight. Choose a varnish suitable for acrylic paints. Apply it evenly with a soft brush or spray. Work in thin layers to avoid drips or cloudiness. Let each layer dry completely before adding another. Varnish also enhances colors and gives a uniform finish. This step keeps your art looking vibrant for years.
Tips For Displaying Your Artwork
Choose a place with good light but not direct sun. Frame your painting to protect edges and add style. Use acid-free backing to prevent damage over time. Avoid areas with high humidity or temperature changes. Show your painting where viewers can appreciate details easily. Proper display keeps your cabin in the woods painting safe and beautiful.
Credit: www.youtube.com
Frequently Asked Questions
What Materials Do I Need For Acrylic Cabin Painting?
You need acrylic paints, brushes of various sizes, a canvas or paper, a palette, water, and cloth for cleaning. Optional items include a pencil for sketching and a varnish for finishing your artwork.
How Do I Start Painting A Cabin With Acrylics?
Begin by sketching the cabin outline lightly on your canvas. Then apply a base layer with broad strokes. Build details gradually, layering colors from dark to light for depth and realism.
Can I Use Acrylics Outdoors For Cabin Painting?
Yes, acrylics dry quickly and are weather-resistant when dry. Use a portable easel and protect your supplies from wind. Acrylics work well for outdoor painting sessions in natural light.
How To Create Wood Texture With Acrylic Paint?
Use a dry brush technique or a fan brush to mimic wood grain. Layer different brown shades and add fine lines for realistic wood texture. Vary your strokes to enhance natural wood patterns.
Conclusion
Painting a cabin in the woods with acrylics can be fun and relaxing. Start with simple shapes and colors. Take your time and enjoy each step. Mistakes can add character, so don’t worry. Use light layers to build depth in your painting.
Keep practicing to improve your skills. Soon, your artwork will look lively and real. Remember, the process matters more than perfection. This project brings nature and creativity together. Try it today and see what you create.