Are you ready to bring the serene beauty of a lake right onto your canvas? Painting a lake with acrylic paint might seem tricky at first, but with the right steps, you can create stunning water reflections and peaceful landscapes that capture nature’s calm perfectly.
Whether you’re new to acrylics or looking to improve your skills, this guide will walk you through easy techniques to paint water, reflections, and ripples that look realistic and vibrant. By the end, you’ll have the confidence to create your own tranquil lake scene that draws the viewer in.
Let’s dive in and transform your ideas into a beautiful acrylic painting!
Materials And Tools
Gathering the right materials and tools is key to painting a lake with acrylics. These items help you create smooth water effects and capture natural reflections. Using quality supplies makes your painting process easier and more enjoyable.
Essential Acrylic Paints
Start with basic colors like blue, green, white, and brown. These colors help paint water, sky, and natural elements around the lake. Use artist-grade acrylics for better pigment and coverage. Having a few shades of blue and green allows you to add depth to the water. White paint helps create reflections and highlights on the lake surface.
Brush Types And Uses
Flat brushes are perfect for painting large lake areas and smooth water. Round brushes help add details like ripples and small waves. Fan brushes work well for blending colors and creating soft edges. Use small detail brushes for trees, rocks, and reflections. Different brush sizes give you control over texture and fine details.
Additional Supplies
Prepare a palette for mixing your colors easily. Use a canvas or acrylic paper as your painting surface. Keep a cup of water nearby to clean brushes between colors. Paper towels help remove excess paint and water. A palette knife can add texture or mix thick paint. These supplies support smooth painting and clean transitions.
Credit: stepbysteppainting.net
Preparing The Canvas
Preparing the canvas is a vital first step before painting a lake with acrylics. It sets the foundation for your artwork and helps you organize the scene clearly. Proper preparation makes the painting process smoother and more enjoyable.
Start by choosing the right canvas size and surface. A smooth, primed canvas works best for detailed lake scenes. Make sure the canvas is clean and dry. This prevents any dirt or dust from affecting your paint layers.
Sketching The Landscape
Lightly sketch the main shapes of your lake and surroundings. Use a pencil or a thin brush with diluted paint. Outline the water, trees, hills, and sky. Keep the lines simple and soft to avoid distraction.
Focus on the large shapes first. Add details only after you finish the basic layout. This sketch helps guide your brush strokes and color placement later.
Setting The Horizon Line
The horizon line divides the sky and water. Place it carefully to create balance in your composition. Usually, the horizon sits one-third from the top or bottom of the canvas.
This line helps show perspective and depth. It guides where you blend the sky colors with the lake reflections. Mark the horizon lightly in your sketch to keep it visible but subtle.
Painting The Sky
Painting the sky is a key step in creating a beautiful lake scene with acrylic paint. The sky sets the mood and affects the reflection on the water. It needs soft colors and smooth transitions to look natural. Start by choosing the right colors. Then use blending techniques to make the sky look seamless and realistic.
Choosing Sky Colors
Pick colors that match the time of day you want to show. For a bright day, use light blues and whites. For sunset, try oranges, pinks, and purples. Mix a little white with your colors to soften them. Avoid using pure black in the sky. Instead, use dark blues or grays for shadows and depth.
Blending Techniques
Use a clean, dry brush to blend colors smoothly. Work quickly while the paint is still wet. Start with the lightest color at the horizon and move to darker shades above. Use gentle, horizontal strokes to avoid harsh lines. Blend edges where two colors meet. This creates a natural gradient in the sky. Let the paint dry before adding clouds or details.
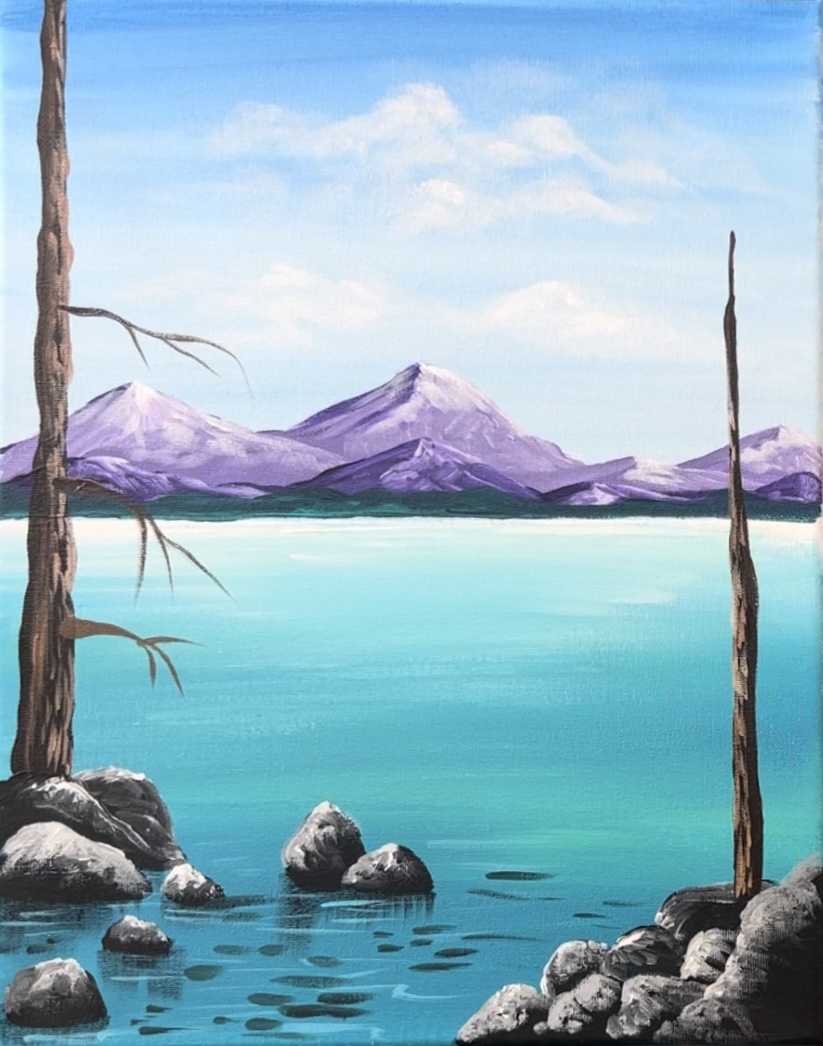
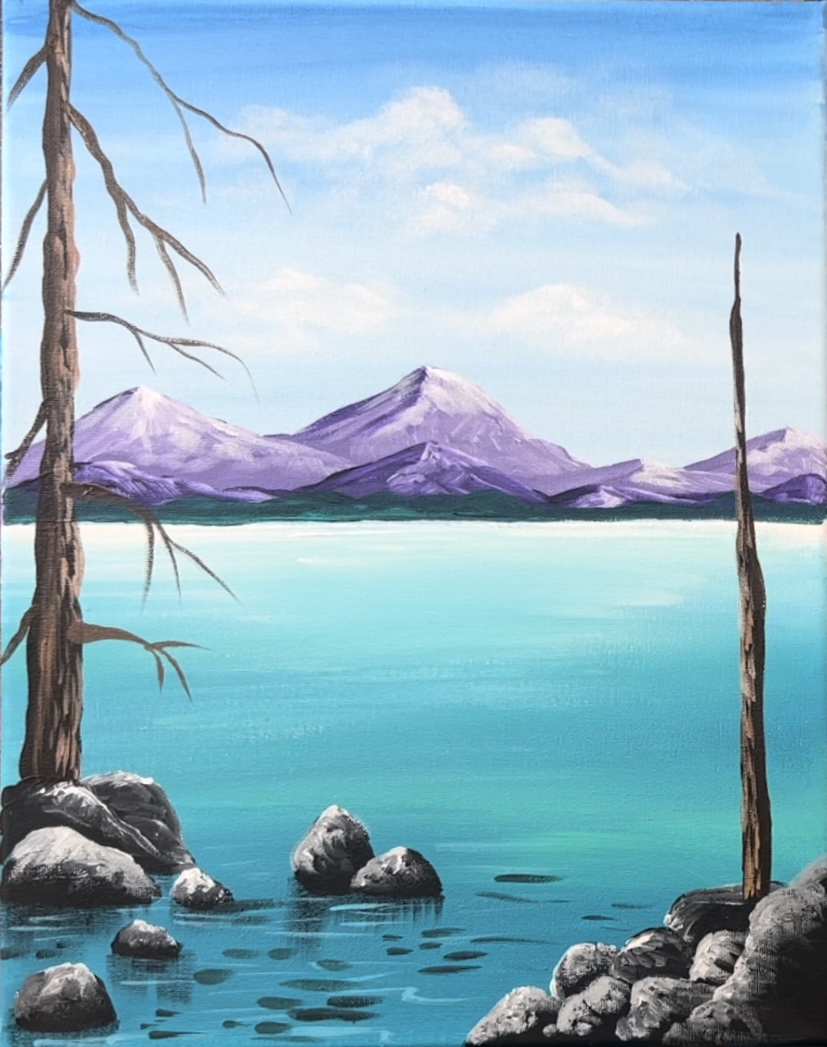
Creating Distant Mountains
Creating distant mountains is key to adding depth and realism to your lake painting. These mountains sit far away, so they appear softer and less detailed. They set the scene and give a sense of space. Painting them well helps your lake feel wide and open.
Color Selection For Depth
Choose cool, muted colors for distant mountains. Use light blues, grays, and soft purples. These colors push the mountains back in space. Avoid bright or dark colors here. They make the mountains look too close. Adding a bit of white to your colors creates a faded look. This simulates the effect of air and light over distance.
Layering For Atmosphere
Start with a light base layer for the mountain shape. Let it dry before adding more layers. Add subtle shades of blue and gray on top. Use a dry brush to blend edges softly. This creates a misty, atmospheric effect. Keep details minimal. Too much detail makes the mountains stand out too much. Build layers slowly to create a natural look.
Building The Lake Base
Start by creating the base layer of your lake painting. This layer forms the foundation and sets the tone for the water’s appearance. Use soft brush strokes to cover the canvas smoothly. The goal is to capture the lake’s depth and calm surface. Focus on simple shapes and colors before adding details. This base helps the final painting feel natural and balanced.
Mixing Water Tones
Mix several shades of blue and green to mimic water. Add a touch of white for lighter tones and a bit of brown or gray for depth. Test your colors on a scrap paper first. Adjust the mix until it feels right. Use these tones to show the lake’s clear and reflective qualities. Keep the colors soft and blended for a realistic look.
Applying Dark To Light Gradients
Paint the darkest colors near the bottom or edges of the lake. This creates the illusion of depth. Gradually shift to lighter colors as you move upward or toward the center. Blend the colors smoothly to avoid harsh lines. This gradient shows how water changes color with depth and light. It makes your lake look alive and three-dimensional.

Credit: www.youtube.com
Adding Reflections
Adding reflections in a lake painting brings the scene to life. Reflections show the water’s calm surface and create depth. Acrylic paint lets you capture these reflections with vivid color and texture. Simple steps can help make the reflections look natural and smooth.
Mirroring Surrounding Elements
Start by painting the main objects near the lake. Trees, rocks, and sky shapes are good choices. Copy their shapes directly below on the water surface. Use slightly darker or muted tones to show the reflection. Keep the edges soft to avoid harsh lines. This copying creates the mirror image effect of water.
Softening With Brushstrokes
Use a clean, dry brush to gently blur the reflection. Light horizontal strokes work best. This softens the shapes and blends colors smoothly. Avoid pressing hard to keep the texture light. Softening makes the reflection look like it moves with the water. It also adds a natural shimmer effect to your lake painting.
Detailing Water Ripples
Detailing water ripples adds life and realism to your lake painting. Small waves and soft movements show the water’s texture. They create a sense of depth and motion on the surface. Painting ripples carefully helps your artwork feel more natural and engaging.
Focus on the light and shadows that fall on the ripples. These contrasts bring out the round shapes and curves in the water. Use the right tools and techniques to capture the delicate flow of ripples.
Using Highlights And Shadows
Start by observing how light hits the water. Highlights appear where light reflects strongest. Use a fine brush with white or light blue paint for these spots. Shadows form in the dips and curves of ripples. Apply darker colors like deep blue or gray to show depth. Blend softly to avoid harsh lines. This contrast makes the ripples stand out and look three-dimensional.
Palette Knife Techniques
A palette knife can create sharp, textured edges in water ripples. Load a small amount of paint on the knife’s edge. Drag it lightly across the canvas in short, curved strokes. This method gives a natural, uneven look to ripples. Use lighter colors on top of darker base layers. The knife’s shape helps mimic the irregular shapes of water movement. It adds a fresh, lively effect that brushes may not achieve.
Enhancing Foreground Elements
Enhancing the foreground elements in your lake painting brings your scene to life. The foreground is where viewers first focus, so it needs clear details and strong colors. This section guides you through painting natural elements like trees and rocks. It also explains how to add depth and perspective to create a realistic view.
Painting Trees And Rocks
Begin with simple shapes for trees and rocks using a medium brush. Use darker greens and browns to paint tree trunks and rock bases. Add lighter shades on one side to show light hitting the surfaces. Use short, quick strokes for leaves and rough textures on rocks. This creates a natural, rough look.
Mix different shades of green to show leaves in shadow and light. For rocks, use gray, brown, and a touch of blue to add cool shadows. Layer colors to build texture. Avoid perfect shapes. Nature has irregular forms.
Adding Depth And Perspective
Place larger, brighter objects near the front to show closeness. Make colors fade and details blur as they move back. Use softer edges for distant trees and rocks. This technique pushes them into the background.
Paint the water’s edge with clear reflections of foreground elements. Reflections add realism and connect the foreground to the lake. Use lighter shades and horizontal strokes to show smooth water.
Apply shadows under trees and rocks to ground them. Shadows also give a sense of form and space. These simple steps create a strong foreground that draws viewers into your lake scene.
Common Mistakes To Avoid
Painting a lake with acrylics can be very rewarding. Avoiding common mistakes helps create a more realistic scene. Even small errors can change the look of water and reflections. Focus on key details to improve your painting skills.
Overblending Colors
Blending too much can make the lake look flat. Water has layers and slight color changes. Keep some edges sharp for a natural effect. Use soft blending only where colors gently meet. Overblending removes texture and depth from the water.
Ignoring Reflection Distortion
Reflections in water are never perfect copies. They often appear wavy or blurred. Paint reflections with slight distortions to add realism. Straight lines and clear images in water look unnatural. Add gentle ripples and breaks for a true lake feel.
Tips For Lasting Acrylic Art
Keeping your acrylic lake painting beautiful for years takes care and the right techniques. Acrylic paint is strong, but it needs extra protection. These tips help your artwork resist damage and stay vibrant.
Sealing And Protecting Your Painting
Apply a clear acrylic sealer once your painting is fully dry. The sealer adds a protective layer that guards against dust, dirt, and scratches. Use a spray or brush-on varnish made for acrylics. Choose matte, satin, or glossy finishes based on your style. Always seal in a well-ventilated area to avoid fumes. Let the first coat dry, then add a second layer for better protection.
Keep the painting away from direct sunlight and high humidity. These conditions can cause colors to fade or paint to peel. Store your artwork in a dry, cool place if not displayed.
Choosing Water-resistant Finishes
Pick water-resistant varnishes to shield your acrylic lake painting from moisture. These finishes prevent water from soaking into the paint and causing damage. Water-resistant finishes also help maintain color brightness over time. Use marine or outdoor acrylic varnishes for extra durability. These are ideal if your painting is in a kitchen, bathroom, or near a window. Apply the finish evenly and avoid thick layers to prevent cracking.
Regularly check your painting’s surface and clean it gently with a soft cloth. This helps keep the protective finish intact and your artwork looking fresh.
Credit: stepbysteppainting.net
Frequently Asked Questions
What Are The Best Colors For Lake Painting?
Best colors for lake painting include deep blues like Ultramarine, muted greens, soft grays, and earthy browns. Use lighter blues and whites for reflections and highlights. These tones create natural depth and realistic water effects.
Will Acrylic Paint Hold Up To Water?
Acrylic paint resists water once dry but is not fully waterproof. Prolonged moisture can damage it. Use a sealant for better protection.
How To Paint Water With Acrylic Paint For Beginners?
Start with a dark base at the water’s edge. Blend lighter blues and greens toward the horizon. Add horizontal reflections and white highlights for ripples. Use smooth brushstrokes to create depth and movement. Keep colors layered to mimic water’s transparency and reflections.
What Are Common Mistakes When Painting Clouds?
Common mistakes when painting clouds include using harsh edges, ignoring light source direction, over-blending, and applying unnatural colors. Avoid flat shapes and lack of depth for realistic clouds.
Conclusion
Painting a lake with acrylics can be simple and fun. Start with dark colors near the shore. Then, use lighter tones toward the horizon. Remember to add reflections of trees and sky on the water. Use gentle horizontal strokes to show ripples.
Take your time blending colors smoothly. Practice makes your painting look more natural. Enjoy creating your peaceful lake scene with these easy steps. Keep experimenting and you will improve quickly. Painting lakes brings calm and beauty to your art collection.