Quick answer: Creative stenciling ideas for DIY home decor include stenciled wood signs, botanical canvas art, patterned throw pillows, tote bags, serving trays, plant pots, drawer fronts and tea towels. For crisp results, secure the stencil with repositionable adhesive or painter’s tape, use very little paint on a stencil brush or foam pouncer, dab straight up and down instead of brushing, and peel the stencil while the paint is still slightly wet.
Stenciling is one of the quickest ways to get a hand-painted look without freehand skill. A good stencil does the drawing; you control the color, texture and placement. That makes it ideal for decor projects where clean, repeatable designs matter, such as a set of matching pillows or a pattern across several drawer fronts.
This guide covers more than 30 creative stenciling ideas for DIY home decor, the supplies and techniques that prevent paint bleed, a step-by-step method, color palette suggestions and fixes for common problems. Many of these projects also work as family crafts, and our guide to the best DIY paint kits for kids covers ready-made options for younger crafters.
Stenciling Supplies You Need
- Stencils: reusable plastic (often Mylar) stencils last for many projects. Adhesive vinyl stencils stick to the surface for sharper edges but are typically single-use. You can also cut your own from stencil film or cardstock.
- Paint: acrylic craft paint for most surfaces; chalk-style paint for furniture; fabric paint, or acrylic mixed with a textile medium, for fabric.
- Applicators: round stencil brushes with stiff, flat-cut bristles, foam pouncers, or small dense foam rollers for larger stencils.
- Repositionable spray adhesive or painter’s tape: to hold the stencil flat.
- Paper towels: for offloading excess paint from the brush.
- Palette or paper plate.
- Sealer: clear acrylic sealer or polyurethane for items that will be handled or wiped.
- Optional: level or ruler for alignment, a craft knife and cutting mat for custom stencils, and a heat setting tool or iron for fabric paint.
Best Stencils for Home Decor: Types Compared
| Stencil type | Best suited for | Advantages | Limitations |
|---|---|---|---|
| Reusable plastic (Mylar) | Repeated patterns, signs, furniture | Durable, washable, flexible | Needs adhesive or tape for crisp edges |
| Adhesive vinyl | Fine details, lettering, glass | Very sharp edges, sticks firmly | Usually single use |
| Cardstock or paper | Quick one-off projects, kids’ crafts | Cheap, easy to cut | Absorbs paint, wears out fast |
| Large wall or furniture stencils | Accent panels, rugs, tabletops | Covers area quickly | Requires careful alignment |
| Self-cut stencil film | Custom designs, names, logos | Fully personalized | Needs cutting tools and patience |
When choosing stencils, look at line thickness (very thin bridges can tear or bleed), size relative to your project, and whether the design repeats cleanly for patterns.
How to Stencil Step by Step
- Prep the surface. Clean and dry it. Sand wood lightly and wipe away dust. Wash and dry new fabric to remove sizing.
- Base coat if needed. Paint a background color and let it dry fully.
- Position the stencil. Use a ruler or level to align it. Mark registration points lightly with pencil for repeating patterns.
- Secure it. Apply a light mist of repositionable adhesive to the back of the stencil, or tape all edges with painter’s tape.
- Load and offload. Dip just the tips of the brush or pouncer into paint, then dab on a paper towel until it feels almost dry. This is the most important step.
- Apply paint. Dab straight up and down (pouncing) or swirl in small circles, starting at the stencil edges and working inward. Avoid brushing sideways, which pushes paint under the stencil.
- Build layers. Two or three light coats give better coverage than one heavy coat.
- Peel carefully. Lift the stencil straight up while the paint is still slightly tacky to avoid peeling dried paint.
- Touch up. Fix any bleed with a small brush and background color.
- Seal or heat-set. Seal wood and hard surfaces; heat-set fabric according to the paint’s instructions.
Creative Stenciling Ideas for Walls and Large Surfaces
- Accent panel: stencil a repeating geometric or floral pattern within a framed area rather than a full wall.
- Faux tile backsplash: stencil tile patterns on a sealed board panel to hang behind a coffee station.
- Stair risers: a different pattern on each riser for a playful look.
- Headboard illusion: stencil a decorative headboard shape on a large canvas or panel.
- Large canvas art: oversized botanical or geometric stencils on a big canvas for a statement piece.
Stenciled Furniture and Storage Ideas
- Drawer fronts: a continuous pattern across all drawers of a dresser.
- Tabletops: a stenciled border or center medallion, sealed with a durable topcoat.
- Chair backs and seats: small motifs or numbers.
- Wooden crates: stenciled labels for pantry or toy storage.
- Bookshelf backs: a pattern inside a bookshelf that peeks out between books.
- Floor rug on canvas drop cloth: heavy canvas stenciled and sealed as a floor cloth.
Fabric and Soft Decor Stenciling Ideas
- Throw pillow covers: botanical, geometric or lettering designs.
- Tea towels: lemons, herbs or simple kitchen phrases.
- Tote bags: bold graphics or initials.
- Table runners: a repeated border pattern.
- Curtains: a simple motif spaced along the bottom hem.
- Napkins: matching monograms for special occasions.
Place cardboard or freezer paper inside fabric items so paint does not soak through, and heat-set as directed for washability.
Signs, Trays and Small Decor Ideas
- Wood signs: family names, house numbers, quotes or “welcome” signs.
- Serving trays: stenciled patterns sealed with a food-safe-rated topcoat where appropriate. Check product labels for food contact.
- Coasters: cork, wood or tile squares with small motifs.
- Terracotta plant pots: geometric bands or botanical sprigs.
- Glass jars: frosted-effect stencils for pantry storage.
- Picture frames: a stenciled border around photos.
- Candles: small motifs kept away from the wick area.
For other hands-on decor techniques that pair well with stenciling, try our guides to DIY dot painting and string art with paint.
DIY Large Canvas Art Ideas for Beginners Using Stencils
Stencils make large canvas art approachable because the stencil holds the shape while you focus on color.
- Oversized monstera or palm leaf on a neutral background.
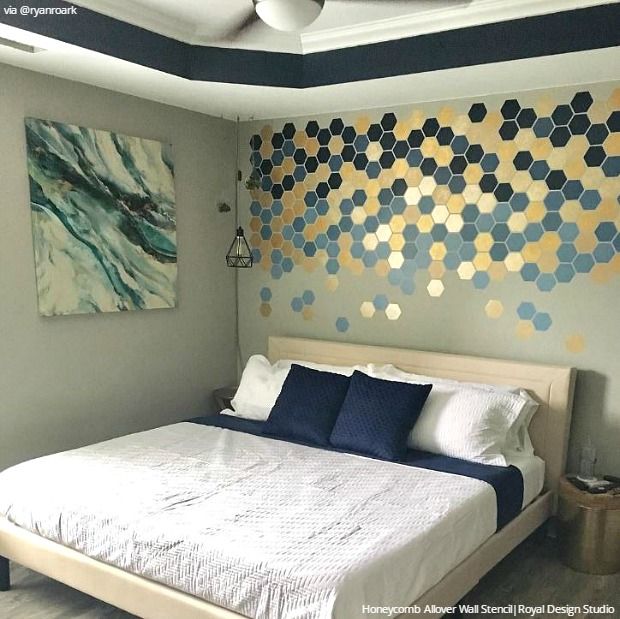
- Repeating geometric pattern such as hexagons or arches across the whole canvas.
- Layered botanical silhouettes in three shades of one color for depth.
- Word art with a single meaningful word in large letters.
- Ombre background with stenciled overlay: blend a gradient, then stencil a pattern in white or gold over it.
Use a foam roller with large stencils on big canvases for faster, even coverage.
Home Paint Palette Ideas for Stenciled Decor
Color choice is what turns a stencil project into decor that fits your space. These palettes work well with stenciled designs.
| Palette | Colors | Works well with |
|---|---|---|
| Modern farmhouse | Warm white, charcoal, sage, natural wood | Signs, crates, tea towels |
| Coastal | Navy, sky blue, sand, white | Pillows, trays, frames |
| Boho | Terracotta, mustard, blush, cream | Plant pots, canvases, runners |
| Scandinavian | White, light gray, black, pale wood | Geometric patterns, furniture |
| Botanical | Olive, forest green, cream, gold accent | Leaf stencils, canvases, napkins |
| Monochrome | One color in light, mid and dark | Layered stencils, large canvas art |
A useful rule: choose one dominant color for the background, one for the stencil, and one small accent, such as metallic gold, for highlights.
DIY Craft Paint Storage Ideas
Stenciling projects tend to multiply your bottles of craft paint. A few storage ideas keep them organized.
- Pegboard with small shelves to display bottles by color.
- Spice racks mounted on a wall or inside a cabinet door.
- Clear stackable bins labeled by color family.
- Over-the-door shoe organizers with a bottle in each pocket.
- Upside-down storage racks so paint stays near the cap and is ready to squeeze.
- Stencil storage: hang stencils on binder rings or store them flat in a large portfolio or under-bed box.
How to Make Your Own Stencils
Custom stencils let you create designs no store carries: a family name, a pet silhouette, a favorite plant or a pattern that matches your wallpaper.
- Draw or print your design. Keep shapes bold and simple. Very fine lines are hard to cut and tend to bleed.
- Add bridges. Letters like A, B, O and R have enclosed centers that would fall out. Leave small connecting strips, called bridges, to hold those pieces in place.
- Transfer to stencil material. Tape the design under clear stencil film or trace it onto cardstock.
- Cut carefully. Use a sharp craft knife on a self-healing mat. Cut toward yourself in smooth strokes and rotate the material rather than your hand.
- Test it. Try the stencil on scrap paper or wood before your final surface.
Electronic cutting machines can also cut adhesive vinyl stencils from digital designs, which is helpful for lettering and detailed patterns.
Advanced Stenciling Techniques
Once basic stenciling feels comfortable, these techniques add depth and polish.
- Shading: apply a darker color lightly around the edges of a stencil opening to create dimension, especially on leaves and petals.
- Two-tone blending: pounce two colors within one opening, letting them blend in the middle, for an ombre effect.
- Layered stencils: some designs come as multiple stencils, each adding one color layer. Align them using registration marks.
- Reverse stenciling: place a stencil shape, such as a leaf, on the surface and paint around it to leave the shape in the background color.
- Raised stenciling: spread texture paste or modeling paste through a stencil with a palette knife for a raised, embossed design. Let it dry fully before painting over it.
- Distressing: after paint dries on wood, lightly sand edges for a weathered, vintage look.
These techniques work particularly well on signs and canvases, where texture and shading are visible up close.
Choosing Stencil Designs That Suit Your Space
Scale is the most overlooked part of stencil decor. A tiny motif repeated across a large dresser can look busy, while an oversized pattern on a small coaster gets cut off. As a rough guide, choose motifs that fill about a third to a half of the surface for single designs, and for repeating patterns, aim for at least three full repeats across the width so the pattern reads as intentional.
Style matters too. Geometric stencils suit modern and Scandinavian rooms, botanical and floral designs suit farmhouse and cottage styles, and Moroccan or tile-inspired patterns add warmth to boho spaces. Testing a design on kraft paper and taping it in place for a day is an easy way to see how it looks before committing paint to furniture.
Common Stenciling Problems and Fixes
| Problem | Cause | Fix |
|---|---|---|
| Paint bleeding under stencil | Too much paint, sideways brushing, stencil not secured | Offload more paint, pounce vertically, use adhesive |
| Blotchy coverage | Single heavy coat | Apply two or three light coats |
| Paint peeling with stencil | Paint fully dried before removing | Lift stencil while paint is slightly tacky |
| Misaligned repeats | No registration marks | Use stencil registration marks or measure and mark |
| Fabric paint washes out | Not heat-set | Heat-set according to product instructions |
| Smudged design | Moving stencil over wet paint | Let each section dry before repositioning |
FAQs
What are the best stencils for home decor?
Reusable plastic stencils are best for repeated patterns and furniture. Adhesive vinyl stencils are better for fine detail and lettering. Choose designs with lines thick enough to avoid bleeding.
What paint is best for stenciling?
Acrylic craft paint works on most surfaces. Chalk-style paint suits furniture. For fabric, use fabric paint or acrylic mixed with a textile medium.
How do you stencil without bleeding?
Secure the stencil with adhesive or tape, use very little paint, offload the brush on a paper towel, and dab straight up and down rather than brushing.
Can beginners stencil large canvas art?
Yes. Large stencils with a foam roller make big canvas art very approachable, and the stencil handles the shapes.
Do I need to seal stenciled decor?
Seal items that will be touched, wiped or used often, such as trays, signs and furniture. Heat-set fabric paint instead of sealing.
How do I clean reusable stencils?
Wash with warm soapy water soon after use, before paint dries. Soak stubborn dried acrylic and gently scrub. Dry flat.
Next Step
Stenciling turns plain surfaces into personalized decor with minimal freehand skill. Secure your stencil, use a nearly dry brush, dab rather than brush, and layer light coats. Start with a small sign or pillow, then move on to furniture and large canvas art.
If you would like kits that make stenciling and painting projects easy for the whole family, explore our top DIY paint kits for creative kids for ready-to-use options.