
Painting on wood slices has become a favorite craft activity for many, from beginners to seasoned artists. These unique, natural canvases offer endless creative possibilities, whether you want to make ornaments, coasters, signs, or personalized gifts. Unlike traditional flat surfaces, wood slices bring a warm, rustic feel to your artwork, but they also come with their own set of challenges.
If you want to learn how to paint on wood slices crafts and get beautiful, lasting results, this guide will walk you through every step. Along the way, you’ll discover key tips, common mistakes to avoid, and even a few expert secrets most people miss.
Why Choose Wood Slices For Craft Painting?
Wood slices are not just trendy—they’re practical and versatile. Each piece has its own character, with visible rings and natural textures. These features add charm to your finished work. Many crafters also choose wood slices because they are:
- Affordable: Wood slices can be bought in bulk or cut from branches at home.
- Eco-friendly: Using fallen branches or scrap wood reduces waste.
- Customizable: You can find small slices for jewelry or large ones for wall art.
Painting on wood slices is especially popular for holiday ornaments, wedding décor, and unique home accents.
Choosing The Right Wood Slices
Before you begin, the wood slice you select can make a big difference in your finished craft. Here’s what to look for:
Type Of Wood
Hardwoods like birch, oak, or maple are best for painting. They are less likely to crack and have smoother surfaces. Softwoods like pine can work, but they often have more resin and knots.
Size And Thickness
Consider the project: Small slices (2-4 inches) are perfect for ornaments; medium (4-8 inches) for coasters; large (8 inches and above) for signs or wall hangings. Thicker slices (at least 0.5 inches) resist warping better.
Dryness And Preparation
Fresh wood slices, called “green wood,” can crack as they dry. Ideally, use slices that have been kiln-dried or air-dried for several months. If buying online, check product reviews for dryness quality.
Comparison Of Common Wood Types
| Wood Type | Texture | Durability | Best For |
|---|---|---|---|
| Birch | Smooth | High | Painting, ornaments |
| Pine | Medium | Moderate | Rustic crafts |
| Oak | Grainy | Very High | Signs, wall art |
Preparing Wood Slices For Painting
Proper preparation is the foundation of any good craft. Skipping these steps often leads to uneven paint or peeling later.
Cleaning
Wipe the surface with a damp cloth to remove dust or dirt. If sap is present, a little rubbing alcohol can help.
Sanding
Most wood slices need some sanding. Use fine-grit sandpaper (180-220 grit) to smooth both surfaces and edges. Always sand in the direction of the grain to avoid scratches.
Sealing (optional But Recommended)
Sealing prevents paint from soaking into the wood and helps colors look brighter. Use a clear, water-based wood sealer or even a thin layer of acrylic medium. Let it dry fully (usually 1-2 hours).
Dealing With Bark
Some crafters love the look of natural bark, but it can flake off. Gently brush away loose pieces. If you want the bark to stay, apply a little sealer around the edges.
Preparation Steps At A Glance
| Step | Tools Needed | Why It Matters |
|---|---|---|
| Cleaning | Damp cloth | Removes dust, sap |
| Sanding | Sandpaper | Smooth surface for paint |
| Sealing | Wood sealer | Prevents paint bleed |
Choosing The Best Paints And Brushes
Picking the right materials is more important than many beginners realize. Not all paints and brushes work well on wood.
Paint Types
- Acrylic Paint: Most popular and easy to use. It dries quickly, has vibrant colors, and is water-based.
- Oil Paint: Rich colors, but slow drying and not ideal for beginners.
- Paint Pens/Markers: Perfect for fine details or lettering.
Acrylics are the top choice for most wood slice projects. For outdoor use, pick paints labeled as weather-resistant.
Brushes
Use synthetic bristle brushes for smooth paint application. Flat brushes cover large areas; round or liner brushes are best for details.
Finishing Products
To protect your finished piece, use a clear sealer like polyurethane or a spray varnish. This makes your artwork last longer and resist scratches.
Paint And Brush Comparison
| Paint Type | Drying Time | Best For | Notes |
|---|---|---|---|
| Acrylic | 15-30 mins | General crafts | Easy cleanup |
| Oil | Several hours | Professional art | Needs special care |
| Paint pens | 5-10 mins | Details, writing | Less messy |

Credit: www.lifeofcolourproducts.com
Step-by-step Guide: How To Paint On Wood Slices
Now it’s time to put everything together. Follow these steps for best results:
- Prepare Your Workspace: Lay down newspaper or a plastic sheet. Keep water, paper towels, and all your supplies handy.
- Prime the Wood (Optional): For a bright base, some artists add a layer of white acrylic paint or gesso. Let it dry completely.
- Sketch Your Design: Use a pencil to lightly draw outlines. Simple shapes work best for beginners.
- Apply Base Colors: Start with the largest areas and paint your base colors. Let each layer dry before adding the next.
- Add Details and Highlights: Use smaller brushes or paint pens for lines, dots, and accents.
- Let Dry Fully: Wait at least 1-2 hours, or overnight if you used thick paint.
- Seal Your Artwork: Spray or brush on a clear sealer in a well-ventilated area. Let dry according to the product’s instructions.
Two Key Insights Most Beginners Miss
- Test Your Paint First: Always test your colors and brush strokes on the back or edge of a wood slice. Wood can absorb colors differently, so you’ll see how it looks before painting your main design.
- Watch for Warping: If you use water-heavy paints or sealers, thin wood slices may bend as they dry. To avoid this, paint both sides (even if you leave the back plain) so moisture is balanced.
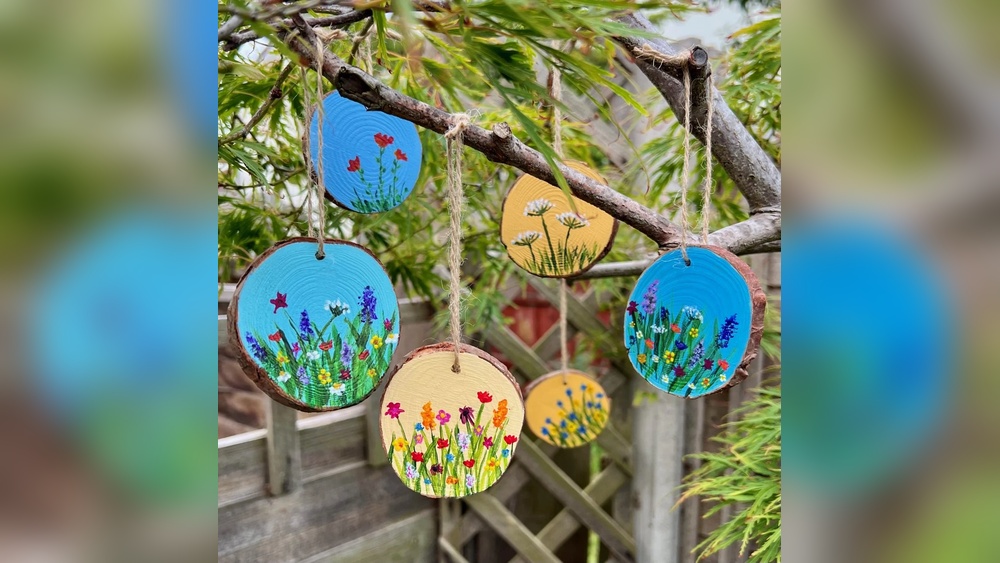
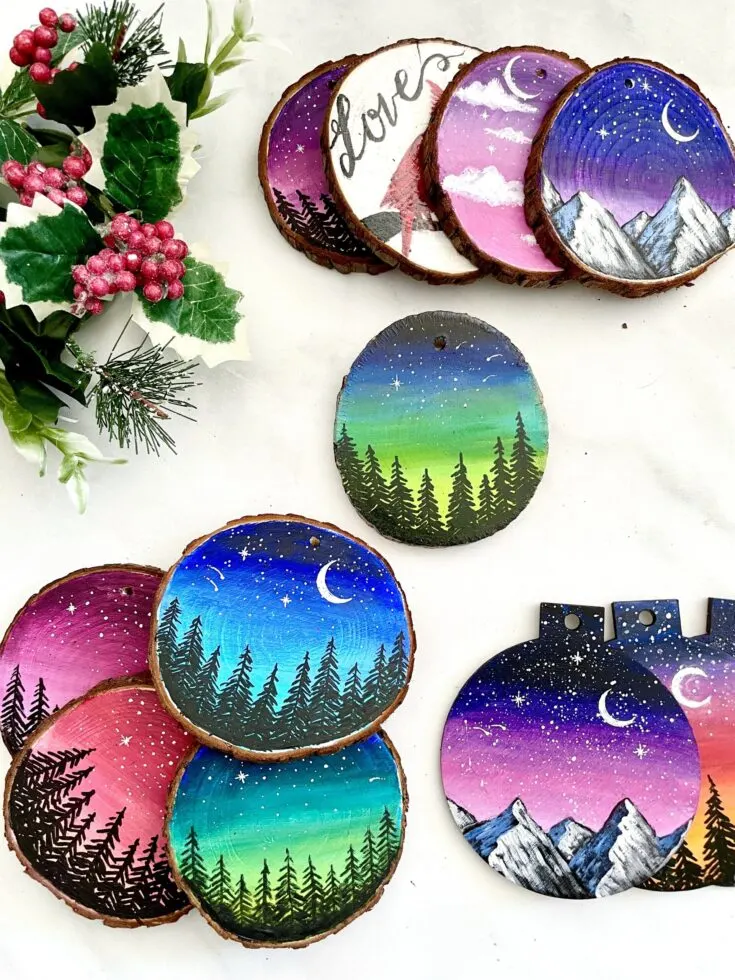
Creative Ideas For Wood Slice Crafts
Looking for inspiration? Here are some popular and unique ideas you can try:
- Holiday Ornaments: Paint snowflakes, reindeer, or custom names for Christmas tree decorations.
- Miniature Landscapes: Create tiny mountain scenes, forests, or sunsets.
- Inspirational Quotes: Use paint pens to add favorite sayings and gift them to friends.
- Photo Transfers: Print a photo on regular paper, use gel medium to transfer the image onto the wood, and paint accents around it.
- Animal Portraits: Paint a pet’s face or favorite animal for a personalized touch.
- Wedding or Party Favors: Paint the couple’s initials or event date and give them as keepsakes.
Avoiding Common Mistakes
Many beginners run into similar problems when painting on wood slices. Being aware of these can save you time and frustration.
- Skipping Prep: Not sanding or sealing can lead to paint bleeding or rough textures.
- Using Too Much Water: Overly wet paint may soak in, causing faded colors and warping.
- Painting Over Wet Layers: Always let each layer dry. Rushing leads to smudges and muddy colors.
- Not Sealing Finished Art: Without a protective coat, paint can chip or fade, especially if the piece will be handled often.
Advanced Tips For Stunning Results
If you’re ready to take your wood slice crafts to the next level, try these expert techniques:
- Layering Colors: Let each color dry, then add more on top for depth and richness. Acrylics are perfect for this.
- Masking and Stencils: Use painter’s tape or cut stencils for clean shapes, especially with geometric designs.
- Burnishing Edges: Lightly rub the edges with metallic paint or wax for a finished, professional look.
- Mixing Media: Combine paint with ink, wood burning (pyrography), or collage for mixed-media pieces.
Sealing And Finishing For Longevity
A well-sealed wood slice craft can last for years. Choose your sealer based on the final use:
- Indoor Display: Use clear acrylic spray or brush-on varnish.
- Outdoor Use: Pick a polyurethane or weatherproof sealant.
- Food-Contact Crafts: For coasters or serving boards, use a food-safe finish.
Apply thin, even coats, and let each coat dry fully before handling. For the smoothest finish, lightly sand between coats with very fine sandpaper.
Storing And Displaying Your Finished Pieces
Proper storage protects your hard work:
- Keep painted wood slices out of direct sunlight to avoid fading.
- Store flat, not stacked, to prevent sticking or scratching.
- For gifts, wrap slices in tissue paper and place in a box.
Display ideas include hanging with ribbon, attaching magnets, or mounting on a wall with double-sided tape.
Credit: feelingnifty.com
Where To Find Quality Supplies
You can buy wood slices at craft stores, online retailers, or make your own from tree branches. For paints and sealers, look for well-known brands with good reviews. If you want more details on the drying process or wood selection, the Wikipedia page on wood drying is a helpful resource.
Frequently Asked Questions
What Is The Best Paint For Wood Slice Crafts?
Acrylic paint is the most popular for wood slices. It’s easy to use, dries quickly, and gives bright colors. For outdoor projects, use weather-resistant acrylics.
How Do I Keep The Bark From Falling Off My Wood Slices?
Seal the edges with a clear wood sealer before painting. Handle slices gently and avoid dropping them. Some natural flaking is normal, but sealing helps hold the bark in place.
Can I Use Watercolor On Wood Slices?
Watercolor can work, but the results are softer and less vibrant than acrylics. The paint may bleed unless the wood is sealed first. Watercolor pencils or markers are a better choice for controlled designs.
How Do I Fix Mistakes While Painting?
Let the paint dry, then gently sand the area or paint over it with the background color. For small errors, a damp cotton swab can remove wet acrylic paint.
Are Wood Slice Crafts Safe For Kids?
Yes, with supervision. Use non-toxic paints and avoid small slices for young children due to choking risks. Sand edges smooth to prevent splinters.
Painting on wood slices crafts is rewarding, relaxing, and full of creative possibilities. With the right prep and a little patience, even beginners can create pieces that look beautiful and last for years. Remember to choose quality materials, take your time with each step, and enjoy the unique charm that only wood slices can bring to your artwork.

Credit: www.glimmerbug.com


