Quick answer: Creative painting ideas with tape and masking include geometric triangle canvases, taped mountain landscapes, birch tree forests, tape-resist names and words, mosaic and stained-glass designs, color-block abstracts, striped and chevron patterns, and masking-fluid highlights in watercolor. Press the tape edge down firmly, seal it with a thin coat of the background color or clear medium, paint in thin layers, and peel the tape slowly at a low angle while the last coat is still slightly damp.
Tape turns painting into a game of reveal. You cover part of the surface, paint freely over everything, and peel away the tape to expose crisp lines and shapes that would take hours to paint by hand. The technique works on paper, canvas, wood and walls, and it suits everyone from preschoolers to abstract painters.
This guide covers which tapes and masking materials to use on which surfaces, how to get perfectly clean lines, and twenty project ideas from simple to advanced. Tape choice makes a bigger difference than most people expect; our comparison of the best masking tape for painting explains which adhesion levels and widths suit paper, canvas and walls.
Tape and Masking Materials Compared
| Material | Best surface | Strengths | Watch out for |
|---|---|---|---|
| Low-tack artist’s tape | Watercolor and drawing paper | Removes without tearing paper fibers | May lift if paper is very wet |
| Painter’s tape (medium adhesion) | Canvas, wood, primed walls | Clean lines, reliable hold | Can tear delicate or unprimed paper |
| Delicate-surface painter’s tape | Freshly painted surfaces, wallpaper | Very gentle release | Less hold on textured surfaces |
| General masking tape | Kids’ crafts, cardboard | Cheap and easy to tear | Stronger adhesive can tear paper; may leave residue if left too long |
| Washi tape | Paper, journals, light crafts | Low tack, decorative, easy to reposition | Paint can seep under on wet paper |
| Fine-line or vinyl tape | Canvas, panels, walls | Very sharp edges, flexible for curves | Higher cost |
| Masking fluid | Watercolor paper | Masks fine, irregular shapes | Must be removed when paint is fully dry; can damage soft papers if left long |
| Contact paper or vinyl stencils | Canvas, wood, glass | Cut any shape | Must be burnished well to prevent bleeding |
How to Get Clean Tape Lines Every Time
- Start with a dry, clean surface. Dust and moisture prevent the tape from sealing.
- Apply the tape in one smooth strip. Stretching it while applying can cause it to pull back and lift.
- Burnish the edge. Run a fingernail, bone folder, credit card or the back of a spoon firmly along the edge you will paint against.
- Seal the edge. Brush a thin layer of the background color, or clear acrylic medium, over the tape edge. Any seepage will be invisible, and the seal blocks the next color.
- Paint thin layers. Heavy paint pooled against the tape edge is more likely to creep under and to form a ridge.
- Brush away from the tape. Stroke from the tape onto the open area, not into the tape edge.
- Peel at the right time. For acrylic, peel when the final coat is still slightly damp or just touch-dry. Fully cured acrylic can form a film over the tape and tear when lifted.
- Peel slowly at a low angle. Pull the tape back over itself at about 45 degrees or lower.
Preventing paper tears
On paper, press tape onto your clothing or a cloth once or twice before applying to reduce its tack. Remove it slowly, and if it starts to lift fibers, warm it gently with a hair dryer on low to soften the adhesive.
Easy Tape Painting Ideas
1. Geometric triangle canvas
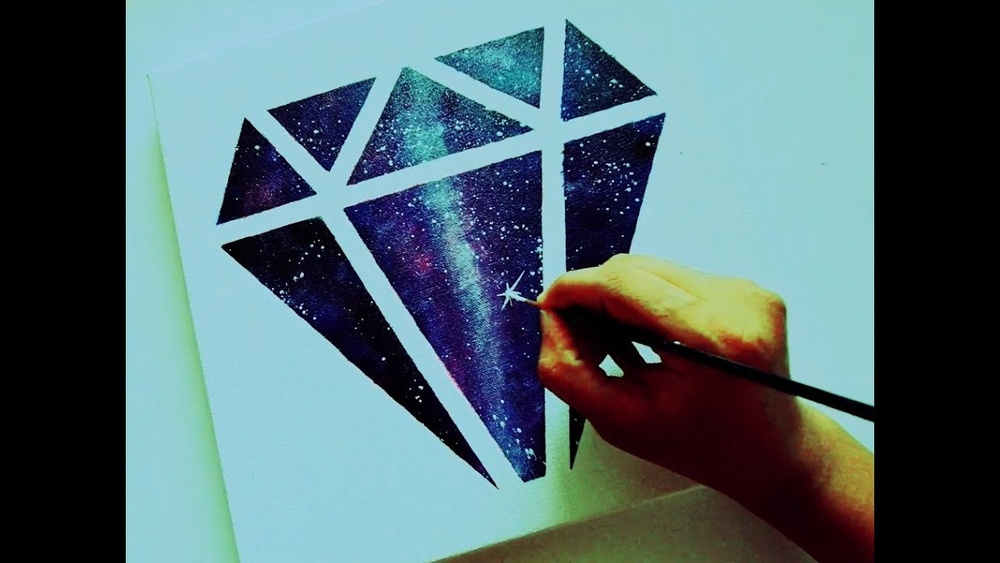
Lay strips of tape across the canvas at random angles, creating triangles and irregular shapes. Fill each shape with a different color. Peel to reveal a stained-glass effect with white lines. One of the most popular tape projects for all ages.
2. Tape-resist names and initials
Spell a name or word in tape on paper or canvas, paint over it with watercolor or acrylic in bright colors, then peel. The white letters stand out against the colorful background. Great for kids’ room decor.
3. Birch tree forest
Place vertical tape strips of varying widths on a canvas. Paint a sunset, a winter sky or a fall background over everything. Peel the tape and add dark bark marks and small branches to the white trunks.
4. Mountain landscape
Tear tape to create jagged mountain ridges. Paint the sky, peel the top tape, then mask and paint successive ranges, each lighter as they recede. The torn tape gives natural, rocky edges.
5. Striped canvas
Tape off evenly spaced stripes and paint alternating colors. Varying stripe widths makes a more modern look.
6. Heart or shape silhouette
Cut a heart, star or other shape from tape or contact paper, stick it in the center of a canvas, and paint around it with splatter or sponging. Peel to reveal the clean shape.
Intermediate Tape Projects
7. Color-block abstract
Tape off overlapping rectangles and fill with a limited palette. Paint one layer, let it dry, re-tape for new shapes that overlap the first, and paint again. Overlaps create new colors if you use transparent paint.
8. Chevron or herringbone pattern
Use a ruler and pencil to mark the zigzag first, then tape precisely along the lines. It takes patience but looks striking.
9. Mosaic tile effect
Lay thin tape in a grid, then fill each small square with slightly different colors, like a mosaic. Use narrow tape (1/4 inch or less) for finer grout lines.
10. Cityscape skyline
Tape rectangular building shapes along the bottom of a canvas, paint the sky, peel, then paint buildings in silhouette or detail. Window grids can be masked with very thin tape.
11. Mondrian-inspired grid
Mask black-line positions, fill selected rectangles with primary colors, then peel and paint the lines black, or tape over the colors and paint the lines.
12. Woven tape pattern
Weave tape strips over and under in a basket pattern on paper, paint over it, and peel for a woven texture effect.
13. Half-and-half canvas
Tape a diagonal across the canvas. Paint one side a solid color and the other with a textured technique, such as sponging or pouring. The crisp division looks contemporary.
Masking Fluid and Watercolor Ideas
14. Starry night sky
Dot masking fluid across watercolor paper for stars, let it dry, then paint a deep blue and purple night sky wet-in-wet. Remove the masking fluid once the paint is fully dry to reveal white stars.
15. Sparkling water highlights
Apply masking fluid in small horizontal dashes where light glints on water. Paint the water, then remove the mask for bright sparkles.
16. Dandelion seeds and grasses
Use a fine brush, ruling pen or toothpick to apply delicate lines of masking fluid for seed heads or grasses before painting a background wash.
17. Snowfall
Flick masking fluid with an old toothbrush for snow, paint the winter scene, then remove.
18. Negative botanicals
Paint ferns, leaves or flowers in masking fluid, wash color over the page, and remove. The botanicals appear as white silhouettes.
Tape Ideas for Walls and Furniture
19. Geometric accent wall
Scale up the triangle canvas idea to a wall. Use a level and painter’s tape, seal edges with the base color, and paint sections in a planned palette.
20. Striped or color-dipped furniture
Tape stripes on a dresser or chair legs, or tape a straight line to create a “dipped” effect at the bottom of table legs. Use a bonding primer first on glossy surfaces.
Step-by-Step: Geometric Triangle Canvas
- Prepare. Use a primed canvas or canvas panel. If you want colored lines instead of white, paint the canvas the line color first and let it dry completely.
- Tape the design. Run tape strips edge to edge across the canvas at different angles until you have 12 to 20 shapes. Wrap tape around the canvas edges for a clean finish.
- Burnish all edges with a card or bone folder.
- Seal the edges with a thin coat of the base color or matte medium. Let dry.
- Choose a palette. Five or six colors in a related family look more refined than a random rainbow. Mix tints by adding white.
- Paint each shape with one color, avoiding placing the same color in adjacent shapes.
- Apply a second coat if needed for opaque coverage.
- Peel the tape slowly, starting with the last strip applied, while the paint is just dry to the touch.
- Touch up any seepage with a small brush and the base color.
Troubleshooting
| Problem | Cause | Fix |
|---|---|---|
| Paint bled under tape | Edge not sealed or burnished; paint too thin and watery | Burnish, seal with base color, use thicker paint |
| Paper tore when peeling | Tape too sticky; peeled too fast or too high an angle | Use low-tack tape, reduce tack on fabric, peel slowly and low |
| Jagged paint edge | Paint dried into a film over the tape | Peel while slightly damp, or score the edge lightly with a craft knife |
| Raised ridge along line | Paint pooled against tape | Use thinner layers; brush away from the edge |
| Residue left behind | Tape left on too long or exposed to heat or sun | Remove sooner; use painter’s tape rated for the needed duration |
| Masking fluid tore paper | Removed before paint dried, or left on too long | Wait until fully dry; remove within a few days |
Planning Colors for Tape Art
Because tape designs divide the surface into many separate shapes, color planning matters more than in a loose painting. A few approaches keep the result cohesive:
- Analogous range: Choose three neighboring hues, such as teal, blue and violet, then add a light tint and a dark shade of each. Nine related colors fill a geometric canvas without clashing.
- Monochrome: One color in five or six values, from nearly white to deep, gives a sophisticated, quiet result.
- One accent: Fill most shapes with neutrals and place a single bright color in two or three shapes to guide the eye.
- Test first: Color a quick pencil sketch of the taped layout on scrap paper before committing to the canvas.
Choosing Tape Width
- 1/8 to 1/4 inch: Fine grout lines, mosaics, windows, lettering.
- 1/2 inch: Geometric canvases and stained-glass effects.
- 3/4 to 1 inch: Bold lines, birch trunks, standard stripes.
- 1.5 to 2 inches: Wall projects, wide stripes, edge protection.
Common Mistakes
- Using household masking tape on watercolor paper. It can tear fibers. Use low-tack artist’s tape.
- Skipping the seal step. It is the single biggest factor in crisp lines.
- Waiting days to remove tape. Adhesive bonds more over time, and paint films become harder to break cleanly.
- Painting too wet. Watery paint wicks under the tape.
- Peeling straight up. Pulling at a steep angle tears paint and paper.
FAQs
What tape is best for painting on canvas?
Painter’s tape with medium adhesion or fine-line vinyl tape gives clean lines on canvas. Burnish the edge and seal it with the base color for the crispest results.
What tape should I use on watercolor paper?
Low-tack artist’s tape or washi tape. Reduce tackiness further by pressing it on fabric before applying, and remove it slowly once the paint is fully dry.
When should I remove painter’s tape from a painting?
For acrylic, peel when the last coat is still slightly damp or just dry to the touch. For watercolor, wait until the paper is completely dry.
How do I stop paint from bleeding under tape?
Burnish the edge firmly, seal it with a thin coat of the background color or clear medium, and use thicker paint applied in thin layers, brushing away from the tape.
How long can masking fluid stay on paper?
Ideally only until the paint is completely dry, and generally no more than a few days. Left longer, particularly in heat or sun, it can bond to the paper and tear it.
Can kids do tape resist painting?
Yes. Tape-resist names, triangle canvases and birch trees are excellent kids’ projects. Use washable paint and low-tack tape so it peels easily without tearing paper.
Next Step
Start with the geometric triangle canvas or a birch forest to practice sealing and peeling, then move on to masking fluid or color-blocking. The quality of your lines depends heavily on the tape itself, so before your next project, check our guide to choosing masking tape for crisp paint lines to match the right tape to your surface.