DIY old tire projects turn scrap rubber into durable, stylish home upgrades.
Have a pile of old tires in the garage, or eyeing that free stack on the curb? You’re sitting on tough, weatherproof material just waiting to become planters, ottomans, swings, pet beds, and garden edging. diy old tire projects save money, reduce waste, and add personality to your space. The rubber is strong, easy to clean, and takes paint well. With simple tools and the right accessories, you can build pro-level results in a weekend. I’ll show you how, and I’ll highlight compact, affordable parts that make prototyping and crafting smoother.
10pcs 20mm Rubber Toy Car Wheels

These 20mm rubber toy car wheels are small, sturdy, and easy to use. They’re designed for hobby models, but they also shine as craft components. I like them for mockups when I sketch new rolling planter stands or mobile storage. The rubber treads grip well on smooth surfaces, which helps when you test movement in mini builds.
For diy old tire projects, these wheels are great for scale prototyping. Build a miniature of your tire caddy or rolling ottoman before you cut wood or drill rubber. You can also add them to small craft bins, doll furniture, or classroom STEM kits. They hold up to repeated use and keep alignment well when mounted on standard axles.
Pros:
- Grippy rubber tread for smooth rolling tests
- Compact size suits STEM kits and craft mockups
- Consistent bores for predictable axle fit
- Lightweight yet durable for repeated trials
- Affordable pack for classrooms and makerspaces
Cons:
- Too small for load-bearing furniture projects
- Requires matching axles not included
- Limited aesthetic variation for decorative crafts
My Recommendation
If you like to plan before you build, this set is ideal. I use them to trial movement for rolling tire planters, toy storage carts, and lazy-Susan-style tire tables. They won’t carry weight, but they help you avoid mistakes. For diy old tire projects, that can save money and time, since tires can be tough to drill and adjust after assembly. These wheels suit teachers, parents, and hobbyists who want low-risk testing and hands-on learning.
| Best for | Why |
|---|---|
| Scale prototyping | Test rolling designs before you commit to full-size builds. |
| STEM education | Hands-on physics and engineering lessons with easy results. |
| Craft mobility | Add mobility to small bins and models for quick demos. |
4pcs 48mm Rubber Tires for RC Models

These 48mm simulation rubber tires are a step up in size and realism. They’re made for RC and toy models, which means better tread detail and a more tactile grip. I use them for decorative accents on mini tire-themed shelves and for teaching how tread affects traction. Their easy installation suits quick builds and weekend projects.
For diy old tire projects, these can become clever props in a garage-themed kids’ room or workshop display. They also help you test caster positions on scale models of rolling tire planters. If you ever design a tire toy bin with wheels, these help you check clearance and turning radius. They’re not furniture-grade casters, but they are perfect as visual aids and functional model wheels.
Pros:
- Realistic tread enhances look and function
- Easy to install for quick prototyping
- Good midsize diameter for scale tests
- Useful for decor in automotive-themed rooms
- Affordable way to try different wheel layouts
Cons:
- Not intended for heavy loads
- Compatibility depends on your axle hardware
- Limited color options
My Recommendation
Pick these if you want your models to look and feel closer to real gear. I recommend them for testing wheel placement on mini rolling tire carts or plant stands. They give you a better sense of grip and spacing without committing to full casters. For diy old tire projects where looks matter, these add realism and flair. They also work as fun room accents in a mechanic or racing theme.
| Best for | Why |
|---|---|
| Realistic model testing | Detailed tread helps simulate traction and cornering. |
| Themed decor builds | Automotive look enhances shelves, frames, and props. |
| Prototype wheel layout | Check clearance and turning radius in small models. |
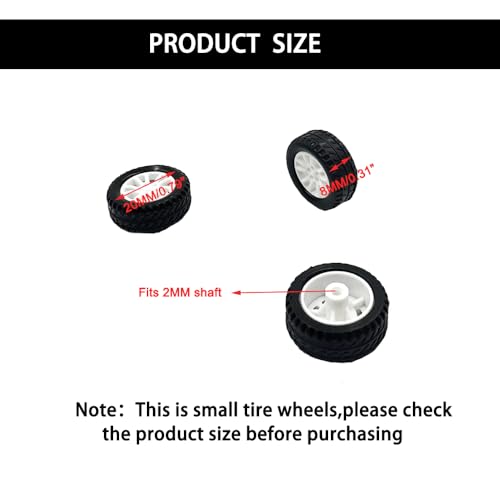
20pcs 20mm Plastic Wheels for 2mm Shafts

These plastic wheels are sized for 2mm shafts, which are common in beginner robotics kits. They’re light, consistent, and easy to work with for classroom builds. I like them for testing simple drive ideas and demonstrating leverage and load distribution. Their uniform size ensures predictable motion in line-following or push-pull experiments.
In diy old tire projects, I use sets like this for scale layout and friction experiments. If you plan a heavy tire ottoman on casters, a mini test can show if the base spacing is stable. These wheels won’t mimic rubber grip, but they roll smoothly on desk surfaces. They’re a smart pick if you run workshops or you mentor kids in makerspaces.
Pros:
- Very lightweight for low-power builds
- Uniform sizing for consistent results
- Great value for bulk classroom use
- Fits standard 2mm shafts used in kits
- Easy surface rolling for quick tests
Cons:
- Plastic tire lacks traction of rubber
- Not suitable for rough surfaces
- No included axles or hardware
My Recommendation
Choose this set if you teach or test often. It shines in STEM classes and quick demos where you need many wheels to go around. For diy old tire projects, it helps you try base designs and weight distribution on a small scale. Use them to teach kids how leverage and stability work before you handle real tires and tools.
| Best for | Why |
|---|---|
| Classroom robotics | Bulk pack suits group projects and practice. |
| Base layout tests | Check spacing and balance in scaled prototypes. |
| Low-friction demos | Smooth rolling shows motion basics without variables. |
50pcs Mini Rubber Tires 1:32 Scale (Black)

This bulk pack of 1:32 scale rubber tires is perfect for scene building and decor crafts. Each tire is small, flexible, and black, which makes them easy to match across projects. I use sets like this to create miniature “garage” scenes, wreaths, and wall art. The rubber texture looks authentic and adds depth to displays.
For diy old tire projects, these mini tires become accents on signs, planters, or storage labels. You can hot-glue them to frames or shadow boxes for themed decor. They also work as tactile fidgets for kids who love cars and trucks. If you do vendor booths or charity builds, these add a fun touch to your setup.
Pros:
- Large quantity for multiple crafts
- Real rubber feel enhances realism
- Flexible and easy to glue
- Great for automotive-themed decor
- Consistent color for clean, unified looks
Cons:
- Not functional for rolling loads
- Small size can be a choking hazard for toddlers
- No tread pattern variety
My Recommendation
Get these if you decorate with a workshop or racing theme. I recommend them for wall art, wreaths, and custom signs that match your bigger builds. They’re also great for labeling bins that hold tire tools or paint. In diy old tire projects, small details like this make your space feel curated and complete.
| Best for | Why |
|---|---|
| Automotive decor | Authentic rubber adds a realistic look and feel. |
| Craft booths and signs | Uniform pieces create clean, themed displays. |
| Classroom projects | Bulk pack suits group crafts and dioramas. |
Black Rubber Super Glue, Waterproof, Heat-Resistant

This black rubber super glue is a workhorse for tough materials. It bonds rubber, shoes, belts, foam, and many plastics. The formula is waterproof and heat-resistant, which matters outdoors and in garages. I use it to fix minor tire surface cuts, attach trim, and seal fabric wraps on tire ottomans.
For diy old tire projects, a rubber-safe adhesive is vital. Screws and bolts handle structure, but glue finishes and details. This glue sets fast, holds tight, and blends in with black rubber. It’s also helpful for speaker surrounds, tool grips, and quick patch work on non-pressurized rubber parts.
Pros:
- Strong bond on rubber and flexible materials
- Waterproof and heat-resistant for outdoor builds
- Black color hides well on tire surfaces
- Fast setting for quick progress
- Works on foam, fabric, and plastics
Cons:
- Not for structural load-bearing joints
- Can be messy without precision tips
- Short open time requires quick placement
My Recommendation
This is my go-to adhesive for finishing work on tire crafts. Use screws and bolts for strength, then use this glue to secure wraps, labels, and trim. It helps you get clean lines on planters, swings, and storage builds. In diy old tire projects, a rubber-safe glue speeds up detail work and improves durability outdoors.
| Best for | Why |
|---|---|
| Outdoor decor | Waterproof bond stands up to rain and sun. |
| Finishing touches | Black adhesive blends into tire surfaces. |
| Quick repairs | Fast set handles small fixes in minutes. |
How to Plan and Build Smart diy old tire projects
I love the value inside an old tire. It’s strong, flexible, and made for weather. That makes it perfect for planters, swings, ottomans, dog beds, and storage. The key is to plan a simple structure and use the right tools. I start with a scale sketch or model before I cut anything.
Clean the tire first. Scrub with soapy water, rinse well, and let it dry. For deeper cleaning, a diluted degreaser helps lift off road grime. If you’ll paint, scuff the surface with 120–150 grit sandpaper. Wipe dust away and use a primer that sticks to rubber. Exterior acrylic latex paint holds up well outside.
Drill drainage holes if you’re making a planter. Use a sharp bit and go slow to avoid tearing. For ottomans and tables, attach a round plywood base with lag screws and fender washers. Pre-drill the rubber to lower resistance. Always use eye protection and gloves. Rubber edges can be tough and springy.
For seating, wrap the top with strong rope or fabric. I like braided cotton rope for a soft look. You can glue the first coil, then screw the end to the base underneath. Add felt feet or casters to protect floors. If you use casters, choose sizes rated for your total weight. Four casters spread the load better than three.
Tire swings are classic. Pick a sound tire with no deep cracks. Drill small drain holes at the bottom so rain doesn’t sit. Use rated chain, quick links, and a strong tree limb or beam. Always follow weight ratings. Check the setup every season. Safety is part of the fun when you plan right.
For pet beds, add a plywood base and a washable cushion. Sand sharp edges. Paint with non-toxic, low-VOC paint once cured. Pets love the cozy curve of a tire. It holds warmth and gives a den-like feel. It’s an easy first project and a big crowd-pleaser.
Garden edging is another win. Cut tires into strips and anchor them with landscape spikes. The rubber curves around beds and resists rot. Paint edges for a bright border. For a raised planter, stack two or three tires. Line with landscape fabric and fill with soil. Tough, fast, and ready for tomatoes.
Storage ideas are endless. Mount a tire to the wall as a hose reel. Turn a tire into a toy bin with a plywood lid. Add rope handles for easy lift. For a garage shelf, bolt two tires to the wall and add planks between them. It’s strong, stylish, and made from free material.
If you prototype first, those mini wheels shine. Map how a rolling tire planter should move. Check caster spacing, turning radius, and grip. Then scale up with confidence. You’ll cut fewer boards and drill fewer holes. Simple models can save real money and frustration.
Always think about placement and weather. Rubber handles rain, but paint fades in harsh sun. Use UV-resistant outdoor paint and clear coats rated for exteriors. In cold climates, add more drain holes and raise planters on blocks. Airflow prevents mold and keeps roots happy.
Cost, Tools, and Time: What to Expect
diy old tire projects are budget-friendly. Many tires are free or cheap at local shops. Ask if they have take-offs that can’t be reused on cars. Most shops recycle, but they often let DIYers take a few. Make sure they’re clean and safe to handle.
Basic tools do the job. A drill with sharp bits, utility knife, jigsaw with coarse blades, sanding block, and a ratchet set get you far. Add a staple gun, rope, and outdoor paint for decor. Have heavy-duty gloves and eye protection ready. Rubber fights back when cut.
Time depends on scope. A painted planter is a half-day project with drying time. A rope-wrapped ottoman can take a day or weekend. A swing is a few hours after you gather hardware. Plan your steps and set up a clean workspace. A tarp keeps dust and paint in check.
On finish materials, invest in good rope and paint. Cheap rope frays fast outdoors. Exterior acrylic latex and a bonding primer make paint stick. For glues, choose rubber-safe options like the black rubber super glue above. It keeps trims and wraps tight in heat and rain.
Design Tips that Make Tire Projects Look Pro
Pick a style first. Rustic, modern, coastal, or industrial all work with tires. For rustic, use sisal rope and matte paint. For modern, go black or white with clean lines. Coastal pops with blues and bleached rope. Industrial likes metal accents and caster wheels.
Keep your palette simple. Two or three colors look best. Repeat the tire’s black tone in hardware or frames. Add texture with rope, wood, and plants. Balance heavy rubber with soft cushions and fabric. The mix feels designed, not improvised.
Hide seams smartly. Start rope wraps on the underside and finish them with clean cuts. Use tape to bind rope ends before you cut, then glue quickly to avoid fray. For paint, thin coats beat thick ones. Let each coat dry as recommended to prevent tackiness.
Label your builds. Mini rubber tires from the 1:32 pack are cute labels for bins. Write on them with paint pens and glue them to boxes. Kids love them. They make cleanup a game. That’s a win in any busy home or garage.
Safety and Sustainability Notes
Use safe paints and adhesives. Many exterior paints are low-VOC now. Let finishes cure before indoor use. If you cut steel-belted tires, watch for wire. Wear gloves and eye protection. A multi-tool with metal blades can help. Take your time.
Tires last a long time outside. That’s good for durability. It’s also why reuse matters. Upcycling extends life and keeps rubber out of landfills. When a project ends, many parts can be reused again. Plan for disassembly when you build. Screws beat permanent bonds when possible.
For planters, add a barrier between soil and rubber if you prefer. Landscape fabric works well. Good drainage prevents stagnant water. Rinse the tire before growing edibles and use quality potting mix. Healthy roots make healthy plants. Maintenance is simple and seasonal checks go fast.
Real-World Project Ideas You Can Build This Weekend
Painted tire planter: Clean, drill 6–8 drain holes, prime, paint, and plant. Add a rope handle for style. Use masonry blocks to elevate it. You’ll improve airflow and keep decks dry. It looks great on patios.
Rope ottoman: Cut a round plywood top and bottom. Bolt through the tire with fender washers. Wrap the top with cotton rope. Add felt feet. It’s sturdy, soft, and easy to move. Perfect for living rooms.
Hanging tire swing: Pick a solid limb or beam. Drill drain holes. Use rated chain and hardware. Hang level. Test with your own weight. Swings are pure joy and a classic backyard piece.
Wall hose reel: Bolt a tire to studs with lag bolts. Slip the hose inside. It keeps shape and avoids kinks. Paint to match the home. Simple, rugged, and always ready.
Garage shelf: Mount two tires side by side. Slide stained boards through. Bolt boards to the tires. It holds tools and bins with style. Add LED strip lights for a pro look.
Dog bed: Cut a plywood circle, glue a cushion, and paint. The curve hugs your pet. Clean is easy with a removable cover. Pets take to it fast. It’s cozy and durable.
FAQs Of diy old tire projects
Are old tires safe to use for planters and furniture?
Yes, when cleaned and finished well. Use exterior paint, add drainage, and let coatings cure. For edibles, line with landscape fabric if you prefer.
What paint sticks best to tires?
Use a bonding primer and exterior acrylic latex paint. Sand lightly first. Apply thin coats and allow full dry time for a tough finish.
How do I cut a tire safely?
Use a sharp utility knife for sidewalls and a jigsaw or multi-tool for tough areas. Wear gloves and eye protection. Go slow and support the tire.
Do I need special hardware for tire swings?
Yes. Use chain and connectors rated for the load, plus a healthy limb or beam. Add drain holes and check the setup seasonally.
How do I stop planters from holding water?
Drill several drain holes and raise the planter off the ground. Add gravel or mesh inside to keep soil from blocking holes.
Final Verdict: Which Should You Buy?
For testing and decor, the 10pcs 20mm Rubber Toy Car Wheels and 20pcs Plastic Wheels are great for prototypes and classes. The 4pcs 48mm Rubber Tires add realistic traction for better scale trials and themed builds.
For finishing diy old tire projects, the Black Rubber Super Glue is essential. For decor accents, the 50pcs Mini Rubber Tires complete the look. Choose based on your project stage: plan, build, then finish strong.