
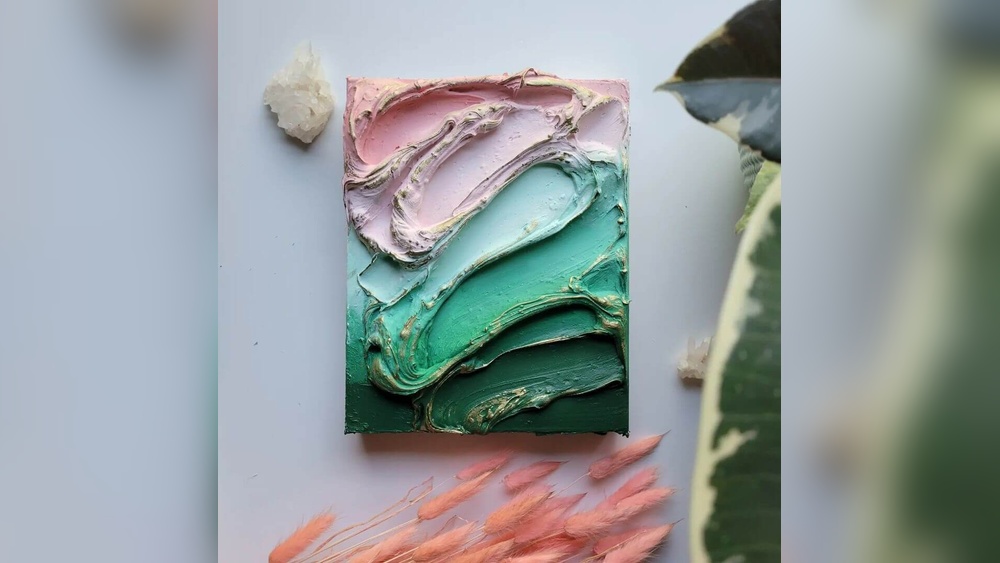
Some of the most effective texture tools are already in your kitchen drawer: a fork, a scrap of plastic wrap, a dish sponge, an old credit card. If you are figuring out how to create texture with acrylic paint without investing in a shelf of specialty products, the techniques below show what each tool does, how to use it, and which subjects it suits.
Quick answer: You can create texture with acrylic paint by changing how you apply it: palette knife strokes, dry brushing, sponging, stippling, scraping with a card, pressing plastic wrap or bubble wrap into wet paint, combing grooves, and scratching through layers (sgraffito). For raised texture, mix thick paint with a little gel medium or add clean sand. Most of these take minutes and work on canvas, board or heavy paper.
Two Ways to Think About Texture
Every technique here falls into one of two groups. Applied texture comes from the tool you use to put paint down: the drag of a dry brush, the dab of a sponge, the ridge left by a knife. Impressed texture comes from pressing something into wet paint or removing paint, like plastic wrap, a fork or a scraper.
Knowing which group a technique belongs to helps you plan. Applied textures can be layered over dry paint at any stage. Impressed textures need wet paint, so you have to work quickly, usually within 5–15 minutes depending on paint thickness and room conditions. Thicker, well-pigmented paint holds both kinds of mark better, which our guide to choosing acrylic paint explains in more detail.
Quick Comparison of Easy Texture Techniques
| Technique | Tool | Paint needs to be | Looks like | Difficulty |
|---|---|---|---|---|
| Palette knife | Painting knife | Thick | Ridges, rocks, waves | Easy |
| Dry brush | Stiff brush | Thin layer of paint, dry brush | Grass, wood, fur, clouds | Easy |
| Sponging | Natural or kitchen sponge | Medium | Foliage, stone, galaxies | Very easy |
| Stippling | Stiff round or stencil brush | Medium | Sand, skin, leaves | Easy |
| Card scraping | Old gift card | Medium to thick | Abstract streaks, layered rock | Easy |
| Plastic wrap | Kitchen cling film | Wet, slightly fluid | Crystals, ice, marble | Easy |
| Bubble wrap | Packing material | Wet | Scales, honeycomb, dots | Very easy |
| Combing | Fork or comb | Thick | Grain, fields, lines | Easy |
| Sgraffito | Brush handle, toothpick | Top layer wet over dry base | Grass, hair, patterns | Moderate |
| Spatter | Toothbrush | Thin | Stars, sand, speckles | Very easy |
How to Create Texture With Acrylic Paint: 10 Techniques
1. Palette knife strokes
Load the underside of a painting knife with thick paint, set it flat on the canvas, and drag or press so paint squeezes out at the edges. Lifting the knife straight up leaves peaks; twisting it leaves curved ridges. This is the quickest way to get raised, sculptural texture.
- Best for: waves, rocks, mountains, impasto flowers.
- Tip: Use paint straight from a heavy-body tube or thickened with gel. Fluid paint just slides off.
2. Dry brushing
Dip a stiff, dry brush into paint, wipe most of it off on a paper towel, then lightly drag the brush across a dry layer. The paint catches only on the high points of the canvas weave or previous layers, leaving a broken, scratchy texture.
- Best for: grass, weathered wood, animal fur, wispy clouds.
- Tip: If strokes look solid, there is too much paint on the brush. Wipe more off.
3. Sponging
Dampen a sponge, squeeze it out, dab it into paint, and blot off the excess. Tap it onto the surface with an up-and-down motion. Natural sea sponges give irregular, organic marks; kitchen sponges give tighter, more uniform ones.
- Best for: tree foliage, lichen-covered stone, galaxy clouds, backgrounds.
- Tip: Layer two or three values, dark to light, letting each dry briefly between passes.
4. Stippling
Hold a stiff round brush vertically and tap the tip straight down repeatedly. The density of dots controls how dark or textured the area looks.
- Best for: sand, gravel, skin pores, distant leaves.
- Tip: An old, splayed brush stipples better than a new pointed one.
5. Scraping with a card
Put a few blobs of color on the canvas and pull an old gift card or plastic scraper across them in one smooth motion. Colors streak and partially blend, revealing layers underneath.
- Best for: abstract backgrounds, layered rock strata, rain-streaked glass.
- Tip: Scrape over a dry, contrasting base so lower layers peek through.
6. Plastic wrap
Paint an area with slightly fluid paint, lay crinkled plastic wrap on top, and press it gently into the paint. Leave it until the paint is mostly dry, then peel it off. The folds leave sharp, crystalline lines.
- Best for: ice, marble, crystal, abstract backgrounds.
- Tip: Bunch the wrap more for small, busy patterns and less for larger, smoother shapes.
7. Bubble wrap stamping
Brush paint onto the bubbled side of bubble wrap and press it onto the canvas, or press clean bubble wrap into wet paint. Lift straight up.
- Best for: fish or dragon scales, honeycomb, polka-dot patterns.
- Tip: Small-bubble wrap looks more refined than large packing bubbles.
8. Combing and fork lines
Spread a thick layer of paint, then drag a fork, wide-tooth comb or notched piece of cardboard through it. Straight drags look like wood grain or plowed fields; wavy drags look like water or hair.
- Best for: wood, fields, water, abstract patterns.
- Tip: Work quickly before the paint skins over.
9. Sgraffito
Paint a base color and let it dry. Add a contrasting top layer, then while it is still wet, scratch lines through it with the end of a brush handle, a toothpick or a skewer to reveal the base color.
- Best for: grass blades, hair, fur, decorative patterns, signatures.
- Tip: A slightly thicker top layer gives cleaner scratches.
10. Spattering
Thin paint to an ink-like consistency, load an old toothbrush, and run your thumb across the bristles to flick fine droplets onto the surface. Mask areas you want to protect with paper.
- Best for: starry skies, sand, speckled stone, snow.
- Tip: Test on scrap first; the first flick is often heavier.
Adding Raised Texture Without Specialty Tools
The techniques above mostly create surface texture. For real raised relief, you need thicker material.
- Heavy-body paint: Holds knife and brush marks well. It is the simplest route to raised texture.
- Gel medium: Mix with paint to thicken it, stretch it further and reduce shrinkage as it dries.
- Modeling paste: Spread with a knife, texture while wet, let dry, then paint over.
- Clean sand: Stir fine, dry sand into paint or gel for a gritty surface.
- Tissue paper: Crumple, flatten, and glue down with gel or matte medium for a wrinkled base before painting.
Whichever you choose, let raised layers dry through before painting over them, which can take a day for thick passages. Paint consistency also varies by brand, so check whether a tube is labeled heavy body before relying on it for raised effects.
Heavy Texture Acrylic Paint: Which Consistency Works Best?
| Paint type | Holds texture? | Use it for |
|---|---|---|
| Heavy body | Yes, holds peaks and ridges | Knife work, combing, impasto |
| Soft body | Moderately | Sponging, stippling, dry brushing |
| Fluid | No raised texture | Plastic wrap, washes, spatter |
| Craft acrylic | Little | Sponging, stamping, decorative projects |
A Simple Textured Landscape, Step by Step
This exercise uses five techniques on one 11×14 inch canvas so you can see how they work together.
- Sky: Paint a blue gradient. While wet, press plastic wrap into the upper corner for wispy texture, then remove it once mostly dry.
- Mountains: Use a palette knife to drag gray-blue paint across the middle, leaving ridges on the peaks.
- Trees: Sponge dark green shapes along the mountain base, then sponge a lighter green on top for highlights.
- Field: Paint a thick layer of yellow-green and comb it with a fork in curved lines that narrow toward the horizon.
- Grass: Once the field is dry, add a darker green layer at the bottom and scratch grass blades through it with a brush handle.
- Finish: Dry brush pale yellow over the mountain ridges and field for sunlight, and spatter a few white flecks across the sky if you want a hint of mist.
Combining Techniques Effectively
- Contrast textured and smooth areas. If everything is textured, nothing stands out. Keep skies or backgrounds smoother so foreground texture reads clearly.
- Use texture where the eye should go. Heavier texture naturally draws attention.
- Bigger texture in the foreground. Large, bold texture up front and finer texture in the distance strengthens depth.
- Glaze over texture. A thin, transparent layer settles in recesses and makes texture pop. Highly fluid acrylic inks work well for this; the Daler-Rowney acrylic ink review covers how an ink glaze behaves over dry layers.
Choosing a Surface for Textured Acrylic Work
The surface underneath affects which texture techniques work. A flexible surface can crack thick paint, while a very absorbent one shortens the window for impressed techniques.
- Stretched canvas: Fine for sponging, dry brushing, spatter and moderate knife work. The weave itself adds a subtle texture that catches dry-brushed paint.
- Canvas panels and hardboard: Rigid, so they suit heavier knife work and modeling paste. Smooth hardboard shows plastic wrap and sgraffito marks crisply.
- Wood panels: Sturdy and good for heavy texture once primed with gesso.
- Heavy paper: Works for sponging, stippling and spatter. Thick paint can buckle thin paper, so use 140 lb or heavier and tape it down.
Cleaning and Caring for Texture Tools
Acrylic dries into a plastic film, so tools need cleaning before the paint sets.
- Palette knives: Wipe with a paper towel while wet. Dried paint usually peels off metal blades with a fingernail.
- Sponges: Rinse in warm, soapy water immediately and squeeze until the water runs clear. Once acrylic dries inside a sponge, it hardens and cannot be restored.
- Brushes: Keep a jar of water nearby and rinse often, especially the area near the metal ferrule where paint builds up.
- Plastic wrap and bubble wrap: Treat as single-use for best results; dried paint changes the pattern.
- Combs and forks: Soak briefly in warm water, then scrub with an old toothbrush.
Common Mistakes With Acrylic Texture
- Waiting too long for impressed techniques. Plastic wrap, combing and sgraffito need wet paint.
- Loading too much paint for dry brushing. It turns into ordinary brushwork.
- Making texture too uniform. Vary pressure, direction and size so it looks natural.
- Using thin paint for raised effects. Fluid paint flattens out.
- Building very thick paint in one go. It can crack as it dries; build in layers.
- Forgetting to clean tools. Dried acrylic ruins sponges, combs and brushes. Rinse right away.
Tips by Skill Level
Beginners
Start with sponging, stippling and spatter. They are forgiving and give immediate results. Practice each on a scrap canvas board before using it in a painting.
Intermediate
Add palette knife work, plastic wrap and sgraffito. Focus on using texture to describe a surface, such as bark that follows the direction of the trunk.
Advanced
Combine raised mediums with impressed texture, glazes and dry brushing in a single piece. Plan texture zones from the start as part of the composition.
Related Reading
FAQs
What household items can I use to add texture to acrylic paintings?
Sponges, plastic wrap, bubble wrap, forks, combs, old credit cards, toothbrushes, toothpicks, crumpled paper, and lace or mesh as stencils all work well.
Do I need texture medium for acrylic painting?
Not for surface texture like sponging or dry brushing. For raised texture that holds its shape, a texture medium such as gel or modeling paste gives better, more durable results than paint alone.
Can I add sand to acrylic paint for texture?
Yes. Use clean, fine, completely dry sand and mix it into paint or gel medium so every grain is coated. Loose sand can flake off.
How do I make acrylic paint thicker for texture?
Use heavy-body paint, mix in gel medium, or add modeling paste. Avoid thickening with household products like flour or cornstarch, which can weaken the film and may degrade over time.
Why does my textured acrylic paint crack?
Cracking usually happens when thick paint dries too fast on the surface while the inside is still wet, or when heavy paint sits on flexible canvas. Build in thinner layers and avoid heat.
What is the best way to add texture for beginners?
Sponging and dry brushing are the easiest starting points. They need no special materials and work over dry paint, so there is no rush.
Final Thoughts
Texture is often less about expensive materials and more about how you move paint. Start with one or two simple tools, practice on scraps, and combine techniques with smooth passages for contrast.
Thicker, well-pigmented paint holds knife marks and combed lines much better than thin craft paint. When you are ready to choose paint that supports these techniques, check our guide to the best acrylic paint for textured, expressive work.





One Comment