
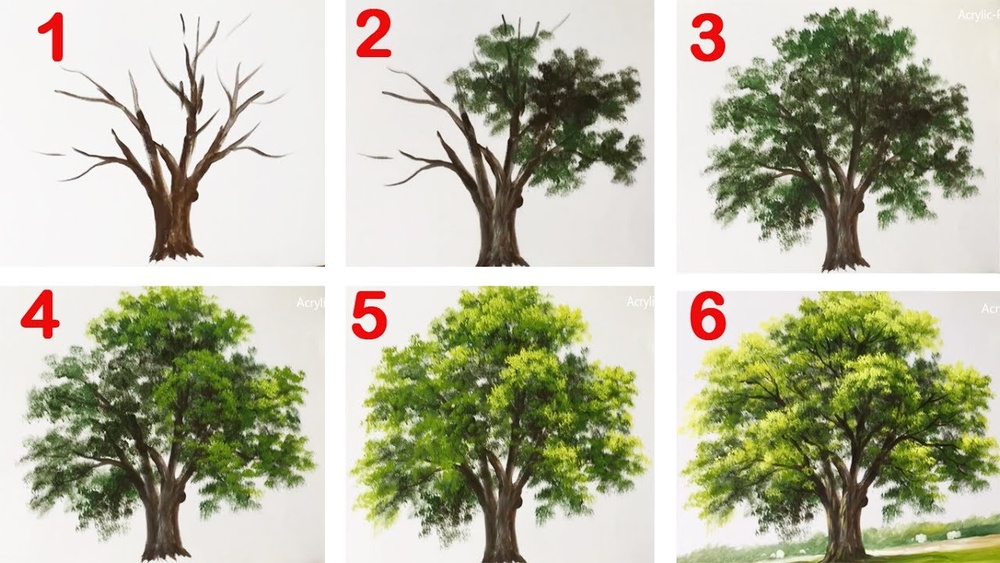
Quick answer: Learning how to paint trees with acrylic step by step means working from dark to light: paint the trunk and main branches in a dark brown-gray, block in the foliage as a few large clumps of dark green, then build lighter greens on the sun-facing side of each clump with a dabbing or stippling motion. Finish with sky holes punched through the canopy and a few fine twigs. Big shapes first, small details last.
Most beginner trees look like lollipops: a straight brown stick holding up a green ball. The fix is not more detail. It is a better understanding of how trees are built and a painting order that matches it. When you paint the structure first and the light last, even a quick tree starts to look three-dimensional.
This tutorial covers how to paint trees with acrylic paint step by step, starting with a full deciduous tree, then moving to pines, distant tree lines and seasonal variations. Every stage uses basic brushes and a short list of colors.
Understand Tree Structure Before You Paint
Five observations will change your trees more than any brush trick:
- Trunks taper. A trunk is widest at the base, often flaring where roots enter the ground, and narrows as it rises.
- Branches get thinner each time they split. A branch is never thicker than the limb it grows from. Every fork produces two thinner limbs.
- Branches grow up and out, not straight sideways. Most deciduous limbs angle upward before curving outward.
- Foliage grows in clumps. A canopy is a cluster of rounded masses, each with a light side and a shadow side, not one solid ball.
- Sky shows through. Gaps in the canopy let light through. These “sky holes” are what make a tree look airy rather than solid.
Spend five minutes sketching a real tree outside your window or from a photo before you paint. Notice where the trunk splits and how many large foliage masses you can see. Usually there are three to seven.
Materials for Painting Trees in Acrylic
Colors
A practical tree palette includes titanium white, a lemon yellow, yellow ochre, sap or hooker’s green type, phthalo or ultramarine blue, burnt sienna, burnt umber and a little purple. You can mix most greens from blue and yellow, and dull them with a touch of red or burnt sienna so they look natural rather than candy-bright.
Brushes
- Size 8 to 12 flat or filbert for trunks and blocking in foliage masses.
- Round size 4 to 6 for main branches.
- Liner or rigger brush for twigs and fine branches.
- Fan brush or an old, splayed round for stippling leaves and pine needles.
- Sea sponge (optional) for fast, textured foliage.
Surface and paint body
A primed canvas panel, 9×12 inches or larger, gives you room for a full tree. Heavy-body paint holds the dabbed texture of leaves well, while softer paint flows better for long, tapering twigs. A mix of both works nicely. To compare how different paint lines handle texture and opacity, see our roundup of the top acrylic paint brands for landscape work.
How to Paint Trees in Acrylic: Full Step-by-Step Tutorial
This is the core method for a single deciduous tree, such as an oak or maple in summer. Allow 60 to 90 minutes.
Step 1: Paint the background
Paint the sky and ground first and let them dry. A simple gradient from pale blue at the horizon to a deeper blue at the top works well. Painting the tree over a dry background keeps your edges clean and avoids muddy greens.
Step 2: Sketch the trunk and main limbs
With a thinned brown or a pencil, mark the trunk and its two to four main limbs. Place the tree slightly off center. A tree in the exact middle of the canvas tends to look static.
Step 3: Paint the trunk
Mix burnt umber with a touch of ultramarine for a cool, dark brown. Real bark is rarely warm chocolate brown; it reads as gray-brown. Paint the trunk with a flat brush, wide at the base and narrowing as you go up. Flare the base slightly into the ground.
Step 4: Add the main branches
Switch to a round brush. Pull branches outward from the trunk using a single stroke that starts with pressure and lifts off as you move outward. That lift creates a natural taper. Keep each branch thinner than the one it grows from.
Step 5: Block in the dark foliage masses
Mix a deep green from phthalo or ultramarine blue, a little yellow and a touch of burnt sienna. Using a filbert or sponge, dab in the three to seven foliage clumps. Keep the edges irregular. Leave some branches visible between clumps, and leave a few gaps for sky.
Step 6: Add mid-tone greens
Lighten the dark green with more yellow. Decide where the light is coming from, then dab this mid-tone on the upper, sun-facing part of each clump. Leave the lower and inner areas dark. This step is where the tree starts to look round.
Step 7: Add highlights
Mix yellow, a little white and a speck of your green. Stipple small touches on the very top edges of the clumps facing the light. Use far less highlight than you think; it should cover maybe 10 to 15 percent of the canopy.
Step 8: Punch sky holes
Using your sky color, dab small irregular openings into the canopy, especially near the edges. Sky holes break up the solid mass and make the tree feel airy. Keep them varied in size.
Step 9: Add twigs and connecting branches
Thin your dark brown to an ink-like consistency and load a liner brush. Draw a few small branches inside the sky holes and around the edges of the canopy, connecting the foliage to the trunk.
Step 10: Ground the tree with a shadow
Paint a cast shadow on the ground opposite the light source, using a dull green or blue-gray. Add a few flicks of grass around the base so the trunk does not look stuck on top of the ground.
How to Paint Trees With Acrylics for Beginners: Simplified Version
If the full method feels like too much, this shorter version still avoids the lollipop look:
- Paint the trunk in one dark stroke, wide at the bottom, thin at the top.
- Add three branches angled upward.
- Dab dark green in three clumps using a sponge or crumpled paper towel.
- Dab a lighter green on the top of each clump only.
- Add four or five sky holes with your background color.
That is it. Five steps, three colors plus white, and a tree that has a light side, a dark side and some breathing room.
How to Paint Pine and Evergreen Trees
Evergreens follow a different structure: a straight central trunk with layered, downward-sloping branches that get wider toward the bottom.
- Draw a vertical line for the trunk with a liner brush.
- Load a fan brush with dark blue-green and tap it lightly along the top of the trunk to form the narrow tip.
- Work downward in tiers, pressing the fan brush and pulling outward and slightly downward on both sides. Each tier should be wider than the one above.
- Leave small gaps between tiers so the trunk occasionally shows.
- Highlight one side with a lighter green tapped sparingly onto the tips of the branches.
For snowy pines, add white on the upper surfaces of each tier after the green dries.
How to Paint Trees in the Distance in Acrylic
Distant trees should not be painted the same way as foreground trees. Atmospheric perspective means objects farther away appear lighter, bluer, less saturated and less detailed.
| Distance | Color approach | Detail level | Brush |
|---|---|---|---|
| Far background | Pale blue-gray green, close to sky value | Silhouette only, soft top edge | Flat, dabbed lightly |
| Middle ground | Muted mid-green with a little blue | Suggest clumps, no branches | Filbert or sponge |
| Foreground | Full-strength darks and warm highlights | Trunks, branches, sky holes, texture | All brushes |
Paint the far trees first, then work forward. Each layer overlaps the one behind it, which naturally creates depth. A row of soft, pale tree shapes along the horizon can do more for a landscape than one perfectly detailed oak.
Seasonal Tree Colors
The same structure works for every season; only the palette and foliage density change.
- Spring: Light yellow-greens, sparse foliage, many sky holes. Blossoms in soft pink or white dabbed over the green.
- Summer: Full, dense canopy in deep and mid greens, strong value contrast between shadow and light.
- Autumn: Dark base in burnt sienna and a deep red, mid-tones in orange, highlights in yellow. A few leaves scattered on the ground.
- Winter: Bare branch structure only. This is the best season to practice branching because nothing hides your mistakes.
How to Paint Grass Under Trees With Acrylics
Grass is usually what makes a tree feel planted. Paint a base layer of mid-green on the ground. While it dries, mix a darker and a lighter green. With a fan brush held vertically, flick upward strokes of the dark green near the base of the tree and in shadow areas. Then flick lighter strokes in sunlit patches. Keep the strokes shorter and smaller as the ground recedes toward the horizon.
Common Mistakes When Painting Trees
| Mistake | Why it looks wrong | What to do instead |
|---|---|---|
| Straight, parallel-sided trunk | Real trunks taper and flare | Wide at base, narrow toward top |
| Branches thicker than the trunk | Breaks the growth logic | Each fork gets thinner |
| Solid green ball canopy | No form or light | Separate clumps with light and shadow sides |
| Bright, pure green from the tube | Looks artificial | Dull greens with a touch of red or burnt sienna |
| Too many highlights | Flattens the form | Keep highlights to the top edges only |
| No sky holes | Tree looks heavy and solid | Dab background color into the canopy |
Tips by Skill Level
Beginner
Practice winter trees first. Paint ten bare trees on a sheet of mixed-media paper, focusing only on taper and branching. Then add foliage to your best three.
Intermediate
Work with a limited palette of ultramarine, yellow ochre, burnt sienna and white. Mixing greens from these forces natural, harmonious color. Try painting the same tree at morning, midday and evening light.
Advanced
Introduce reflected light: a slightly cooler, bluish tint on the shadow side of foliage picks up sky color. Experiment with thin glazes over dried foliage to unify color temperature across the whole tree.
Pigment strength makes these subtle mixes easier. A well-pigmented artist-quality line gives cleaner greens and more opaque highlights. Our Daler-Rowney acrylic paint review looks at how one widely available range performs in coverage and mixing.
FAQs
What brush is best for painting trees in acrylic?
A filbert or flat brush handles trunks and foliage masses, a liner or rigger brush handles twigs, and a fan brush is useful for stippling leaves, grass and pine branches. A natural sea sponge is a fast alternative for textured foliage.
How do you make acrylic trees look realistic?
Taper the trunk and branches, group foliage into clumps with a light and dark side, dull your greens slightly with a warm color, and leave sky holes in the canopy. Paint distant trees paler and less detailed than foreground trees.
What color should tree trunks be?
Most trunks read as gray-brown rather than warm brown. Mix burnt umber with a little ultramarine blue, then add lighter gray or ochre on the sunlit side.
Should you paint the tree or the background first?
Paint the background first and let it dry. Painting the tree over a dry sky keeps edges crisp and lets you add sky holes with the same background color later.
How do I paint acrylic tree leaves without a sponge?
Use an old round or filbert brush with splayed bristles, or a fan brush, and dab or stipple with the tip. A crumpled paper towel or plastic wrap also creates leaf texture.
How long does it take to paint a tree in acrylic?
A simple beginner tree takes around 20 to 30 minutes. A detailed foreground tree with layered foliage and branches usually takes one to two hours, including drying time between layers.
Next Step
Trees reward repetition. Paint a page of bare winter trees to master taper and branching, then a page of foliage clumps, then combine them into a full landscape with trees at three distances. The structure-first, light-last order carries over to bushes, hedges and forests.
Your paint influences how easily those dark-to-light layers build up, especially when you need opaque highlights over dark greens. Browse our comparison of acrylic paints with strong coverage and clean mixing to find a range that fits your budget and style.




One Comment