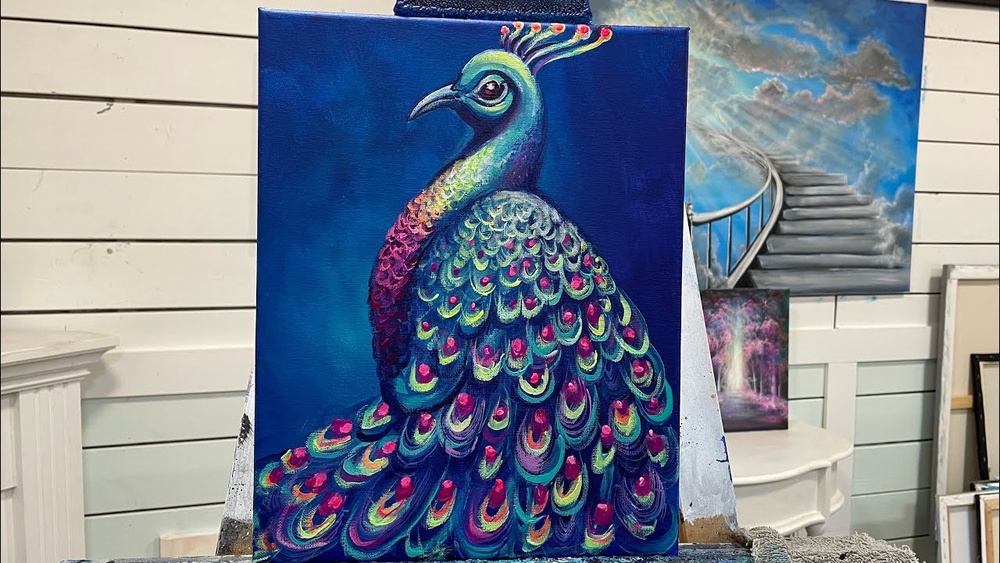
Quick answer: To paint a peacock with acrylics, sketch the body as an S-curve with a teardrop head, block in the neck with phthalo blue and phthalo green, then build the tail as a fan of overlapping “eye” feathers painted from the outer edge inward. Each eye is a stack of shapes: a dark navy center, a turquoise ring, a bronze or gold ring and a green outer halo, finished with fine, flicked barbs. Work dark to light, let each layer dry for 10 to 20 minutes, and save metallic or interference highlights for the very end.
A peacock looks intimidating because of the tail, but the tail is really one small motif repeated dozens of times. Once you can paint a single convincing eye feather, the rest is patience and placement. The body and neck, which carry most of the color intensity, take less time than most people expect.
This guide on how to paint a peacock with acrylics walks through the full process on a canvas around 16×20 inches: planning, palette, the body, the eye feathers, the fine barbs and the finishing glazes. Timings assume medium-viscosity paint and a room at normal humidity.
Supplies for Painting a Peacock in Acrylic
You don’t need a huge kit, but you do need a few strong, transparent colors. Peacock blues and greens look lifeless when they’re mixed from weak, chalky pigments, so this is one subject where paint quality shows immediately.
- Surface: stretched canvas or a primed panel, 12×16 to 16×20 inches. Smaller than 11×14 makes the eye feathers fiddly.
- Brushes: a 1-inch flat for the background, a size 8 and size 4 round, a size 2 liner or rigger for barbs, and a small fan brush (optional) for soft tail texture.
- Palette knife for mixing clean piles of color.
- Stay-wet palette or a misting bottle, because you’ll keep several blues and greens open for an hour or more.
- Glazing medium or a slow-dry (retarder) medium for transparent layers on the neck.
- Optional: iridescent or interference medium, metallic gold or bronze, and acrylic ink for crisp detail lines.
The peacock palette
Keep this list short. Every extra color is another chance to make mud.
| Color | Role in the painting | Mixing note |
|---|---|---|
| Phthalo blue (green shade) | Neck, eye centers, deep tail shadows | Extremely strong; add in tiny amounts |
| Phthalo green (blue shade) | Tail halos, neck transitions | Mix with phthalo blue for teal |
| Ultramarine blue | Darker, warmer blue for the body underside | Mix with burnt umber for a near-black |
| Cobalt teal or turquoise | Bright rings in the eye feathers | Can be mixed: phthalo blue + phthalo green + white |
| Yellow ochre | Bronze ring, warm feather shafts | Add burnt sienna for copper |
| Burnt sienna and burnt umber | Shafts, wing browns, shadows | Umber + ultramarine makes rich darks |
| Hansa or lemon yellow | Brightening greens | Phthalo green + lemon makes a vivid lime |
| Titanium white | Highlights, tints | Use sparingly in the neck to keep saturation |
Phthalo pigments are the backbone of a peacock. They’re transparent and intensely saturated, which lets you glaze them over each other to get that jewel-like depth. If your current set only has a generic “blue” and “green,” it’s worth looking at our guide to the best acrylic paint brands for rich, pigment-heavy color before starting this project.
Plan the Composition Before You Paint
Decide early whether your peacock is displaying (tail fanned up) or resting (tail trailing behind). The two poses need very different layouts.
- Displaying: the fan forms a semicircle behind the bird and fills most of the canvas. Place the body slightly below center so the fan’s arc doesn’t crash into the top edge.
- Trailing: the tail sweeps diagonally across the canvas, often from the upper left to the lower right. This pose is easier for a first attempt because fewer eye feathers are fully visible.
Choose a background that pushes the blues forward. A warm, darker background (burnt umber glazed with a little ochre) makes the neck glow. A soft, muted green-gray works if you want a garden setting. Avoid a bright blue sky, which competes with the bird.
How to Paint a Peacock With Acrylics: Step-by-Step
Step 1: Tone the canvas and paint the background
Cover the canvas with a thin wash of your background color, using the 1-inch flat. A toned ground means you never have bright white canvas peeking through the tail barbs, which is one of the most common reasons peacock paintings look unfinished.
Let this dry fully, about 20 to 30 minutes for a thin coat. Touch the back of your finger lightly to the surface; if it feels cool, it’s still damp.
Step 2: Sketch the body and tail structure
With a pencil or a thinned brown paint, draw the body as an elongated teardrop and the neck as a slender S-curve. The head is small, about the size of the widest part of the neck, with a short beak and a crest of five to eight thin feathers topped with tiny fan shapes.
For the tail, don’t draw every feather. Draw the guiding lines instead: for a fan, a series of curves radiating from the base of the body like spokes. For a trailing tail, long, gently curved lines that taper together toward the end. Mark rough ovals where the largest eye feathers will sit, staggered like bricks so they don’t line up in rows.
Step 3: Block in the neck and body
Mix phthalo blue with a touch of ultramarine and paint the neck and chest as one solid shape. Keep it darker than you think it should be. The brilliant blue of a real peacock comes from structural color, the way light bounces off the feather surface, and you’ll recreate that with layered highlights later rather than by starting bright.
Paint the wing area (the patterned section on the back) in burnt sienna mixed with yellow ochre. The lower body and the area where the tail meets the back can go darker with ultramarine and burnt umber.
Step 4: Add the neck’s color transitions
Once the base coat is dry, glaze a thin layer of phthalo green mixed with glazing medium along the lower part of the neck where it joins the body. Then use a lighter blue (phthalo blue with a small amount of white) to suggest the curve of the neck: a stripe of lighter color on the side facing your light source, fading into the dark base on the shadow side.
Build the light side up in two or three thin passes rather than one thick one. Thin layers stay saturated; thick white-heavy layers turn pastel.
Step 5: Paint the head and face
The face has two white stripes, one above and one below the eye. Paint them with a size 2 brush in off-white (white with a whisper of ochre so they don’t look stark). The eye is a small dark brown or black circle with a tiny white catchlight placed toward your light source.
Paint the crest last: thin stems in dark blue-brown with small fan-shaped tips in your neck blue.
Step 6: Block in the tail base color
Fill the tail area with a mid-value bronze-green. A useful mix is phthalo green, yellow ochre and a touch of burnt umber. Use the size 8 round and follow your guide curves with every stroke, so even this first layer reads as feather direction rather than a flat area.
For a fanned tail, darken the base color toward the center near the body, where feathers overlap and shadow each other.
How to Paint Peacock Eye Feathers
The eye feather (the “ocellus”) is the heart of the painting. Practice two or three on scrap paper before working on the canvas. Each eye is built in layers from the outside in, and each layer must be dry before the next or the colors will blend into a muddy smear.
- Outer halo: paint a soft oval in bright green (phthalo green + lemon yellow). Let the edges stay slightly ragged.
- Bronze ring: inside the green, paint a slightly smaller oval in yellow ochre with a touch of burnt sienna. Leave a thin band of green showing around it.
- Turquoise ring: inside the bronze, paint a smaller oval in turquoise (phthalo blue + phthalo green + white).
- Center: finish with a heart- or kidney-shaped spot of deep navy (phthalo blue + a touch of burnt umber). The real eye center is rarely a perfect circle; a slight notch at the top looks more natural.
- Soften the transitions: once dry, glaze a very thin layer of transparent green over the outer ring to unify it with the tail.
Size the eyes in a loose sequence. The largest sit at the outer edge of the fan, and they get smaller and more crowded toward the body. Overlap some of them so the lower one is partly hidden. That overlap is what makes a tail look layered instead of like a sheet of stickers.
Common eye-feather problems
| Problem | Likely cause | Fix |
|---|---|---|
| Rings blend into gray-green | Painted wet-into-wet | Wait 10 to 15 minutes between rings; use a hair dryer on low if needed |
| Eyes look pasted on | Hard outer edges, no barbs crossing them | Pull fine barb lines over the outer ring |
| Tail looks like polka dots | Eyes evenly spaced and same size | Vary size, stagger rows, overlap edges |
| Colors look chalky | Too much white in the mixes | Glaze transparent color over the dry ring |
Painting the Fine Barbs
The barbs are the thin, hair-like filaments that make up each feather. They’re what turn a tail of colored ovals into something that looks soft and alive.
Thin your paint to the consistency of ink, roughly two parts paint to one part water or flow improver. Load a liner brush fully, then flick it outward from each feather’s central shaft in a slight curve. Don’t paint every barb. Suggest them in groups, especially around the eyes and along the outer edges of the tail.
Use three values of barb color: a dark bronze-green for barbs in shadow, a mid green-gold for the general texture, and a pale yellow-green for barbs catching light. Fluid acrylic or acrylic ink flows more smoothly than thinned heavy-body paint for this step. If you prefer inks, our Daler-Rowney acrylic ink review covers how that type of ink handles fine line work.
Add a thin central shaft to the larger feathers: a single line of burnt sienna mixed with ochre, running from the base of the tail through the middle of each eye. Keep the shaft slightly lighter than the surrounding tail so it reads.
Wing Pattern and Body Details
The peacock’s back has a scale-like or barred pattern in browns, creams and dark blue-black. You don’t need to copy it feather for feather. Paint small, overlapping U-shapes or short horizontal bars in a darker brown over the burnt sienna base, then touch in a few creamy highlights.
The primary flight feathers on the wing are often a rusty orange-brown. A few long strokes of burnt sienna with a lighter ochre edge will suggest them without competing with the tail.
Legs are a dull gray-brown with a scaly texture. A few short horizontal marks across the leg are enough to suggest the scales.
Adding Shimmer and Iridescence
This step is optional, but it can make the painting. Real peacock feathers shift color as the viewer moves, and you can borrow some of that effect.
- Interference medium appears almost clear on a white surface but flashes color over dark paint. Glaze a thin layer of interference blue or green over the dark neck and the eye centers.
- Iridescent or pearlescent medium adds a soft shimmer to the turquoise rings.
- Metallic gold or bronze works for the bronze ring in each eye, but use it in only some of the eyes. Too much metallic flattens the painting under gallery lighting.
Apply these mediums last and thinly. Thick metallic paint sits on top of the surface and hides the color variation underneath.
Tips by Skill Level
Beginner
Choose the trailing-tail pose, keep the canvas to 11×14 or 12×16 inches, and limit yourself to about 12 to 15 visible eye feathers. A dark background hides imperfect edges. Expect the painting to take two or three sessions of an hour or two each.
Intermediate
Try a full fan with 30 or more eyes, and spend real time on the neck transitions. Use glazing medium to build the blue in four or five transparent layers. Work on varying the edges: crisp eyes in the foreground, softer, partly lost eyes near the body.
Advanced
Work from a reference photo with strong directional light and paint the structural color shifts: the neck turns from deep cobalt to near-violet in shadow and almost green-gold where light hits it. Consider a white or albino peacock as a value study, which forces you to describe form with warm and cool whites instead of color.
Common Mistakes When Painting a Peacock
- Starting the neck too bright. Begin dark and build light. You can always add highlights; it’s hard to deepen an overly pale blue without it turning dull.
- Making the head too large. Peacock heads are small relative to the body. A big head makes the bird look like a chicken.
- Ignoring feather direction. Every stroke in the tail should follow the curve of the feathers toward the body.
- Too many colors. A limited palette of phthalos, ochre, siennas and white gives a more harmonious result than a dozen premixed greens.
- Varnishing too soon. Thick areas and metallic layers need extra time. Wait at least 72 hours, and longer for heavy texture, before applying varnish.
Related Reading
FAQs
What colors do I need to paint a peacock?
Phthalo blue, phthalo green, ultramarine, yellow ochre, burnt sienna, burnt umber, a lemon or hansa yellow and titanium white cover nearly everything. A turquoise or cobalt teal is convenient for the eye rings, but you can mix it from the phthalos and white.
How do I make peacock colors look iridescent in acrylic?
Paint the base colors dark, then glaze lighter, transparent layers on top and finish with a thin coat of interference or iridescent medium over the dark areas. Interference colors flash brightest over dark grounds, so apply them on the neck and the eye centers.
How long does a peacock painting take?
A simple trailing-tail peacock on a 12×16 canvas typically takes four to six hours spread over two or three sessions. A full fanned tail with dozens of detailed eyes can take 10 hours or more, mostly because each ring needs drying time.
Can beginners paint a peacock with acrylics?
Yes, if you simplify. Pick a side view with a trailing tail, use a dark background, and practice the eye feather on scrap paper first. The repeated motif makes the tail more manageable than it looks.
Should I use heavy body or fluid acrylic for this project?
Both work. Heavy body paint is good for blocking in the background and body. Fluid acrylics or acrylic inks are easier for barbs, glazes and fine details because they flow off a liner brush without drag.
How do I paint peacock feathers without them looking flat?
Overlap the eyes, vary their sizes, darken the tail toward the body where feathers shadow each other, and pull fine barbs across the edges of each eye. Those four changes add depth more effectively than extra detail inside each eye.
Next Step
A peacock rewards strong, transparent pigments more than almost any other bird subject. The phthalo blues and greens, a reliable yellow ochre and a clean white do most of the work, so it pays to have colors that stay saturated in thin glazes. If you’re deciding what to stock before you start, our roundup of the top acrylic paint brands, compared by pigment load and value will help you choose a set that can handle jewel-toned subjects like this one.