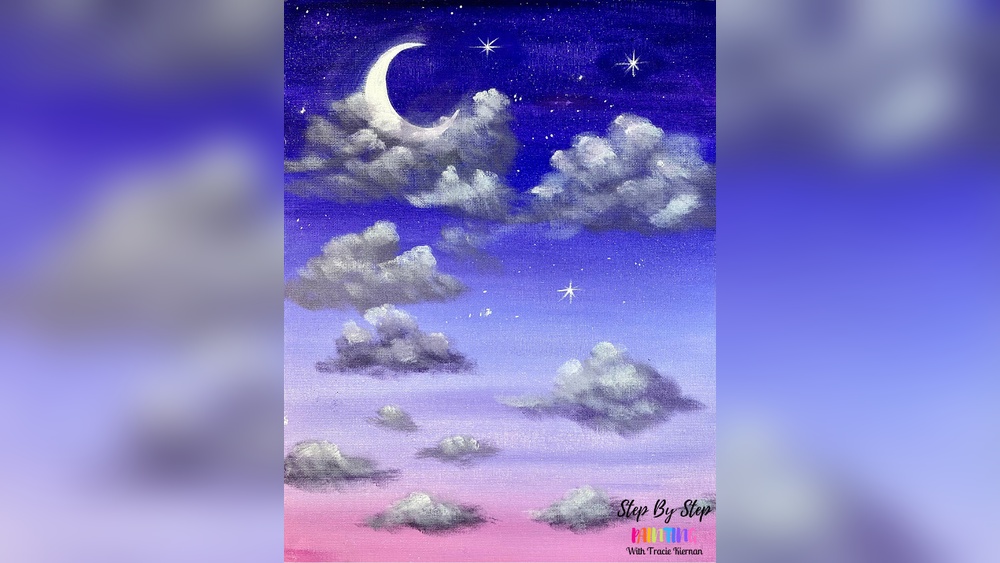
Imagine capturing the magic of a sunset or the soft glow of twilight right on your canvas. You don’t need to be an expert to create a dreamy sky that pulls people in and stirs their emotions.
With just a few simple acrylic painting techniques, you can bring your vision to life and add that perfect touch of wonder to your art. Ready to learn how to paint a dreamy sky that feels both real and magical?
Keep reading, and you’ll discover easy steps to transform your acrylics into a breathtaking sky that speaks to your creativity.

Credit: www.youtube.com
Choosing The Right Colors
Choosing the right colors is key to painting a dreamy sky with acrylics. The colors you select set the mood and bring your sky to life. You need a good balance of cool and warm tones to create depth and softness. This section breaks down the best colors for a beautiful sky.
Essential Blues And Whites
Blues are the foundation of any sky painting. Ultramarine blue offers a rich, deep tone. Cerulean blue gives a lighter, softer look. Mixing these blues with white creates smooth gradients and highlights. White is crucial for clouds and light areas. Use titanium white for bright, opaque highlights. Mixing blues with white helps you paint a realistic sky that feels open and fresh.
Adding Warm Tones For Depth
Warm colors add life and richness to your sky. Soft pinks, peaches, and light oranges bring warmth to sunsets and sunrises. Adding a touch of warm yellow can brighten the horizon. These warm tones contrast with the blues to give the sky depth. Blend warm colors gently into the cool background to keep the dreamy feel. Avoid harsh lines for a smooth, natural look.
Selecting Pastel Shades
Pastel shades make your sky look soft and gentle. Light pinks, lavenders, and pale blues create a calm mood. These colors are perfect for early morning or twilight scenes. Use pastel tones by mixing small amounts of color with plenty of white. They help soften the sky and add a dreamy quality. Pastels work well for clouds and subtle color shifts.
Preparing Your Canvas
Preparing your canvas is the first step to paint a dreamy sky with acrylics. A well-prepared surface helps your colors blend smoothly and look vibrant. Taking time to prepare improves the final result and makes painting easier.
Starting with a clean and primed canvas ensures better paint adhesion. The texture of the canvas affects how the paint spreads and blends. Choosing the right brushes also plays a big role in creating soft, dreamy effects.
Priming For Smooth Blending
Begin by applying a layer of gesso to your canvas. Gesso creates a smooth, white surface that grips the paint well. Let the gesso dry completely before starting to paint.
You can sand the dried gesso lightly for an even smoother finish. This step helps your brush glide easily and blend colors softly. A well-primed canvas prevents paint from soaking in unevenly.
Choosing The Right Brush Types
Use soft, wide brushes for blending large areas of sky. Flat or filbert brushes work well to create smooth gradients. Smaller round brushes help add details like clouds or highlights.
Natural bristle or synthetic brushes both work for acrylics. Choose brushes that feel comfortable in your hand and hold paint well. Having a variety of brush sizes gives you more control over your painting.
Creating A Gradient Sky
Creating a gradient sky is a key step in painting a dreamy sky with acrylics. It helps set the mood and adds depth to your artwork. A smooth transition of colors from light to dark or from one hue to another creates a natural sky effect. This section covers simple techniques to blend colors and build layers that make your sky look realistic and soft.
Wet-on-wet Blending Techniques
Wet-on-wet blending means applying new paint on still-wet layers. This method lets colors mix directly on the canvas. Start with a base color, like light blue or soft pink. Quickly add the next color while the first is wet. Use a clean, soft brush to gently blend the edges. Move the brush in small, circular motions for a smooth gradient. Avoid pressing too hard to keep the paint soft. Work fast to prevent the paint from drying too soon. This technique creates a dreamy, seamless sky background.
Layering Colors For Realism
Layering adds depth and richness to your sky. Let each layer dry completely before adding the next. Begin with lighter colors as the base. Slowly add darker shades or different hues on top. Use thin washes of paint for subtle changes. This builds a natural look that mimics real skies. Add soft, light strokes near the horizon and stronger colors higher up. Layering also helps create the illusion of light and shadow. This simple step improves the sky’s realism and makes it more engaging.
Painting Dreamy Clouds
Painting dreamy clouds adds magic to any acrylic sky. Soft, fluffy clouds create a calm and peaceful mood. They bring depth and interest to your artwork. Start with simple shapes, then build light, shadow, and edges carefully.
Use gentle brush strokes to keep the softness. Focus on blending colors smoothly. This technique helps clouds look real and dreamy at once.
Basic Cloud Shapes
Begin with simple round and oval shapes. Clouds often appear as soft blobs or clusters. Use a light touch to sketch these shapes on your canvas. Avoid hard lines to keep the cloud natural.
Group shapes closely to form cloud clusters. Vary sizes to add variety and interest. Leave some space between clouds for the sky to show.
Using Light And Shadow
Light creates volume in clouds. Paint the parts hit by light in white or light colors. Use soft gray or blue tones for shadows. Shadows give clouds a 3D look.
Observe the light source’s direction carefully. Shadows should be opposite the light. Blend shadow and light areas softly to avoid harsh edges.
Adding Soft Edges
Soft edges make clouds look airy and light. Use a dry, clean brush to blend edges gently. Feather the paint outwards for a smooth transition.
Avoid sharp outlines. Clouds fade into the sky naturally. Soften the edges where clouds meet the background color. This step enhances the dreamy feel of your sky.
Incorporating Atmospheric Effects
Incorporating atmospheric effects adds depth and mood to your dreamy sky painting. These effects create a soft, natural look that captures light and air. They help your sky feel alive and believable. Use simple acrylic techniques to build haze and glow, enhancing the sky’s beauty.
Adding Haze And Glow
Start by mixing a small amount of white with your sky colors. Use a dry brush or soft sponge to gently apply this mix over areas where light hits the sky. This creates a subtle haze that softens hard edges. Blend the colors smoothly to avoid harsh lines.
Focus on the horizon or near clouds, where light naturally scatters. Adding a warm glow with pale yellows or soft pinks can mimic sunrise or sunset. Work in thin layers, letting each dry before adding more. This builds a delicate, glowing effect that feels natural.
Using Glazing For Luminosity
Glazing means applying thin, transparent layers of paint to enhance brightness. Mix your acrylic paint with a glazing medium or water to make it more see-through. Paint these layers over dry areas to enrich color and light.
This technique adds depth and a glowing quality to your sky. Use blues, purples, or warm tones depending on the mood you want. Keep your brush strokes gentle and even. Glazing helps create a smooth transition of colors and a luminous sky.
Highlighting Details
Highlighting details brings your dreamy sky to life. This step adds depth and interest. Small touches make the sky feel vibrant and real. Focus on subtle shifts in color and tiny light points. These elements create a magical atmosphere in your painting.
Painting Subtle Color Variations
Use soft brushes to blend colors gently. Mix shades of blue, pink, purple, or orange for variety. Change the paint’s opacity by adding water or medium. Apply thin layers with light strokes to avoid harsh lines. Let colors fade into each other naturally. This technique gives the sky a soft, glowing effect. Avoid sharp contrasts. The goal is smooth, gentle transitions.
Adding Stars Or Sun Elements
Choose a small, fine brush or a toothpick for stars. Dab tiny dots of white or pale yellow paint across the darker areas. Vary the size and brightness for a natural look. For the sun, paint a soft circle with warm colors. Use white or yellow to highlight the edges. Blend the sun gently into the sky to avoid a hard edge. These small details add charm and focus points. They transform your sky into a dreamy scene.
Common Mistakes To Avoid
Painting a dreamy sky with acrylics can be a joyful experience. Avoiding common mistakes helps your artwork look soft and natural. Many beginners make errors that affect the final result. Being aware of these pitfalls improves your painting process and outcome.
Overworking The Paint
Overworking the paint causes the colors to become muddy. Acrylics dry fast, so keep your brush strokes light and quick. Blending too much removes the soft gradients that create a dreamy sky. Stop while the paint still looks fresh and smooth. Let layers dry before adding details to avoid harsh lines.
Ignoring Color Harmony
Ignoring color harmony makes your sky look unnatural. Choose colors that blend well together, like blues, pinks, and purples. Avoid using too many contrasting colors in one area. Harmonious colors create a peaceful and dreamy atmosphere. Test your palette on paper before painting the sky. Balance cool and warm tones for a realistic effect.

Credit: www.reddit.com
Finishing Touches
Finishing touches bring your dreamy sky painting to life. They protect your work and prepare it for display. These steps help keep colors bright and details sharp. Take your time to ensure your acrylic sky looks its best for years to come.
Sealing Your Artwork
Sealing protects your acrylic painting from dust and fading. Use a clear acrylic varnish for the best results. Choose between matte, satin, or gloss finishes depending on your style. Apply thin, even coats with a soft brush or spray. Let each coat dry fully before adding another. This layer also enhances color depth and contrast. Avoid applying varnish in direct sunlight or humid places.
Displaying Your Painting
Display your dreamy sky where light can highlight its beauty. Frame your painting with or without glass for added protection. Use acid-free mats to prevent damage over time. Hang away from direct sunlight to avoid color fading. Consider a spot with soft, natural light to enhance the sky’s glow. Rotate your artwork occasionally to keep it looking fresh.

Credit: www.amazon.com
Frequently Asked Questions
How To Paint A Vibrant Sky?
Use ultramarine blue mixed with white for a smooth gradient. Blend colors softly and allow streaks for realism. Add lighter tones near the horizon for depth.
What Is The Best Acrylic Color For The Sky?
Ultramarine blue mixed with titanium white creates the best acrylic sky color. This combo offers vibrant, natural gradients and realistic depth.
How To Paint Clouds In Acrylic For Beginners?
Use a soft round brush and blend white with blue for cloud shapes. Dab with a dry brush to create fluffy edges. Layer lighter tones last for highlights. Keep strokes light and circular. Practice blending to achieve soft, natural clouds in acrylics.
How To Make Your Art Look Dreamy?
Use soft, blended colors and gentle brush strokes to create a smooth, ethereal effect. Add subtle light glows and pastel tones. Incorporate blurred edges and layers to enhance depth. Use muted contrasts and avoid harsh lines for a dreamy, whimsical appearance.
Conclusion
Painting a dreamy sky with acrylics can be simple and fun. Use soft colors and gentle brush strokes to create depth. Blend blues, pinks, and purples smoothly for a magical look. Don’t worry about mistakes; they add character and charm.
Practice often to build confidence and improve your skills. Enjoy the process and let your creativity flow freely. Soon, you’ll create skies that feel alive and full of wonder. Keep experimenting and have fun with every painting!