
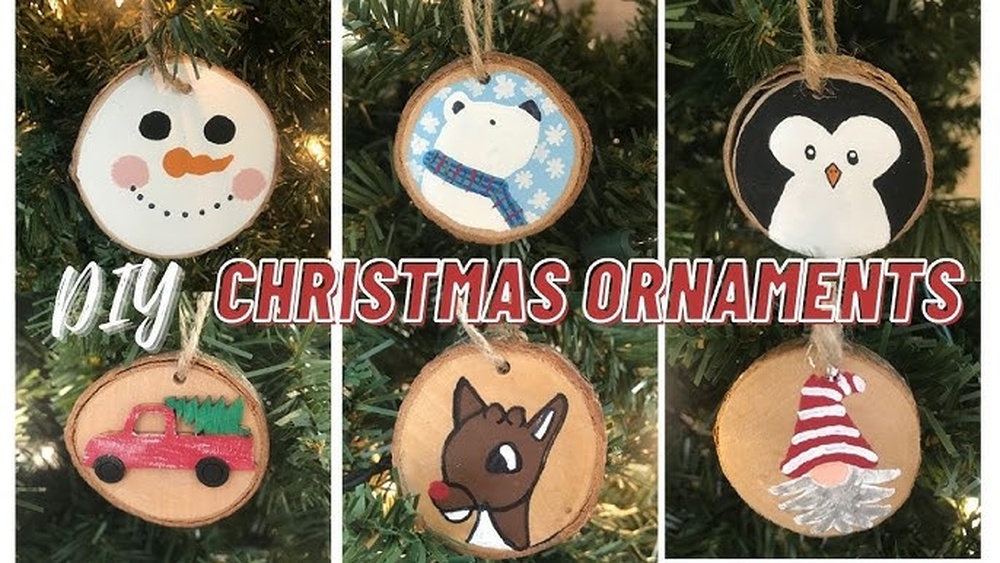
Quick answer: To make DIY painted wood slice art, start with a dry, sanded wood slice, seal the face with clear sealer or a thin coat of gesso, sketch your design lightly in pencil, then paint with acrylic in thin layers from background to foreground. Add fine details last with a liner brush or paint pen, let everything dry for 24 hours, and finish with a clear varnish (matte, satin or gloss) to protect the paint and bring out the wood grain.
A wood slice gives you something a canvas never will: a natural frame of bark, visible growth rings and a slightly irregular shape that makes every piece one of a kind. DIY painted wood slice art has become popular for ornaments, wall hangings, coasters and wedding signs because even a simple design looks finished on such a characterful surface.
This step-by-step guide covers preparing slices so they do not crack or bleed sap, how to choose designs that use the grain, a complete painting method, varnishing, and six project ideas from easy to advanced. If you are choosing paint, our comparison of the best paint for DIY wood slice art explains which acrylics and paint pens give good coverage on raw wood.
Understanding the Surface: Why Wood Slices Behave Differently
A wood slice is a cross-section of a branch or trunk. That means you are painting on end grain, where the wood’s fibers point straight at you like a bundle of drinking straws. End grain absorbs liquid much faster than the long side of a board, so unsealed slices soak up paint quickly, can look blotchy, and may wick moisture into the wood.
Slices also move. As they dry, wood shrinks more around the rings than across them, which is why slices often develop a crack from the bark toward the center. Choosing well-dried slices and sealing them reduces, though cannot fully eliminate, this risk.
Common wood types
| Wood | Look | Painting notes |
|---|---|---|
| Birch | Pale face, white papery bark | Popular for crafts; light background suits bright colors |
| Pine | Yellowish with visible rings | Can contain sap pockets; seal well, especially with knot spots |
| Aspen / poplar | Light, fine grain | Smooth, takes paint evenly once sealed |
| Oak | Darker, open grain | Heavier texture; may need extra sanding |
| Paulownia | Very light, soft | Lightweight for ornaments; dents easily |
Supplies for Wood Slice Art
- Wood slices: kiln-dried or well air-dried. Craft stores sell packs in sizes from about 2 to 12 inches across.
- Sandpaper: 120 grit to smooth saw marks, then 220 grit for a fine finish. A sanding block helps keep the face flat.
- Sealer or primer: clear acrylic sealer, sanding sealer, shellac-based primer for sappy wood, or white gesso if you want a white background.
- Acrylic paints: craft or artist grade. Higher pigment means fewer coats.
- Brushes: a 1-inch flat for sealing, small flats and rounds for color, a fine liner for detail.
- Paint pens: optional but helpful for lettering and outlines.
- Graphite or transfer paper: for moving designs onto the slice.
- Varnish: water-based polyurethane or acrylic varnish; outdoor-rated if the piece will be outside.
- Drill or screw eye and twine: for hanging ornaments and wall pieces.
Art Supplies for DIY Projects: Paint Types Compared
| Paint | Coverage on wood | Best use |
|---|---|---|
| Craft acrylic | Moderate; often needs two to three coats | Background colors, kid projects, budget work |
| Artist acrylic (heavy or soft body) | Strong; richer color | Detailed scenes, blending, gifts |
| Acrylic paint pens | Opaque lines | Lettering, outlines, small patterns |
| Chalk-style paint | Matte, opaque | Rustic or farmhouse looks |
| Wood stain or diluted acrylic wash | Translucent; grain shows | Tinting the face while keeping the rings visible |
Step 1: Prepare the Wood Slice
- Check for dryness and cracks. Slices that feel cool, heavy or slightly damp may still be drying. Let them sit indoors for a few weeks if you are unsure. Small hairline cracks are normal; deep cracks may spread.
- Remove loose bark. If the bark is flaking, either peel it off entirely or glue loose edges with wood glue. Bark that falls off later will take paint with it.
- Sand the face. Start with 120 grit to remove saw marks, moving in small circles. Finish with 220 grit. Wipe away dust with a slightly damp cloth or tack cloth.
- Seal the face. Brush on a thin coat of clear sealer or gesso. This keeps paint from soaking in and helps colors stay bright. On pine or knotty slices, a shellac-based primer helps block sap from bleeding through later.
- Light sand again. Sealer can raise the grain slightly. A quick pass with 220 grit after it dries makes the surface smooth.
Step 2: Plan a Design That Uses the Wood
The most attractive wood slice art lets the wood show. A few approaches:
- Use the rings as a frame. Paint inside the inner rings and leave the outer rings and bark bare.
- Let the grain be the sky or water. A thin, translucent blue wash over the rings can suggest ripples.
- Center the subject on the pith. The darker center dot can become a sun, a flower center or a moon.
- Leave negative space. A small painted bird or flower on bare wood looks more refined than a fully covered face.
Sketch your design on paper the size of the slice, then transfer it with graphite paper or by drawing lightly with a soft pencil.
Three ways to transfer a design
- Graphite transfer paper: place it graphite-side down on the slice, lay your printed design on top, and trace with a ballpoint pen. Press lightly; deep grooves show through thin paint.
- Pencil rubbing: scribble soft pencil over the back of your printed design, flip it, and trace the lines on the front. It is a free alternative to transfer paper.
- Freehand with chalk: chalk lines brush off easily, which is useful on dark or stained slices where graphite does not show.
Avoid permanent markers for sketch lines. They can bleed through light paint and are hard to cover.
Step 3: Paint in Layers
- Background first. Paint skies, solid fields or base shapes. Use thin coats; two thin layers dry faster and smoother than one thick layer.
- Mid-ground shapes. Add hills, trees, petals or main forms. Let the background dry before overlapping it, usually 15 to 30 minutes for acrylic.
- Foreground and details. Paint the nearest elements last, and add highlights with a small round brush.
- Fine lines and lettering. Use a liner brush with slightly thinned paint, or a paint pen. Pull lines toward you for better control.
- Edge painting (optional). Some painters paint the cut edge or bark a solid color for a modern look; others leave it natural.
Painting on bare wood versus a sealed or primed face
Painting directly onto lightly sealed wood lets the grain show through thin color and suits rustic designs. A white gesso base gives brighter, more accurate colors and suits detailed or colorful designs. You can also mix approaches: gesso only where the subject goes, bare wood around it.
Step 4: Varnish and Finish
- Let the paint cure. Wait at least 24 hours, longer for thick paint or humid rooms.
- Choose the sheen. Matte keeps a natural look; satin adds a soft glow; gloss deepens color and makes grain stand out.
- Apply thin coats. Use a soft brush and long, even strokes. Brush gently over paint pen lettering, since some pens can smear under a wet brush. Spray varnish avoids this.
- Coat the back and edges too for pieces exposed to humidity; sealing all sides helps the slice absorb and release moisture more evenly.
- Add hangers. Drill a small hole near the top for twine, or attach a sawtooth hanger to the back of large slices.
Six Painted Wood Slice Projects
1. Christmas ornaments (beginner)
Small 2 to 4 inch slices with a simple snowflake, a red cardinal, a pine tree or a name and year. Drill a hole near the bark and thread ribbon. These are quick to batch-produce for gifts.
2. Coasters (beginner)
Four-inch slices painted with a geometric pattern or monogram. Finish with several coats of a water-resistant varnish and add felt pads to the bottom. Keep designs fairly flat so mugs sit level.
3. Mountain landscape (intermediate)
Paint a sunset gradient across the top half, layered mountain silhouettes in progressively darker blues, and a line of dark pine trees at the bottom. The bark edge becomes a natural frame.
4. Botanical bouquet (intermediate)
Paint a loose bunch of wildflowers on bare, sealed wood, letting the grain show between stems. Use white gesso under each flower head so colors stay bright.
5. Wedding or welcome sign (intermediate to advanced)
Large slices of 10 inches or more work well for names and dates. Plan lettering carefully with a ruler and pencil guidelines, and use paint pens or a liner brush for crisp script.
6. Pet or animal portrait (advanced)
Transfer a simplified outline from a photo, block in large color areas, then build fur texture with short strokes of a small brush. A neutral background with plenty of bare wood keeps focus on the animal.
DIY Painting Wood Paneling and Larger Wood Art Panels
The same preparation steps apply to flat wood art panels and larger boards, but there are a few differences. Panels made of plywood or MDF have a smooth face and absorb less than end grain, so a coat of gesso is usually enough. Larger panels can warp if only the front is sealed; seal the back as well, or use cradled panels with a support frame on the back. Wood slices remain the better choice when you want bark edges and growth rings to be part of the art.
Common Mistakes
- Painting a damp slice. Moisture causes peeling and cracking later.
- Skipping the sealer. Unsealed end grain soaks up paint and looks patchy.
- Thick paint layers. They crack more easily as the wood moves.
- Varnishing too early. Trapped moisture can cloud varnish.
- Ignoring sap. Sticky spots on pine will bleed through paint unless blocked with a suitable primer.
- Overfilling the design. Covering every inch hides the wood, which is the main appeal.
Tips by Skill Level
Beginners
Start with small slices and one-subject designs such as a heart, a star or a single leaf. Limit yourself to three colors plus white, and leave the outer rings bare.
Intermediate
Try gradients and layered landscapes, and experiment with translucent washes that let the rings read as water or sky.
Advanced
Work on larger slices with detailed portraits or lettering, and combine painting with wood burning outlines for crisp, warm-toned edges.
Caring for Finished Wood Slice Art
- Keep pieces away from radiators, heating vents and direct sun, which speed up drying cracks and fade colors.
- Dust with a soft, dry cloth.
- For outdoor pieces, recoat with outdoor varnish periodically, as recommended by the product.
- Store ornaments wrapped in tissue so painted faces do not rub together.
FAQs
Do you need to seal wood slices before painting?
It is strongly recommended. Sealing stops the end grain from soaking up paint, helps colors look even and bright, and on sappy woods helps prevent sap from bleeding through.
What paint works best on wood slices?
Acrylic paint is the most common choice because it is water-based, fast-drying and sticks well to sealed wood. Acrylic paint pens are useful for lettering and fine details.
How do you keep wood slices from cracking?
Use slices that are fully dried, keep them away from heat sources, and seal all sides to slow moisture changes. Some cracking is natural and cannot be fully prevented.
Can you use wood slices for coasters?
Yes. Sand them flat, paint, and finish with several thin coats of water-resistant varnish. Add felt or cork pads underneath to protect furniture.
Are DIY art kits for adults a good way to start?
Kits that include pre-sanded slices, a few paints and a brush are a convenient way to try the craft. If you enjoy it, buying slices and better paint separately usually gives more control over quality.
How long should paint dry before varnishing wood slices?
Wait at least 24 hours for acrylic paint. Thick areas or humid conditions may need longer.
Final Thoughts
Good wood slice art starts before the first brushstroke: dry slices, careful sanding and a sealed face make every design look cleaner. Then keep layers thin, let the grain and bark frame your work, and protect it with a suitable varnish. To pick paints that cover well on wood and stay vivid under varnish, see our guide to choosing paint for wood slice projects.





2 Comments