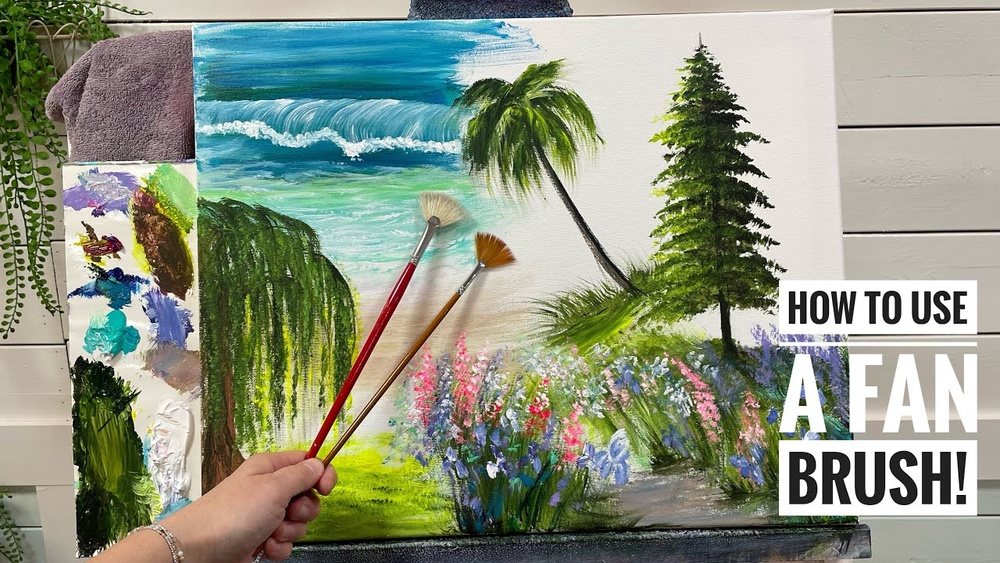
Quick answer: The main fan brush techniques for painting are tapping (stippling) for foliage and evergreens, upward flicking for grass, light dragging for clouds, water and wood grain, dry blending to soften transitions, and edge strokes for thin lines like branches or rain. Use a fan brush with very little paint, hold it lightly near the end of the handle, and let the separated bristles make many small marks at once. Synthetic fans suit acrylic; firmer bristle fans suit thick oil paint; soft fans are best for blending.
A fan brush looks like a novelty, but it solves a specific problem: making many small, irregular marks in one stroke. Trees, grass, fur, foam and clouds are all made of countless tiny elements. Painting each one with a round brush is slow and tends to look mechanical. A fan’s spread-out bristles handle that texture naturally, and a clean, dry fan can also soften edges better than many other shapes.
This guide covers how to use a fan brush for painting, step by step, with techniques for landscapes, blending and texture, plus how to choose sizes and keep the brush in shape. If you have not bought one yet, our guide to the best fan brushes for landscapes and blending compares options by bristle type and size.
What Is a Fan Brush?
A fan brush has a thin, flat layer of bristles spread into a semicircle by the ferrule. Because the bristles are separated rather than packed together, each one leaves its own mark. That gives fan strokes their broken, textured quality.
Types of fan brushes
| Bristle type | Feel | Best for |
|---|---|---|
| Synthetic (taklon, nylon) | Springy, smooth | Acrylic, general texture, blending, beginners |
| Hog bristle | Stiff, coarse | Thick oil and heavy body acrylic, bold foliage, grass |
| Soft natural or soft synthetic (sable-style) | Very soft, gentle | Delicate blending, glazes, softening edges in oil and watercolor |
| Badger or mop-style fan | Very soft, full | Feathering transitions in oil |
Fan brush sizes
Sizes vary between brands, so use these as general guidance:
- Small fan (roughly sizes 0 to 2): fine grasses, distant trees, small details, fur texture on small animals, miniatures.
- Medium fan (roughly sizes 4 to 6): the most versatile range; trees, bushes, clouds and general landscape texture on 8×10 to 16×20 canvases.
- Large fan (roughly sizes 8 and up): large canvases, broad skies, big foliage masses, wide blending.
If you buy one fan brush, a medium synthetic is the safest first choice. A small and a large make a useful fan brush set later.
How to Use a Fan Brush: Fundamentals
- Load lightly. Dip only the tips of the bristles in paint. Too much paint clumps the bristles together and turns the fan into a flat brush.
- Offload excess. Tap or drag lightly on the palette so the bristles separate again.
- Hold it loosely. Grip toward the end of the handle for loose, natural marks. Choke up for control.
- Use light pressure. The fan works best barely touching the surface. Pressing hard spreads and crushes the bristles.
- Vary angle and direction. Turning the brush between marks prevents repetitive patterns.
- Rinse and reshape often. Clean the brush when paint begins to dry in the bristles, then blot and pinch it back into a fan shape.
Paint consistency matters
For texture strokes, paint should be fairly thick, roughly like soft butter or toothpaste. Watery paint floods the bristles and makes blobs. For blending, use a clean, dry fan with no added paint, gently brushing across the transition.
Fan Brush Techniques for Painting Landscapes
1. Evergreen trees
Pine and fir trees are the classic fan brush subject.
- Paint a thin vertical trunk line with a liner or the fan’s edge.
- Load the fan with a dark green (green plus a little blue or brown).
- Hold the fan vertically, edge-on, and touch the top of the trunk to make a small point.
- Working downward, turn the fan horizontally and tap or press short, slightly downward-angled strokes on each side of the trunk.
- Make the strokes wider as you move down the tree.
- Add a lighter green highlight on one side, tapping lightly, to suggest light direction.
2. Deciduous trees and bushes
Tap the flat face of the fan in clusters to build foliage masses. Start dark at the base and interior of each cluster, then tap mid and light greens on top, leaving gaps so sky shows through. Rotate the brush between taps.
3. Grass and meadows
- Paint a base color for the ground.
- Load the fan with a slightly darker or lighter green.
- Place the bristle tips at the base line and flick upward quickly, lifting the brush as you go.
- Vary the height and angle of flicks, and overlap layers of different greens and ochres.
- Keep strokes shorter and smaller in the distance and taller in the foreground.
4. Clouds
Load the fan with white or a pale gray, then use light, circular or arcing strokes to build soft cloud shapes. Use a clean, dry fan to soften the bottoms and edges into the sky. The fan’s texture prevents the hard edges you get with a flat brush.
5. Water, waves and reflections
- Reflections: pull the fan downward vertically through wet paint, then lightly drag horizontally across to create a shimmering reflection.
- Waves and foam: tap white with the fan along the crest of a wave, and flick small sprays upward.
- Waterfalls: drag the fan downward in long strokes with white and pale blue over darker rocks.
6. Rocks, wood grain and bark
Drag a fan lightly over a dried base to create parallel lines for wood grain or bark texture. Tap with a lighter color on rocks to suggest rough surfaces.
Fan Brush Blending Technique
A soft, clean fan is one of the gentlest blending tools available, particularly in oil painting and with slow-dry acrylic.
- Lay two colors side by side while they are still wet.
- Take a clean, dry soft fan brush.
- Lightly sweep back and forth across the boundary with almost no pressure.
- Wipe the brush on a paper towel frequently so you do not drag one color into the other.
- Stop as soon as the transition looks smooth; overblending creates mud.
This works beautifully for skies, skin transitions in portraits and soft backgrounds. In acrylic, work quickly or add a slow-dry medium, since the paint may set before you finish.
Other Creative Uses for a Fan Brush
- Animal fur and feathers: short strokes following the direction of growth.
- Hair: sweeping strokes to suggest strands.
- Rain and snow: edge strokes for streaks of rain; tapping white for snow on branches.
- Splatter texture: flick a loaded fan against your finger for controlled splatters.
- Abstract textures: crosshatched strokes, layered colors and dry brushing.
- Dry brushing: nearly dry paint dragged over textured canvas to catch the high points.
Fan Brush Techniques by Medium
| Medium | Recommended fan | Tips |
|---|---|---|
| Acrylic | Synthetic | Work quickly, keep the brush damp but not wet, rinse often so paint does not dry in the ferrule |
| Oil | Hog bristle for texture; soft fan for blending | Oils stay wet, so blending is easier; wipe the brush often |
| Watercolor | Soft synthetic or natural | Use for grass, branches and dry-brush textures; less useful for blending |
| Gouache | Synthetic | Use thick paint for texture; avoid overworking or layers will lift |
Common Fan Brush Mistakes
- Overloading with paint: bristles clump and lose their fan effect.
- Using watery paint: strokes turn into blobs.
- Pressing too hard: spreads and damages the bristles.
- Repeating identical strokes: creates a wallpaper look. Vary angle, size and pressure.
- Overusing the fan: a whole painting of fan textures looks busy. Combine with rounds, flats and knives.
- Letting acrylic dry in the bristles: fan brushes are thin and get ruined quickly. Rinse frequently.
Fan Brush for Cleaning and Other Uses
Outside painting, fan brushes are sometimes used to brush away eraser crumbs, graphite or pastel dust from drawings without smudging, and to sweep dust from canvases before varnishing. A dedicated, clean fan reserved for this purpose avoids transferring paint. In makeup, fan brushes are used for highlighter, but those are cosmetics brushes; keep art brushes and makeup brushes separate.
How to Care for Your Fan Brushes
- Rinse during painting before paint dries in the bristles.
- Wash with mild soap and lukewarm water after each session, working soap gently toward the ferrule.
- Rinse until water runs clear.
- Reshape the fan with your fingers, spreading it evenly.
- Dry flat or bristles-up, never resting on the bristles.
- For oil, clean with an appropriate solvent or brush cleaner first, then soap and water.
A fan that has lost its shape can sometimes be restored by washing, coating it lightly with a brush shaper or soap, reshaping, and letting it dry overnight.
Choosing a Fan Brush: What to Look For
- Bristle spring: the bristles should return to shape after being pressed.
- Even spread: no gaps or clumps in the fan.
- Secure ferrule: bristles should not shed when you tug gently.
- Handle length: long handles suit easel painting and loose strokes; short handles suit tabletop work and detail.
- Right material for your medium: synthetic for acrylic, bristle or soft depending on oil technique.
Cheap fan brushes can work for rough textures, but they often shed and splay quickly. A professional fan brush with good spring lasts longer and gives more consistent marks.
Step by Step: A Simple Fan Brush Landscape
This short project combines the core techniques into one painting on an 8×10 or 9×12 canvas. It works in acrylic or oil.
- Sky. With a large flat, paint a gradient from pale yellow at the horizon to soft blue at the top. While it is still wet in oil, or using slow-dry medium in acrylic, sweep a clean, dry fan lightly across the transition to soften it.
- Clouds. Load a medium fan with white mixed with a touch of the sky color. Use small arcing strokes to build two or three cloud shapes, then soften their bottoms with a clean, dry fan.
- Distant hills. Mix a muted blue-green with white. Paint a low, rolling band across the horizon with a flat brush. Keep it pale so it recedes.
- Background trees. Using a small fan and a slightly darker blue-green, tap small evergreen shapes along the hills. Keep them simple and close together.
- Foreground evergreens. Switch to a medium fan with dark green. Paint two or three larger pines on one side using the edge-on top and widening tapped branches. Highlight one side of each with a lighter green.
- Meadow. Lay in a ground color, then flick upward with the fan in two or three greens and a touch of ochre, taller in the foreground than at the back.
- Water (optional). Add a small pond by pulling sky colors downward with the fan, then dragging lightly sideways to break up the reflection.
- Accents. Use the fan’s edge for a few tall grass blades or reeds, and tap a few lighter dabs on foreground bushes.
Notice how little paint each step uses. Keeping the fan lightly loaded is what keeps every texture crisp and separate.
If you find your current fan too stiff for the sky blending or too floppy for the pines, it may simply be the wrong bristle type for the job; our roundup of fan brushes compared by bristle and size can help you match a brush to these steps.
Practice Exercises for Fan Brush Control
- Row of pines: paint ten small evergreens in a row, varying height and lean.
- Grass strip: fill a horizontal strip with three layers of grass in different greens.
- Cloud study: paint three different cloud types on a blue background using only a fan.
- Blending bar: blend two colors across a 6-inch strip using a dry fan.
- Texture sampler: try tapping, flicking, dragging and splattering in four boxes on one sheet.
These short drills build muscle memory faster than jumping straight into a full painting.
FAQs
How do you use a fan brush for painting?
Load the tips lightly with fairly thick paint, hold the brush loosely, and tap, flick or drag with light pressure. Use it for trees, grass, clouds and texture, or clean and dry for soft blending.
What is the best fan brush for acrylic?
A synthetic fan brush is usually the best match for acrylic. It holds its shape, handles the paint’s fast drying, and cleans easily with soap and water.
What size fan brush should I get?
A medium size is the most versatile for typical canvas sizes. Add a small fan for details and a large one for big canvases or broad blending.
Can you blend with a fan brush?
Yes. A soft, clean, dry fan gently swept across a wet color transition creates smooth blends, especially in oil or slow-dry acrylic.
Why does my fan brush make blobs?
Usually too much paint, paint that is too thin, or pressing too hard. Load only the tips, use thicker paint, and touch the surface lightly.
Is a cheap fan brush good enough?
For learning rough textures, often yes. Cheaper brushes tend to shed and lose shape sooner, so many painters upgrade once they use the fan regularly.
Final Thoughts
Fan brush techniques come down to light loading, light pressure and plenty of variation. Tap for foliage, flick for grass, drag for clouds and water, and keep a clean, soft fan on hand for blending. Combined with other brushes, the fan can speed up landscapes dramatically and add natural texture that is hard to get any other way.
The right bristle type and size make these techniques much easier. Take a look at our comparison of top fan brush picks for every medium to find a fan that suits how you paint.