
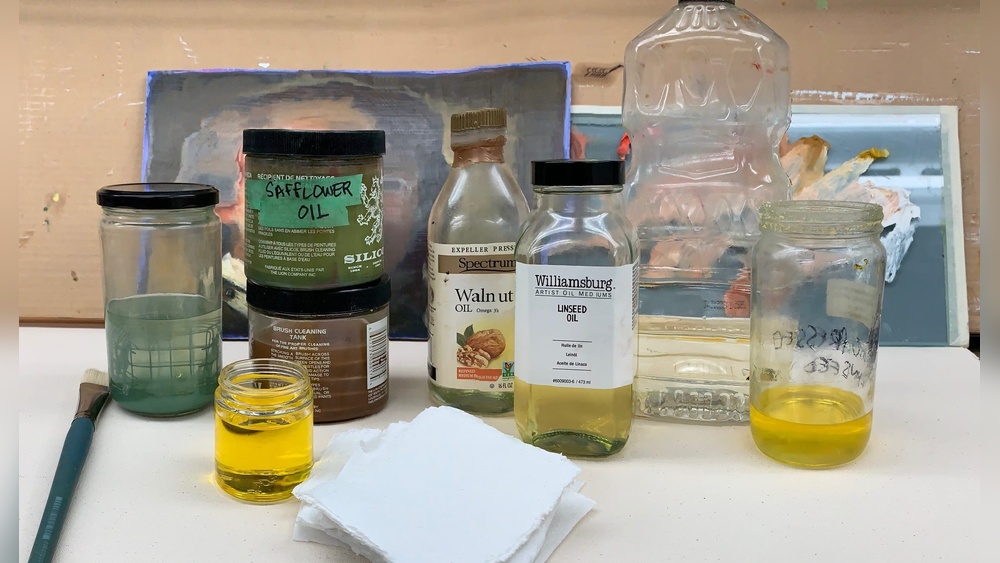
Quick answer: To clean oil paint brushes without solvent, wipe out as much paint as you can on a rag, then massage the brush in a light vegetable oil such as safflower to dissolve the remaining paint, and wipe again. Finish by washing the brush with soap and lukewarm water, repeating until the lather is completely clear. Rinse, reshape and dry flat. Oil does the job solvent normally does, and soap removes the oil.
Solvents such as turpentine and mineral spirits have been part of oil painting for centuries, but they are not essential for keeping brushes clean. Many painters now go solvent-free for health reasons, because they work in small spaces, or because they paint outdoors where carrying flammable liquids is awkward. Learning how to clean oil paint brushes without solvent is straightforward once you understand the principle: oil dissolves oil paint, and soap removes oil.
This guide compares the main solvent-free methods, gives a full step-by-step routine, explains how to store brushes in oil between sessions, and covers a lightweight setup for plein air painting.
Why Go Solvent-Free?
There are several practical reasons painters choose to clean brushes without solvent.
- Air quality. Solvents release vapors that can cause headaches or irritation, especially in poorly ventilated rooms. Odorless mineral spirits reduce smell but still evaporate.
- Skin contact. Repeated contact with solvents can dry and irritate skin.
- Fire safety. Many solvents are flammable. Removing them from the studio reduces one risk, although oily rags still need careful handling.
- Disposal. Used solvent must be handled as hazardous waste in most areas.
- Travel. Solvents are inconvenient for plein air painting and may be restricted on flights.
Going solvent-free does mean slightly more time washing with soap, but most painters find the trade-off worthwhile.
Solvent-Free Cleaning Methods Compared
| Method | How it works | Pros | Drawbacks |
|---|---|---|---|
| Vegetable oil plus soap | Oil loosens paint; soap removes oil | Effective, inexpensive, very low odor | Requires thorough soap wash |
| Soap only (direct) | Soap emulsifies paint directly | Simple; no extra materials | Slower and uses more soap for heavy paint |
| Solvent-free commercial brush cleaner | Formulated to break down oil paint | Convenient; some condition bristles | Varies by product; follow directions |
| Storing brushes in oil | Brush stays wet in oil between sessions | Minimal daily cleaning | Must wipe out oil before painting; not for long periods with drying oils |
| Dish soap paste soak | Concentrated soap left in bristles | Helps with stubborn residue | Can dry out natural bristles |
Which oil should you use?
Safflower oil is a popular choice because it is light, pale and slow to yellow. Other light vegetable oils, such as sunflower or canola, are also commonly used. Some painters use a drying oil like linseed or walnut for cleaning, but drying oils will harden if left in the brush, so they must be washed out promptly. Non-drying vegetable oils are more forgiving.
If your brushes are older or worn, even perfect cleaning will not bring back a clean edge. Our guide to the best oil painting brushes for beginners covers durable options that respond well to solvent-free care.
How to Clean Oil Paint Brushes Without Solvent: Step by Step
- Wipe out the paint. Pinch the brush through a rag or paper towel and pull toward the tip. Repeat several times until little color comes off. This step removes the majority of the paint.
- Massage in oil. Pour a small amount of vegetable oil into a shallow dish. Press and swirl the brush in the oil, pushing gently so the oil reaches the heel. Wipe the brush on a rag. Repeat until the rag shows very little color.
- Lather with soap. Wet the brush with lukewarm water and lather it on brush soap or a bar of mild soap. Use your fingers to work the lather into the bristles, especially near the ferrule.
- Rinse and repeat. Rinse and lather again. It may take three or four rounds before the foam is white.
- Final rinse. Rinse thoroughly until no soap remains.
- Reshape and dry. Squeeze out excess water, reshape the bristles and dry the brush flat or tip-down.
The full routine takes about two to four minutes per brush, depending on how much paint was in it.
How to clean paint brushes oil-based without any oil
If you do not have oil on hand, you can wash directly with soap. Wipe the brush thoroughly first, then lather on a bar of soap and work it into your palm, rinsing and repeating many times. This works best for lightly loaded brushes; heavy paint takes longer and uses more soap.
Storing Brushes in Oil Between Sessions
Some painters skip the daily soap wash entirely by keeping brushes in oil between closely spaced sessions.
- Wipe the brush thoroughly.
- Work non-drying vegetable oil into the bristles.
- Lay the brush flat in a shallow tray, or suspend it so the bristles sit in a little oil without touching the bottom.
- Before painting again, wipe out the oil thoroughly on a rag so it does not thin your paint excessively.
- Do a full soap wash at the end of the painting project or every few days.
Avoid storing brushes in drying oils such as linseed for extended periods, because the oil can slowly thicken and harden in the bristles.
How to Clean Oil Paint Off Brushes That Have Stiffened
If paint has started to harden, try these solvent-free steps.
- Soak the bristles in vegetable oil for several hours or overnight, keeping the ferrule out of the oil if possible.
- Work the softened paint out with your fingers or a brush comb, pulling toward the tip.
- Apply a dish soap paste. Work a small amount of concentrated soap into the bristles, leave it for 15 to 30 minutes, then rinse.
- Use a solvent-free brush restorer for paint that resists, following label directions.
- Repeat if needed, then reshape and dry.
Paint that has fully cured may not come out without stronger products. Retired brushes are still useful for texture, underpainting and applying grounds.
How to Tell a Brush Is Truly Clean
Oil-cleaned brushes can look clean while still holding residue. Run through these checks before putting a brush away.
- White lather. The final soap lather should be white or only faintly tinted by staining pigments.
- No slick feel. Rub the damp bristles between your fingers. A greasy or slippery feel means oil is still present; lather again.
- Clean heel. Spread the bristles gently near the ferrule and look for color. Paint hiding here is what causes splaying.
- Springs back. A clean brush should return to its shape when bent and released. Stiff or clumped bristles suggest leftover paint or oil.
Cleaning Palettes and Knives Without Solvent
The same principle works for the rest of your tools. Scrape leftover paint off the palette with a palette knife, then wipe the surface with a rag dampened with vegetable oil. Finish with a little soapy water on glass or sealed palettes, or simply wipe dry on a wooden palette that has been oiled. Palette knives clean with a rag and a drop of oil, then a quick wipe with a soapy cloth. Because none of these steps uses solvent, the whole studio clean-up stays low-odor.
Solvent-Free Plein Air Kit
Painting outdoors without solvent is easy with a small kit.
- A small leak-proof jar of safflower or vegetable oil
- A roll of paper towels or a stack of rags
- A sealable bag or small metal tin for used towels
- A sealable tube or brush carrier for dirty brushes
In the field, wipe brushes and dip them in oil between colors. Pack dirty brushes flat, then do a full soap wash when you get home. This setup avoids carrying flammable liquids and is easier to travel with.
Cleaning by Brush Type
| Brush | Solvent-free tips |
|---|---|
| Hog bristle | Tolerates oil and soap well; condition occasionally |
| Synthetic | Releases paint easily; avoid hot water |
| Soft natural hair | Use gentle oil and mild soap; never soak for long |
| Large flats | Spend extra time on the heel; multiple lathers |
Whatever the brush, the order stays the same: wipe, oil, soap. Only the amount of pressure and the number of lathers change.
Safety Still Matters Without Solvent
- Oily rags can self-heat. Rags soaked in drying oils like linseed, and even some vegetable oils, can heat up as they oxidize. Lay them flat to dry outdoors or store them in a sealed metal container with water before disposal.
- Toxic pigments. Some pigments, like cadmiums and lead white, are hazardous. Wear gloves and wash hands thoroughly.
- Waste oil. Let pigment settle in used cleaning oil, reuse the clear oil, and dispose of sludge according to local rules for paint waste. Do not pour it down the drain.
Going Solvent-Free Beyond Brush Cleaning
If you are removing solvent from cleaning, you may want to remove it from your painting process too. Instead of thinning paint with solvent for early layers, many painters use a small amount of oil or a solvent-free medium. Keep the traditional “fat over lean” principle in mind: each layer should be slightly more flexible (contain a little more oil) than the layer beneath it, to reduce the risk of cracking. A thin first layer with just paint, followed by layers with gradually more oil or medium, follows this rule without any solvent.
Some water-mixable oil paints can also be cleaned with soap and water, which is another way to avoid solvent entirely. They handle a little differently from traditional oils, so try a few colors before switching your whole palette.
A Simple Solvent-Free Routine
| When | What to do |
|---|---|
| During painting | Wipe brushes on a rag; dip in oil and wipe when changing colors |
| End of session | Wipe, oil, wipe, soap wash until clear, reshape, dry flat |
| Short breaks between sessions | Wipe and keep brushes in non-drying oil, flat or suspended |
| Weekly | Deep soap clean and occasional conditioning for natural bristles |
| Monthly | Decant settled cleaning oil; dispose of sludge properly |
Common Mistakes With Solvent-Free Cleaning
- Not removing all the oil with soap, leaving brushes greasy or gummy
- Using drying oils for long-term brush storage
- Skipping the initial wipe, which wastes oil and soap
- Letting brushes rest on their tips in oil dishes
- Throwing oily rags into an open trash can
For a broader overview that includes both solvent and solvent-free cleaning, see our guide on how to properly clean and care for oil painting brushes.
As a final check, compare a solvent-free brush with one you have cleaned using mineral spirits. After a few weeks, many painters find little difference in how the brushes perform, as long as the soap stage is thorough. The extra minute spent lathering is the price of a studio without solvent fumes, flammable jars or hazardous waste to manage.
FAQs
Can you clean oil paint brushes without turpentine?
Yes. Wipe out the paint, work the brush in vegetable oil to dissolve what remains, then wash with soap and water. Odorless mineral spirits are another option if you want a solvent without turpentine’s odor.
What oil is best for cleaning oil paint brushes?
Safflower oil is a popular choice because it is light and pale. Other light vegetable oils also work. Wash any oil out completely with soap afterward.
Can I use dish soap to clean oil paint brushes?
Yes. Dish soap is good at breaking down oil. Use it after wiping and oiling the brush, and condition natural bristles occasionally because strong soap can dry them out.
Is it safe to store brushes in oil?
Short-term storage in non-drying vegetable oil is a common practice. Wipe out the oil before painting, and wash brushes fully with soap every few days. Avoid long-term storage in drying oils like linseed.
How do you remove oil paint from brushes without turpentine if it has dried?
Soak the bristles in vegetable oil for several hours, work out the softened paint, then apply a soap paste and rinse. A solvent-free brush restorer can help with stubborn paint.
Does solvent-free cleaning take longer?
Slightly. Expect two to four minutes per brush, mainly because you need several rounds of soap to remove all the oil.
Final Thoughts
Cleaning oil paint brushes without solvent comes down to three steps: wipe, dissolve with oil, and wash with soap until clear. It is gentler on your lungs, simpler to travel with and works for every brush type. When you need new brushes that hold up to this routine, see our guide to oil painting brushes that last.




2 Comments