Want to add a personal touch to your Minecraft world? Crafting a painting is one of the best ways to decorate your space and make it truly yours. Learn how to craft painting Minecraft style and transform your virtual environment.
Whether you’re aiming to brighten up your base or create unique art, knowing how to craft a painting can transform your gameplay experience. In this guide, you’ll learn simple steps to create paintings, customize them, and even go beyond the basics with custom designs.
Ready to turn blank walls into a gallery of your own? Keep reading to unlock the secrets of crafting paintings in Minecraft!
Materials Needed
To craft a painting in Minecraft, you need specific materials. These materials are easy to find in the game world. Gathering them is the first step to create your own artwork inside Minecraft. The main items you need are wool and sticks. Each plays a key role in crafting the painting.
Gathering Wool
Wool comes from sheep, a common animal in Minecraft. Find sheep in grassy areas or plains. Use shears to get wool quickly without hurting the sheep. You need at least one block of wool, but having extra helps. White wool is standard for paintings. Dyeing wool is not necessary for crafting a painting.
Collecting Sticks
Sticks are easy to make from wooden planks. Chop down trees to collect logs. Convert logs into planks in your crafting menu. Then, place two planks vertically to craft sticks. You need at least eight sticks for one painting. Sticks act as the frame around the wool in the crafting process.

Credit: www.minecraft.net
Basic Crafting Steps
Crafting a painting in Minecraft adds style and personality to your builds. The process is simple and only requires a few steps. Follow these basic crafting steps to create and display paintings in your world. This guide covers everything from crafting the item to placing it on a wall.
Crafting The Painting
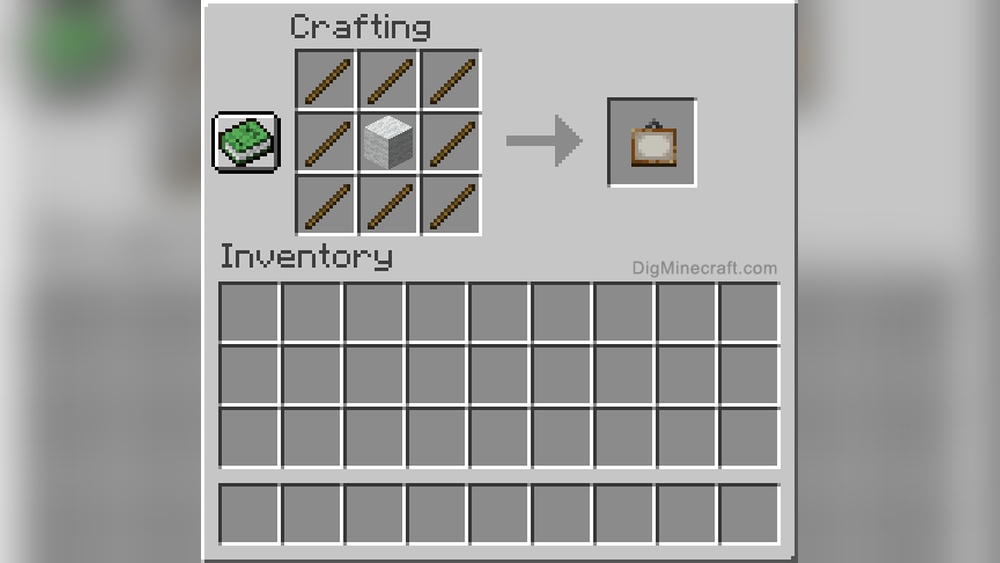
To craft a painting, gather eight sticks and one piece of wool. Open your crafting table to the 3×3 grid. Place the wool in the center slot. Surround the wool with sticks in all other slots. This recipe creates one painting. Wool color does not affect the painting’s design.
Placing The Painting
Hold the painting in your hand and face the wall. Right-click or tap the wall to place the painting. The painting will appear on the surface you clicked. If the space is too small, Minecraft will choose a smaller painting design. You can break and move the painting anytime without losing it.
Advanced Customization Techniques
Custom Paintings
Custom paintings add a unique touch to your Minecraft world. They replace the default art with your own images. This makes your builds more personal and creative. Creating custom paintings involves changing textures or adding new data. The process works for both Java and Bedrock editions. Below are key methods to craft your own paintings.
Using Resource Packs
Resource packs change Minecraft’s textures and sounds. You can replace the default painting images with new ones. Start by downloading the original painting textures from Minecraft’s files. Edit these images using simple tools like MS Paint or GIMP. After editing, place the new images in a resource pack folder. Load this pack in Minecraft’s settings to see your custom paintings.
Editing Painting Textures
Painting textures are PNG files that store the art images. Open these files in an image editor to change the pictures. Keep the same image size to avoid errors in the game. Save your changes and add the files to your resource pack. This step lets you put any picture you want on a Minecraft painting. Make sure the art fits the Minecraft style for best results.
Creating Data Packs
Data packs add new game features and customize content. For paintings, data packs tell Minecraft how to use your new images. Create JSON files that define the painting’s size and texture. Place these files in a data pack folder inside your world.