Fast drying is acrylic’s biggest advantage and its most common trap. Paint goes down, sets in minutes, and the next stroke lands on top, but if the order, thickness, or timing is off, you get streaks, lifting, muddy color, or a surface so slick the next coat beads up. Learning how to layer acrylic paint correctly means controlling three things on every pass: how dry the layer below is, how thin or thick the new layer is, and what job that layer is supposed to do.
Quick answer: To layer acrylic paint correctly, start with thin, lean layers (a toned ground and loose block-in), let each one dry to the touch before painting over it, and build gradually toward thicker, more opaque paint and fine details. Thin with acrylic medium rather than lots of water so each layer keeps enough binder to bond, and finish with glazes or highlights on top. Wait at least 24 to 72 hours before varnishing, longer for thick passages.
How Acrylic Layers Actually Bond
Acrylic paint dries as water leaves the emulsion and the acrylic polymer particles fuse into a film. Once that film forms, water won’t redissolve it, which is why you can paint over a dry layer without disturbing it. The new layer bonds partly by gripping the texture of the layer below and partly by the fresh binder fusing with the surface.
Two practical rules follow. First, the lower layer needs to be dry, or at least set enough that your brush won’t drag it. Second, each layer needs enough binder to form its own sound film. That is why heavily water-diluted paint can lift, powder, or fail to adhere: there isn’t enough polymer left to hold the pigment together.
Unlike oil painting, acrylic doesn’t require a strict “fat over lean” rule, because the film stays flexible throughout. The useful version for acrylic is simpler: thin to thick, and dull to glossy only where you intend it. Very glossy layers can be slippery for the next coat, while slightly matte layers give it something to grip.
What You Need for Layering
- Artist-quality acrylics with good pigment load. Student paints contain more filler and often need more layers to cover. See our comparison of acrylic paint brands for layered work if you’re choosing a set.
- Gesso-primed surface, canvas, panel or heavy paper.
- Matte and gloss acrylic medium for thinning without weakening the paint.
- Glazing medium (optional) for transparent color layers with longer open time.
- Brushes: a large flat for blocking in, filberts for blending, a round and a liner for detail.
- Palette knife for mixing and for thick top layers.
- Spray bottle and a stay-wet palette to keep mixed paint workable.
- Hair dryer on a cool or low setting to speed drying between layers.
- Fine sandpaper (220–400 grit) for smoothing ridges between layers.
How to Layer Acrylic Paint Correctly: The Six-Stage Sequence
Most layered acrylic paintings, from landscapes to portraits, follow the same broad order. Each stage has a different consistency and purpose.
| Stage | Purpose | Consistency | Typical drying wait |
|---|---|---|---|
| 1. Toned ground | Kill the white, set overall temperature | Thin wash, like ink | 5–15 minutes |
| 2. Underdrawing / underpainting | Map shapes and values | Thin, single color | 10–20 minutes |
| 3. Block-in | Establish main color masses | Light cream | 20–40 minutes |
| 4. Building form | Refine value, edges and color | Soft butter | 30–60 minutes |
| 5. Glazes and scumbles | Adjust color, unify, add depth | Transparent or broken film | 15–30 minutes per glaze |
| 6. Details and highlights | Final accents, texture, impasto | Thick or crisp | Hours for impasto |
Drying times vary with humidity, temperature, airflow, paint brand and layer thickness. Treat these as starting points and check with a light knuckle touch: if it feels cool, it still contains water.
Stage 1: Tone the ground
Brush a thin wash of a mid-value color across the whole surface. Burnt sienna, yellow ochre, or a gray made from ultramarine and burnt umber are common choices. A toned ground makes it easier to judge values, because pure white makes every color look darker than it is. Bits of the ground showing through later layers also tie the painting together.
Stage 2: Draw and underpaint
Sketch the main shapes with a thinned dark color and a small round brush, or with a pencil if you prefer. Then mass in the shadows with the same color, keeping it thin. This is a value map. Get the big lights and darks right here and the rest of the painting becomes much easier.
Stage 3: Block in color
Cover each area with its local color using a large brush. Don’t chase detail. Aim for the right hue and value in big, flat shapes, and let the edges stay soft. Paint should be fluid enough to move easily but thick enough to cover the underpainting at least partially.
Stage 4: Build form and refine
Now work over the block-in with slightly thicker paint, adjusting value, adding half-tones, and sharpening the edges that matter. Mix several values of each color on your palette before you start so you aren’t remixing while layers dry. This stage usually takes two or three passes.
Stage 5: Glaze and scumble
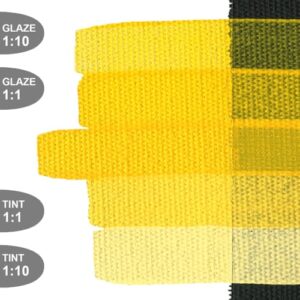
A glaze is a thin, transparent color layer laid over dry paint, which shifts the color beneath it the way tinted glass would. A scumble is the opposite: a thin, semi-opaque, usually lighter layer dragged over a darker area to soften it or create atmosphere. Both rely on the layer below being fully dry. More on each below.
Stage 6: Details, highlights and texture
Save the brightest highlights, crisp edges, and thick textured strokes for last. Thick paint on top of thin paint is stable; thin paint on top of heavy texture tends to pool in the valleys and looks uneven.
Glazing Acrylics: Ratios and Technique
Glazing is where layering pays off the most, because it creates color depth you can’t mix on the palette. A few points make it reliable:
- Use transparent pigments. Quinacridones, phthalocyanine blues and greens, dioxazine purple, and transparent iron oxides glaze beautifully. Opaque colors like titanium white and cadmiums tend to cloud.
- Thin with medium. A common starting range is about 1 part paint to 5–10 parts gloss or glazing medium. More medium means a more subtle glaze.
- Apply thinly and evenly with a soft, wide brush. Wipe back with a lint-free cloth if it goes on too strong.
- Let each glaze dry fully before the next, or you’ll lift and streak the one below.
- Build slowly. Three thin glazes look richer than one heavy one.
Gloss medium keeps glazes clear. Matte medium contains matting agents that can look cloudy in several stacked layers, so reserve it for the final layer if you want a matte finish.
Scumbling, Dry Brushing and Broken Color
Scumbling uses a stiff brush loaded with a small amount of semi-opaque paint, scrubbed lightly so the color below shows through gaps. It’s ideal for haze, distance, sunlight on surfaces, and softening an area that looks too harsh.
Dry brushing uses even less paint, dragged quickly across a textured surface so it catches only the high points. It’s the fastest way to suggest wood grain, grass, weathered stone, or the weave of fabric. Both techniques depend on layers below being completely dry; damp paint will smear instead of breaking.
How Long to Wait Between Acrylic Layers
Thin layers of acrylic are often touch-dry in 10 to 30 minutes. Heavier body paint applied thickly can take an hour or more to set and much longer to dry all the way through. Very thick impasto can stay soft inside for days.
You can safely work over a layer once it’s touch-dry, as long as you’re not scrubbing hard. For glazing or anything that involves pressure, give it longer. A hair dryer on a low setting, held about a foot away, speeds things up, but too much heat can cause skinning or bubbles in thick paint.
If you need more time to blend instead, add a retarder or slow-drying medium to the paint, mist the palette, and work in a cooler, more humid room.
Water vs Medium for Thinning Layers
Water is free and fine in moderation, but heavy dilution weakens the paint film. Many paint makers suggest that adding up to roughly a third water by volume is generally safe on primed surfaces, while more than that can risk poor adhesion and a chalky finish. Guidance varies by brand, so check the manufacturer’s notes.
Acrylic medium, on the other hand, adds binder as it thins, so the layer stays strong and flexible no matter how transparent you make it. For anything thinner than light cream, use medium, or a mix of medium and a little water.
Troubleshooting Layering Problems
| Problem | Likely cause | Fix |
|---|---|---|
| Lower layer lifts or smears | Painted before it was dry; overworking | Wait longer, use lighter pressure, apply new paint in one confident stroke |
| Streaky coverage | Transparent pigment, too much water, overbrushing | Add a more opaque color or an underlayer of a similar opaque tone; use slightly thicker paint |
| Muddy color | Wet-into-wet mixing of complements; too many layers of mixed color | Let layers dry and glaze clean color over them instead |
| New coat beads or crawls | Very glossy or greasy surface below | Lightly sand, or apply a thin layer of matte medium to give tooth |
| Chalky, powdery patches | Over-diluted with water | Seal with a coat of medium, then repaint with properly thinned paint |
| Cracks in thick layers | Thick paint dried too fast, or applied over a soft, not-yet-dry layer | Build impasto in stages, use gel medium for bulk, avoid heat on thick paint |
| Colors look darker when dry | Wet acrylic binder is milky and clears as it dries | Mix slightly lighter than your target; test swatches |
Common Mistakes When Layering Acrylics
- Starting with detail. Fine details painted early get buried or fight later layers.
- Going thick too soon. Heavy texture in early layers makes smooth glazing impossible later.
- Using white to lighten every mix. It cools and chalks colors. Try a lighter yellow or the ground color for some passages.
- Trying to blend on the canvas after the paint has set. That’s when acrylic drags and leaves ridges. Blend fast, or layer and glaze instead.
- Skipping drying time between glazes. One impatient glaze can lift two hours of work.
- Not testing color shift. Paint a swatch, let it dry, and compare before committing a big area.
Layering Tips by Skill Level
Beginners
Limit yourself to three or four layers: toned ground, block-in, refinement, highlights. Use a limited palette of five or six colors so layers stay harmonious. Work small, around 8×10 or 9×12 inches, so you finish each layer before the paint dries on the palette.
Intermediate painters
Add a dedicated value underpainting and one or two glazes. Experiment with a stay-wet palette and slow-drying medium so you can blend on the canvas when you want soft transitions.
Advanced painters
Combine fluid acrylics and inks for glazes with heavy body paint for top texture. Our acrylic ink review covers how intense, transparent ink layers behave over dried paint. Isolation coats before varnishing, made from soft gel gloss diluted with water, also protect the paint layers if the varnish ever needs removing.
Finishing: Isolation Coat and Varnish
Once the final layer is dry, typically at least 24 to 72 hours for normal layers and longer for thick paint, many painters apply an isolation coat. It’s a clear, permanent acrylic layer that evens out the sheen and separates the paint from a removable varnish. A common recipe is about two parts soft gel gloss to one part water, but follow your medium’s label.
Varnish goes on after the isolation coat has dried. It protects against dust and UV and unifies glossy and dull areas, which is especially noticeable in paintings with lots of glazes.
FAQs
Do you have to wait for acrylic paint to dry between layers?
For crisp layers, glazes and dry brushing, yes. If you want soft blending, you can work wet-into-wet within the paint’s short open time, but layer-on-layer techniques need the paint below to be at least touch-dry.
How many layers of acrylic paint should I use?
There’s no fixed number. Simple paintings may need three or four layers, while detailed realism can involve ten or more, including glazes. Use as many as it takes to get coverage and depth, keeping each layer thin.
Why does my acrylic paint look patchy after layering?
Patchiness usually comes from transparent pigments, uneven thinning, or mixed sheen between matte and glossy areas. A more opaque layer, consistent dilution, and a final varnish usually solve it.
Can you layer acrylic over oil paint?
No. Acrylic won’t bond reliably over oil paint and can peel off. You can paint oil over fully dry acrylic, but not the other way around.
Should I use water or medium between layers?
Use a little water to adjust flow, but switch to acrylic medium for anything thinner than light cream. Medium keeps the paint film strong; too much water weakens adhesion.
Can I sand between acrylic layers?
Yes. Once a layer is fully dry, light sanding with fine-grit paper removes ridges and brush marks, which helps smooth glazes later. Wipe off the dust before painting.
Next Step
Good layering is a sequence, not a trick: thin and loose first, thicker and sharper last, with enough drying time and medium in between to keep each film sound. Practice it on a small study and the difference in depth will show quickly.
The paint itself also shapes how well layers cover and glaze. Pigment load, opacity and binder quality vary a lot between ranges, so compare options in our guide to the best acrylic paint brands before your next layered piece.