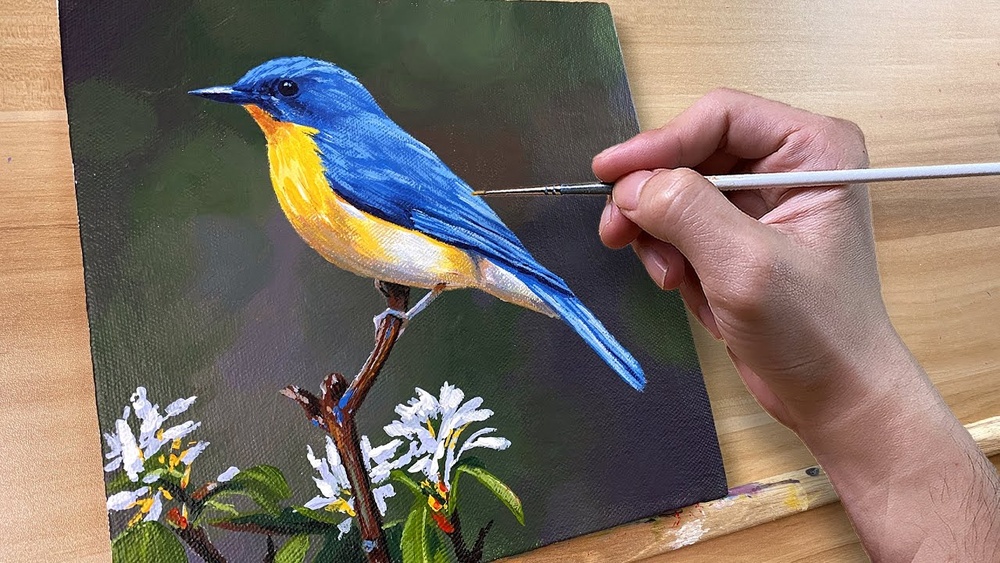
Birds reward acrylic painters who think in shapes before feathers. Most bird paintings that look stiff or cartoonish go wrong in the first ten minutes: a head too big, a body too round, an eye placed in the wrong spot, or feathers painted one by one across the whole body. This guide explains how to paint a bird with acrylic paint by building it the way the bird is built, from simple forms to feather groups to the small details that bring it to life.
Quick answer: To paint a bird with acrylic paint, sketch it from a reference using an oval for the body and a circle for the head, paint the background first, then block in the bird’s main color areas in mid-tones. Add shadows and highlights to give it a rounded form, suggest feather groups (not every feather) with a small flat or liner brush, and finish with the eye, beak, feet and a white catchlight in the eye. Let each layer dry before adding fine detail.
Materials You’ll Need
- Surface: canvas board, small stretched canvas, or heavy acrylic paper, 8×10 to 11×14 inches.
- Acrylic paints: titanium white, mars or ivory black, burnt umber, burnt sienna, yellow ochre, cadmium yellow, cadmium red, ultramarine blue and phthalo blue. Add colors specific to your bird species.
- Brushes: 1/2 in flat for backgrounds, small flats (size 2–6), small round (size 2–4), a liner or rigger for fine feather lines, and a small filbert for soft blending.
- Pencil, eraser, palette knife, water, paper towels and a spray bottle.
- Reference photo: a clear, well-lit image of the species you want to paint.
Small, detailed subjects benefit from paints with smooth consistency and strong pigment. Our guide to the best acrylic paint brands for detailed work compares options at different price points.
Choosing a Good Reference Photo
Most of a bird painting’s success is decided before you pick up a brush. A good reference shows the bird large and in sharp focus, especially the eye, with clear light coming from one direction so you can see where the shadows fall. Side or three-quarter views are easier than birds facing straight at you, which foreshortens the body and beak.
Use your own photos, public-domain sources, or images whose license allows reference use. Field guides are helpful for checking markings and proportions, even if you paint from a photo. If the background in your reference is busy, simplify it; you don’t need to copy every leaf to keep the bird believable.
Understand the Bird’s Structure
A few anatomy basics make any bird easier to paint, whether it’s a sparrow or a heron.
Simple shapes
Most perching songbirds can be drawn as an egg-shaped oval for the body and a smaller circle for the head that overlaps the top of the oval. The tail extends from the back of the body, and the beak points from the front of the head. Getting the size relationship between head and body right is more important than any feather detail.
Feather groups
Feathers grow in overlapping groups that act like shingles on a roof. On a perched bird, from front to back of the wing, you’ll typically see:
- Coverts: small, rounded feathers at the top of the wing, like scales.
- Secondaries: medium feathers in the middle of the folded wing.
- Primaries: the longest flight feathers at the wingtip, often crossing over the tail.
- Tail feathers: long feathers that fan out from beneath the body.
The head, breast and belly have small, soft feathers that read as a smooth surface rather than individual shapes. That’s where soft blending works better than detailed strokes.
Eye placement
The eye usually sits roughly in line with the gape (the corner where the beak opens) and above it. Placing it too high, too far forward, or too large is the most common reason a bird looks off. Check your reference carefully.
Color Mixes for Popular Birds
| Bird | Main colors | Shadow mix | Notes |
|---|---|---|---|
| Northern cardinal (male) | Cadmium red + touch of quinacridone or alizarin | Red + burnt umber + ultramarine | Black mask around the beak; orange-red beak |
| Blue jay | Ultramarine + phthalo blue + white | Ultramarine + burnt umber | Black necklace, white wing bars, gray-white belly |
| American robin | Burnt sienna + cadmium orange for the breast; gray back | Burnt sienna + umber | White eye ring; yellow beak |
| Black-capped chickadee | Black cap and bib, white cheeks, warm buff sides | Gray mixed from black, white and umber | Very round body, short tail |
| Goldfinch (male, summer) | Cadmium yellow + white | Yellow + a touch of yellow ochre and purple | Black wings with white bars, black forehead |
| Hummingbird | Phthalo green + yellow + white for back | Phthalo green + burnt umber | Iridescent throat; long thin beak |
Note on blacks: pure black looks flat on feathers. Mix in a little ultramarine or burnt umber, and paint highlights on black feathers with a blue-gray rather than white.
How to Paint a Bird With Acrylic Paint: Step by Step
Step 1: Sketch from your reference
Lightly draw the body oval and head circle, then the tail, wing shape, beak, eye and legs. Add the branch or perch. Check proportions by comparing the head width to the body length in your reference. Erase heavy lines so they don’t show through.
Step 2: Paint the background
Paint the background first so you can paint the bird’s edges over it cleanly. A soft, blurred background makes the bird stand out. Try a gradient of soft greens for foliage, a light blue-gray sky, or a warm neutral. Blend while wet, or dab soft shapes of out-of-focus leaves. Let it dry completely.
Step 3: Paint the branch
Block in the branch with burnt umber and ultramarine, adding lighter bark texture with dry brushing and a few bits of moss or lichen. Keep it less detailed than the bird so it doesn’t compete.
Step 4: Block in the bird’s main colors
Using small flats, fill each color area with its mid-tone: the red body of a cardinal, the blue back of a jay, the orange breast of a robin. Follow the direction feathers grow as you brush, from head toward tail. Don’t worry about detail; aim for clean, accurate shapes. Two coats may be needed for full coverage.
Step 5: Shape the form with light and shadow
Decide where the light comes from. Add darker values on the opposite side of the body, under the wing, beneath the head, and under the belly where it meets the branch. Add lighter values on the top of the head, the shoulder and the breast facing the light. Blend these softly on the head and body so the bird looks round, not flat.
Step 6: Suggest feather groups
Now work on the wing. Paint the coverts as small, curved, overlapping strokes. Paint the secondaries and primaries as longer, slightly darker feathers with thin light edges, using a small flat or liner brush. Each feather’s light edge is what separates it from the next. On the tail, paint long overlapping feathers with lighter tips.
Resist painting every feather on the body. A few suggested feathers near the edges of the breast and back are enough for the eye to fill in the rest.
Step 7: Paint the eye
Paint the eye as a dark circle, using black mixed with a touch of burnt umber. Many birds have a dark eye that reads almost black at painting scale. Add a thin ring of lighter color around it if the species has an eye ring. Once dry, add a small white catchlight on the side facing the light, about 1 o’clock or 11 o’clock. That tiny dot is what makes a bird look alive.
Step 8: Beak and feet
Paint the beak with its base color, then add a darker line where the upper and lower halves meet and a soft highlight on top. Feet and legs are usually gray, pink-brown or black. Paint the toes wrapping around the branch, with small highlights on each knuckle. Keep them thin; feet painted too thick look clumsy.
Step 9: Final details and glazes
Add fine feather lines with a liner brush around the edges of the bird to soften its silhouette against the background. Brighten a few highlights. If any area needs deeper color, apply a thin glaze of transparent pigment mixed with gloss medium. Acrylic inks are useful for these vivid glazes; our acrylic ink review explains how ink layers behave over dried paint.
Painting a Bird in Flight
Flying birds use the same process with a different structure. The wings open to show the full sequence of feathers: coverts near the leading edge, then secondaries, then the long primaries fanning out at the tip. The underside of the wing is often lighter and in shadow, while the upper side catches the light.
Sketch the body as a streamlined oval, tilted along the line of flight, and draw each wing as a long, tapering shape attached at the shoulder. Pay attention to how the wingtips separate into individual “fingers” on larger birds like hawks and gulls. Keep the background simple, usually a soft sky gradient, so the silhouette reads clearly. A little motion blur on the wingtips, made by dry-brushing the edges outward, suggests movement without losing the bird’s form.
Painting Techniques That Make Feathers Look Real
- Follow the growth direction. Strokes running from head to tail make feathers look natural.
- Use soft and lost edges. Let parts of the bird’s outline blend into the background, especially on the shadow side.
- Dry brushing over a dried base adds soft, fluffy texture to breast feathers.
- Light edges on dark feathers separate wing feathers better than dark outlines.
- Thin paint for detail. Liner work needs paint thinned to an inky consistency so lines flow without dragging.
Common Mistakes When Painting Birds
- Head too big or too small. Compare head and body proportions to the reference.
- Eye in the wrong place. Check its position against the beak gape.
- Missing catchlight. Without it, the bird looks lifeless.
- Every feather outlined. This creates a busy, scaly look. Suggest feather groups instead.
- Flat, single-value color. Birds need light and shadow to look round.
- Floating birds. Toes should grip the branch, with a soft shadow under the body.
- Busy, detailed backgrounds. They compete with the bird. Keep them soft.
Tips by Skill Level
Beginners
Start with a round, simple bird like a chickadee or sparrow on a plain background. Use five or six colors. Focus on getting the shape, the eye and a few wing feathers right.
Intermediate painters
Try species with bold patterns, like blue jays or goldfinches, and practice blending soft breast feathers while keeping wing feathers crisp. Add a blurred foliage background.
Advanced painters
Take on birds in flight, iridescent plumage like hummingbirds or starlings, and complex lighting such as backlit birds with glowing edges. Use glazes to build depth in iridescent areas.
FAQs
What is the easiest bird to paint with acrylics?
Round, simply marked birds like chickadees, sparrows and robins are good starting points. Their shapes are easy to draw and their color patterns are clear.
What brushes are best for painting birds?
Small flats and rounds handle feather groups and shapes, a liner brush handles fine feather lines and legs, and a soft filbert helps blend breast feathers.
How do you paint feathers with acrylic paint?
Block in a mid-tone base, let it dry, then add feather shapes with darker values and light edges using a small flat or liner. Suggest groups rather than painting every feather.
How do you paint a bird’s eye realistically?
Paint a dark circle in the right position, add an eye ring if the species has one, and once dry, place a small white catchlight on the side facing the light.
Should I paint the background or the bird first?
Paint the background first. That way the bird’s edges sit cleanly on top, and you can soften them into the background where needed.
How long does it take to paint a bird in acrylic?
A simple bird on a small canvas can take one and a half to three hours. Detailed realistic paintings may take several sessions.
Next Step
Painting a convincing bird comes down to accurate shapes, light and shadow that make the body round, suggested feather groups and a well-placed eye with a catchlight. Work background first, build the bird from mid-tones, and save the fine details for last.
Smooth, well-pigmented paint makes small details and soft blends much easier. Compare options in our guide to the best acrylic paint brands before starting your next bird painting.