If you’ve ever wanted to add a splash of color and charm to your garden or home, painting ladybugs on rocks is a fun and simple way to do it. You don’t need to be an artist or have fancy tools—just a few basic supplies and a bit of creativity.
Imagine turning ordinary rocks into cute, bright ladybugs that bring smiles to anyone who sees them. In this guide, you’ll learn easy step-by-step tips to create your own DIY rock painting ladybugs, perfect for decorating your space or gifting to friends.
Ready to bring your rocks to life with a dash of red and black? Let’s get started!
Materials Needed
Gathering the right materials sets the foundation for your DIY rock painting ladybugs. This step ensures your craft looks vibrant and lasts longer. Each item plays a key role, from the rocks you pick to the brushes you use. Preparation makes painting smooth and fun.
Choosing The Right Rocks
Select smooth, flat rocks for easy painting. Avoid rough or crumbly stones; they don’t hold paint well. Medium-sized rocks work best for ladybug designs. Clean rocks with water and let them dry fully before starting. This helps paint stick and prevents peeling.
Essential Paints And Brushes
Use acrylic paints for bright, lasting colors. Red, black, and white are must-haves for ladybug details. Pick small, fine-tipped brushes for dots and lines. A wider brush helps cover the rock’s base coat quickly. Paint pens can be handy for precise spots and eyes.
Additional Supplies
Keep a cup of water nearby to rinse brushes between colors. Paper towels help clean brushes and fix mistakes. A pencil lets you sketch your design lightly before painting. Seal your finished rock with a clear varnish to protect it outdoors. Gloves protect your hands from paint stains.

Credit: craftsbyamanda.com
Preparing Your Rocks
Preparing your rocks is the first step in creating beautiful DIY ladybug rock art. Clean, smooth rocks help paint stick better and last longer. Taking time to prepare ensures your ladybugs look bright and neat. Follow simple steps to get your rocks ready for painting.
Cleaning And Drying
Start by washing your rocks with warm water and soap. Use a brush to remove dirt and debris. Rinse the rocks well to remove all soap. Let the rocks dry completely before painting. Dry rocks help paint stick and prevent smudging.
Priming The Surface
Apply a layer of white or light-colored primer to your rocks. Primer creates a smooth surface for paint to hold onto. Use a brush or spray primer for even coverage. Let the primer dry fully before starting your ladybug design. Primed rocks give your colors a brighter, cleaner look.
Painting The Base Color
Painting the base color is the first important step in creating your DIY ladybug rock. This layer sets the stage for the details that will bring your ladybug to life. A smooth, even base makes the final design look clean and bright. Choose a vibrant red paint that matches the classic ladybug shade. Use acrylic paint for good coverage and durability.
Applying The Red Coat
Start by cleaning your rock to remove dirt and dust. Use a brush with soft bristles for an even coat. Paint the entire surface where the ladybug will appear. Apply thin layers to avoid drips and uneven spots. Let the first coat dry before applying a second one. Two coats usually give the best color depth and coverage.
Drying Tips
Allow your painted rock to dry in a warm, dry place. Avoid direct sunlight as it can cause the paint to fade. Wait at least 30 minutes between coats for better adhesion. Use a fan or gentle airflow to speed up drying if needed. Make sure the paint is fully dry before adding details or a sealant.
Credit: craftsbyamanda.com
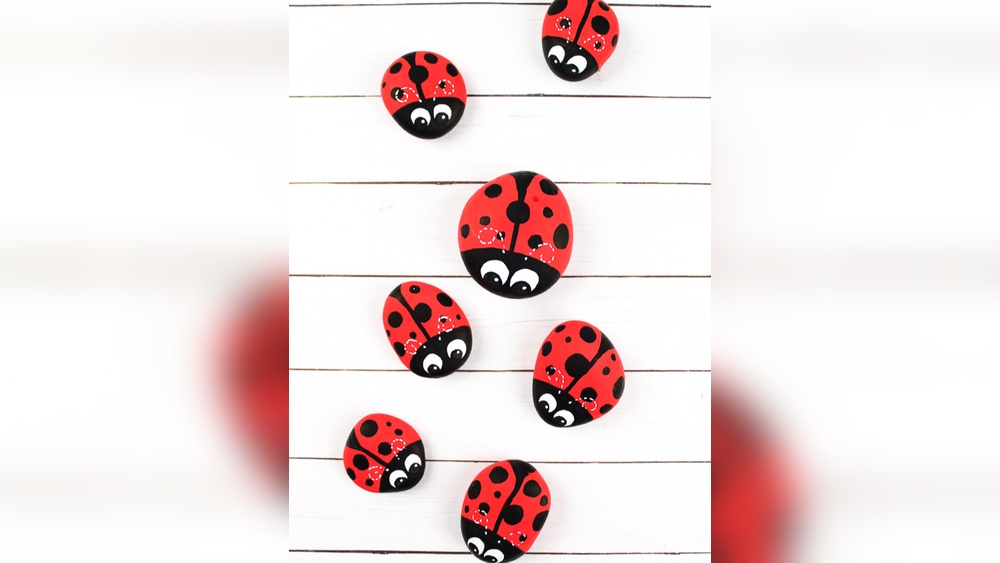
Creating Ladybug Details
Creating the details of your ladybug rock brings it to life. Small touches make a big difference. Focus on simple shapes and clear lines. These details give your ladybug charm and character. Use fine brushes or paint pens for better control. Take your time and enjoy the process.
Painting The Head
Start by painting a small black circle at one end of the rock. This will be the ladybug’s head. Use a round brush for a smooth shape. Make sure the paint is even and fully covers the area. Let it dry before moving to the next step.
Adding Spots
Next, add black spots on the red part of the rock. Use a small brush or the tip of a paint pen. Vary the size and placement of spots to look natural. Aim for three to six spots depending on your rock size. Keep the spots round and spaced out evenly.
Drawing Eyes And Antennae
Finally, add two white dots on the black head for eyes. Place smaller black dots inside the white ones for pupils. Draw two thin black lines extending from the head for antennae. You can curve them slightly for a playful look. These simple details complete your ladybug’s face.
Finishing Touches
Finishing touches bring your DIY rock painting ladybugs to life. They protect your work and add charm. These final steps ensure your ladybugs stay vibrant and eye-catching for a long time.
Sealing Your Artwork
Sealing your painted rocks locks in the colors and designs. Use a clear acrylic sealer spray for best results. Apply thin, even coats and let each layer dry well. This protects your ladybug rocks from water and fading. Choose a matte or glossy finish based on your style. Sealing also helps prevent paint from chipping or scratching. Make sure to seal both sides and edges for full protection.
Optional Decorative Elements
Decorate your ladybug rocks with small gems or glitter for extra sparkle. Use craft glue to attach tiny beads or stickers. Draw fine details like antennae or flower petals around your ladybug. Add a touch of white dots for a 3D effect. You can also place your ladybugs on a painted leaf or flower rock. These extras make your art unique and fun to display. Keep decorations simple to avoid overpowering the ladybug design.
Displaying Your Ladybug Rocks
Displaying your DIY rock painting ladybugs adds charm to any space. These cute creations brighten rooms and gardens alike. Thoughtful placement helps highlight their colors and details. Choose spots where they catch attention and complement surroundings. Keep your ladybug rocks safe and beautiful with smart display ideas.
Indoor Decoration Ideas
Place ladybug rocks on windowsills to catch natural light. They add a splash of color to plain shelves or tables. Use small trays or bowls to group several ladybug rocks together. Add them to plant pots for a fun, natural look. Arrange them along a hallway or stairway for a playful touch. Keep rocks away from heavy traffic areas to avoid damage.
Outdoor Placement Tips
Set ladybug rocks near flower beds to enhance garden beauty. Place them on stepping stones or pathways for surprise spots. Use waterproof sealant to protect rocks from rain and sun. Avoid placing them in muddy or overly wet areas to keep colors bright. Group rocks by size or color for a neat display. Refresh their sealant each season to maintain vibrancy.
Troubleshooting Common Issues
Painting ladybugs on rocks is fun but can have small problems. These issues may cause frustration. Fixing them quickly keeps your project enjoyable. This section helps solve common troubles. You can make your ladybug rocks look perfect.
Fixing Paint Smudges
Paint smudges happen when paint is wet and touched. Use a damp cloth to gently wipe the smudge. Be careful not to spread the paint more. Let the paint dry fully before trying again.
If the smudge is dry, lightly sand the area with fine sandpaper. After sanding, paint over the spot with the correct color. This hides the smudge and smooths the surface. Work slowly for the best result.
Dealing With Uneven Surfaces
Rocks often have bumps and cracks that make painting hard. Start by cleaning the rock well to remove dirt. Use a primer or a base coat to create a smooth surface. This helps paint stick better and look even.
For deep cracks, fill them with a small amount of acrylic paint or craft filler. Let it dry, then sand gently to even out. Paint over the area to blend it with the rest of the rock. This makes your ladybug rock look neat and polished.

Credit: www.youtube.com
Creative Variations
Exploring creative variations can make your DIY rock painting ladybugs truly unique. Small changes in design add charm and personality to each rock. These ideas let you have fun while painting.
Adding Floral Designs
Combine ladybugs with pretty flowers for a fresh look. Paint small blossoms around the ladybug or on the rock edges. Use simple shapes like daisies or tulips to keep it easy. Flowers add color and create a natural scene. This style brightens gardens or indoor spaces.
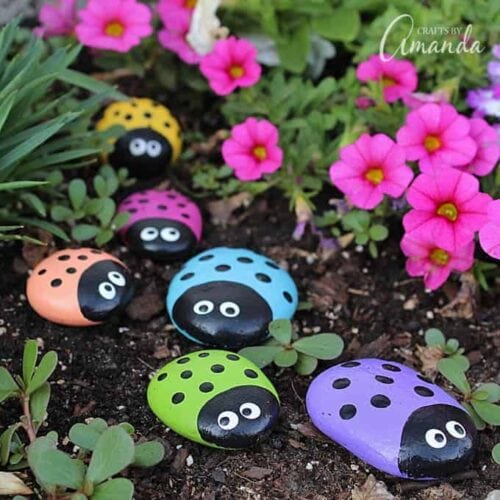
Using Different Color Schemes
Try unusual colors instead of the classic red and black. Use pastels like pink, lavender, or mint green for a soft effect. Bright colors such as orange or yellow make your ladybugs pop. Experiment with metallic paints for a shiny finish. Different colors help your rocks stand out and match your style.
Frequently Asked Questions
What Materials Are Needed For Diy Rock Painting Ladybugs?
You need smooth rocks, red and black acrylic paint, paintbrushes, a fine-tip marker, and a sealant. These materials ensure vibrant colors and durability for your ladybug rocks.
How Do You Start Painting A Ladybug On A Rock?
Begin by cleaning the rock and painting it fully red. Let it dry completely before adding black spots and details for a neat finish.
What Is The Best Paint To Use For Rock Ladybugs?
Acrylic paint is best because it adheres well and is weather-resistant. It provides bright colors and dries quickly for easy layering.
How Do You Make Ladybug Spots On Painted Rocks?
Use a fine-tip brush or black paint pen to add small round spots evenly on the red-painted rock surface. This creates the classic ladybug look.
Conclusion
DIY rock painting ladybugs bring fun and color to any space. You only need a few simple supplies to start. Each rock becomes a charming, tiny ladybug with your own touch. This craft suits all ages and skill levels. Enjoy the process and let creativity flow freely.
Painted ladybugs also make lovely gifts or garden decorations. Try different sizes and colors for variety. Keep practicing to improve your painting skills. Simple steps lead to beautiful results every time. Happy painting and enjoy your new ladybug friends!