Are you ready to bring the serene beauty of a snowy landscape to life with your digital art? Painting snow digitally might seem tricky at first, but with the right techniques, you can create stunning winter scenes that feel crisp and alive.
Whether you want to capture the soft glow of fresh snow or the sparkle of icy textures, this guide will walk you through simple steps to master digital snow painting. By the end, you’ll have the skills to make your digital landscapes not just look real, but tell a story that draws viewers in.
Let’s dive into how you can transform your digital canvas into a breathtaking winter wonderland.

Credit: www.youtube.com
Choosing The Right Tools
Choosing the right tools is the first step to create a beautiful digital snow landscape. The tools you select affect the look and feel of your artwork. Good tools help you add texture, light, and depth to your snowy scene. They make painting easier and more fun. Below are key points to consider when picking your digital painting tools.
Digital Software Options
Many software programs work well for painting digital snow landscapes. Popular choices include Adobe Photoshop, Procreate, and Clip Studio Paint. Each program has unique features and brushes suited for snow effects. Photoshop offers advanced layering and blending modes. Procreate is user-friendly and great for quick sketches. Clip Studio Paint has excellent brush customization. Choose software that fits your style and device.
Brushes For Snow Effects
Brushes play a big role in creating snow textures. Use soft round brushes for smooth snow surfaces. Try scatter brushes to add falling snow or snowflakes. Texture brushes help create rough snow on trees or ground. Experiment with custom brushes designed for snow effects. Change brush size and opacity to add variety. Layer different brushes for realistic snow depth.
Setting Up Your Workspace
Arrange your digital workspace for comfort and efficiency. Use a tablet or a screen with good pressure sensitivity for better control. Keep your most used brushes and colors easy to reach. Set up layers to separate background, midground, and foreground elements. Organize your tools so switching between them is fast. A clean workspace helps you focus on painting.
Creating A Snow Palette
Creating a snow palette is key to painting a realistic digital snow landscape. Snow is not just white. It reflects colors from the sky and surroundings. A good palette includes soft base colors, clear shadows, and subtle variations. These help the snow look natural and lively.
Choosing the right tones sets the mood of your scene. It makes the snow appear cold, bright, or even warm. This section breaks down how to build your snow color palette step-by-step.
Base Snow Colors
Start with cool whites and very light blues for your base snow colors. Pure white can look flat. Mixing in a touch of blue or gray adds depth. Use soft brushes to blend these colors smoothly. This creates a solid foundation that feels soft and fresh.
Shadows And Highlights
Shadows give snow its shape and volume. Use cool grays, blues, or even purple for shadow areas. Avoid harsh black shadows. For highlights, use brighter whites with a hint of warm yellow or light blue. This contrast makes the snow sparkle under light.
Adding Subtle Color Variations
Snow reflects colors from its environment. Add faint hints of pink, lavender, or green to add interest. These subtle colors break the monotony of white and blue. They give your painting a lively and realistic feel. Blend these variations gently for a natural look.
Sketching The Landscape
Sketching the landscape is the first step in creating a digital snow scene. It sets the foundation for your painting. A clear sketch helps organize shapes and ideas before adding colors and details.
Spend time on this stage to plan the overall look. A strong sketch guides the painting process and improves the final result.
Basic Composition
Start by drawing simple shapes to block out the main parts of the scene. Think about the horizon line and how the land meets the sky. Place large snow-covered hills or mountains to create depth. Keep the sketch loose and light. Focus on balance and flow, not details yet.
Incorporating Foreground And Background
Divide the landscape into foreground, middle ground, and background. Add trees, rocks, or snow mounds in the foreground to create interest. Background elements like distant mountains or sky should be smaller and less detailed. This separation gives your scene a sense of space and distance.
Planning Light Sources
Decide where the light comes from early in your sketch. This affects shadows and highlights on the snow. Mark the sun or moon position. Sketch in the direction of shadows cast by trees and hills. Planning light helps make the snow look realistic and three-dimensional.
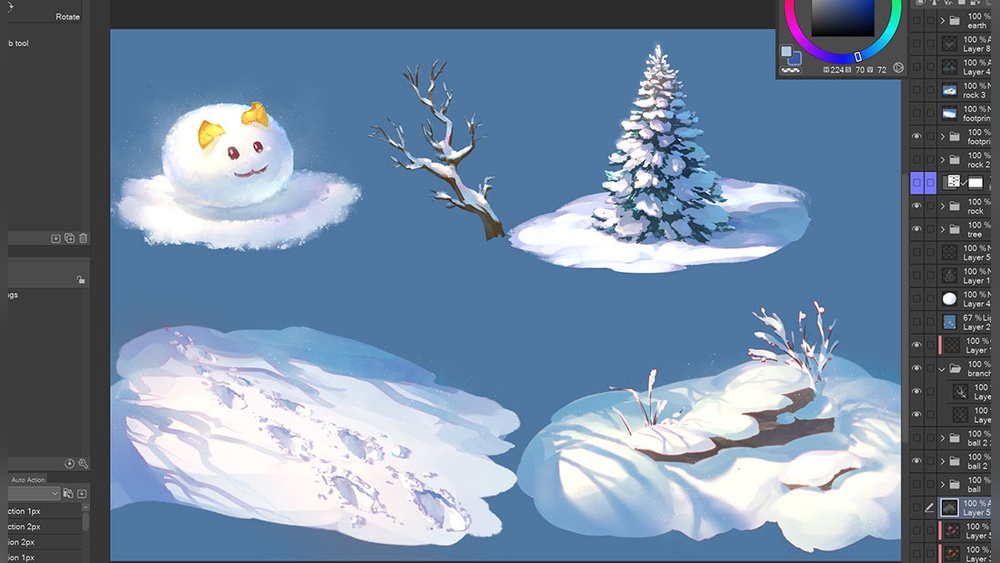
Credit: tips.clip-studio.com
Painting Snow Textures
Painting snow textures gives life to any digital winter scene. Snow appears soft, crisp, and varied depending on its location and lighting. Capturing these details creates a realistic and immersive landscape. Focus on three main types of snow textures to enhance your artwork.
Soft Snow Surfaces
Soft snow looks smooth and fluffy. Use gentle brush strokes with low opacity to mimic its lightness. Blend whites and pale blues to show coldness and shadows. Avoid harsh lines to keep the snow delicate. Add subtle highlights where light touches the surface. This technique helps convey a fresh snowfall.
Snow On Trees And Objects
Snow on trees and objects gathers unevenly. Paint small clumps on branches and ledges using a textured brush. Use white with a touch of gray or blue for shadows. Vary the shape and size of snow patches to make them natural. Show some areas where snow melts or slides off. This detail adds realism and depth.
Snow Drifts And Mounds
Snow drifts form soft hills and curves shaped by wind. Use smooth, rounded strokes to create these shapes. Highlight the tops where light hits and darken the bases for shadows. Layer colors gently to build volume and weight. Adding small cracks or uneven edges makes drifts feel solid and real.
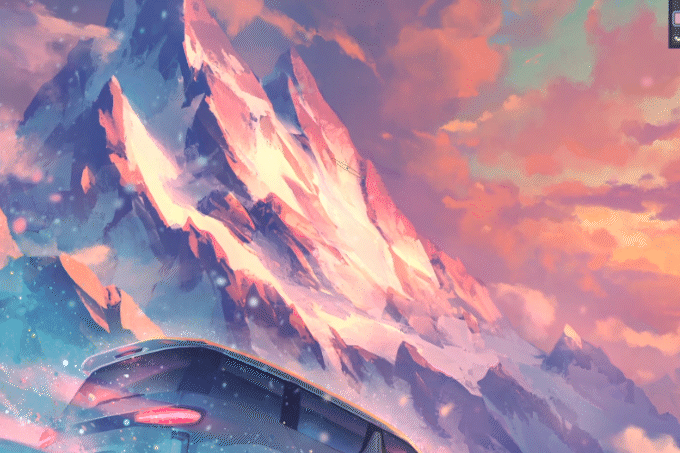
Adding Depth And Distance
Adding depth and distance is key to creating a realistic digital snow landscape. It makes your painting feel alive and three-dimensional. Proper use of fading, layering, and detailing brings the scene to life. This section breaks down how to paint snow with a sense of space.
Fading Snow In The Background
Start by lightening colors in the background to show distance. Use soft, pale blues and grays for snow far away. Reduce contrast and blur details to mimic how snow looks through the air. This fading effect helps create the illusion of depth.
Layering Mid-distance Elements
Add trees, hills, or rocks in the middle ground with more color and detail than the background. Use medium tones and sharper edges here. Layering these elements builds a bridge between the soft background and sharp foreground. It guides the viewer’s eye deeper into the scene.
Detailing Foreground Snow
Focus on clear, crisp details in the foreground snow. Use bright whites and cool shadows to show texture and shape. Include footprints, snowdrifts, or sparkling ice crystals for realism. This sharpness contrasts with the faded background and makes the snow feel close and tangible.
Special Snow Effects
Special snow effects bring life and realism to your digital snow landscape. These details create atmosphere and depth. They help tell a story through your painting. Use them to show movement, temperature, and interaction with the environment.
Falling Snowflakes
Paint snowflakes in different sizes and shapes. Use soft brushes with low opacity for a gentle fall. Add larger flakes in the foreground for depth. Scatter flakes randomly but avoid uniform patterns. Brighten some flakes with white to catch light.
Footprints And Tracks
Footprints add a human or animal presence to the scene. Use a small brush to carve out shapes in the snow. Show subtle shadows inside the tracks for depth. Blur edges slightly to suggest snow softness. Position tracks to lead the viewer’s eye through the painting.
Breath And Mist In Cold Air
Cold air makes breath visible as mist or fog. Use a soft, low-opacity brush to paint white or light gray shapes near mouths or noses. Blend edges gently to create a natural look. Add light reflections to enhance the effect. This detail adds life and coldness to your scene.
Using Snow To Tell A Story
Snow in digital landscapes does more than cover the ground. It can tell a story. Each snowflake, shadow, and drift adds meaning. Using snow thoughtfully helps viewers feel the scene’s mood and setting. Snow shows time, weather, and movement. It shapes the story behind the picture.
Learn how to use snow to create emotions and reveal details. Paint snow not just as white, but as a part of the tale. This makes your digital snow landscapes richer and more alive.
Mood Through Snowy Scenes
Snow sets the mood in a landscape. Soft, fresh snow feels calm and peaceful. Heavy, dirty snow can feel cold and harsh. Use light and shadow on snow to create feelings. Bright snow under sunlight gives hope. Dark, cloudy snow sets a sad or lonely tone. Think about the mood you want before painting snow.
Seasonal And Weather Indicators
Snow shows the season and weather clearly. Powdery snow means early winter. Wet, melting snow shows late winter or early spring. Snow on trees or rooftops shows recent snowfall. Snow mixed with rain or fog tells of changing weather. Use these details to place your scene in time. It helps viewers understand the story without words.
Dynamic Snow Movement
Snow does not always lie still. Wind blows snow into drifts and swirls. Falling snow adds action and life. Paint snowflakes of different sizes and shapes to show depth. Snow blowing across the scene makes it feel alive and cold. Use lines and shapes to guide the eye through the snow’s movement. This adds energy to your landscape story.
Final Touches
Final touches bring your digital snow landscape to life. This stage refines the mood and depth. It makes the scene vivid and believable. Small tweaks here can create a big impact. Focus on lighting, sparkle, and detail polishing. These elements enhance realism and draw the viewer’s eye.
Enhancing Lighting And Contrast
Adjust lighting to create a natural winter glow. Brighten areas where sunlight hits the snow. Deepen shadows to add depth and shape. Use contrast to separate foreground from background. This makes your landscape feel spacious and clear. Soft light edges give a gentle, cold atmosphere.
Adding Sparkle And Reflection
Snow often sparkles under light. Add tiny white or light blue dots for sparkle effects. Use a soft brush to create subtle glimmers. Paint reflections on icy surfaces with smooth, mirror-like strokes. These reflections add realism and interest. Keep sparkles scattered and irregular for natural look.
Polishing Details For Realism
Zoom in to refine small elements. Sharpen edges of snow clumps and tree branches. Add fine texture to snow using tiny, varied strokes. Include footprints or small debris to tell a story. Blend harsh lines softly to maintain realism. These small details give your painting a finished, polished feel.

Credit: www.etsy.com
Frequently Asked Questions
What Tools Are Best For Painting Digital Snow Landscapes?
Digital painting software like Photoshop and Procreate work best. Custom brushes designed for snow effects enhance realism. A tablet with pressure sensitivity helps create natural strokes. Using layers allows easy adjustments and adds depth to the snow landscape.
How Do You Create Realistic Snow Textures Digitally?
Use varied brush opacity and size to mimic snow’s uneven texture. Adding subtle blue and gray shades gives snow depth. Layer soft brushes for smooth snow and hard brushes for icy details. Incorporate light reflections to enhance realism in the snow surface.
What Colors Should I Use For Digital Snow Painting?
Start with white as the base color. Add cool tones like light blues, grays, and purples to show shadows. Warm light touches like pale yellows can simulate sunlight. Avoid pure white alone to keep the snow looking natural and dynamic.
How Can I Depict Falling Snow In Digital Art?
Use small, semi-transparent white dots scattered randomly. Vary the size and opacity for depth perception. Adding motion blur or layering helps create a sense of falling snow. Using custom snowflake brushes can enhance the effect further.
Conclusion
Painting a digital snow landscape can be simple and fun. Use light colors to show snow’s brightness. Add shadows to give depth and shape. Remember to include small details like footprints or falling snow. These little touches bring your scene to life.
Practice often to improve your skills and create beautiful winter scenes. Keep experimenting with brushes and effects. Soon, your digital snow landscapes will tell unique stories. Enjoy the process and let your creativity flow.