
Painting a line art piece for your wall is more than just putting paint on a canvas. It’s a way to bring modern, stylish energy into your space. With line art, simple lines create powerful images—faces, plants, animals, or abstract shapes.
You don’t need to be a professional artist to make something beautiful. In fact, many people find line art relaxing and surprisingly easy once they understand the steps. This guide will walk you through the whole process, from picking your tools to hanging your finished piece.
Along the way, you’ll pick up tips that most beginners never hear, helping you avoid mistakes and create a piece you’re proud to display.
Understanding Line Art
Line art uses clean lines to form images without much shading or color. It’s popular in modern interiors because it’s simple but expressive. You might see a single face drawn with one continuous line, or abstract patterns that look both random and balanced. The secret to great line art is confidence—even imperfect lines can look elegant if you draw them with intent.
A key insight: line art works best when you choose a subject that looks good with minimal detail. Not every photo or idea will translate well. Start by looking at famous line art artists or searching for “one-line drawings” for inspiration.
Choosing Materials And Tools
The right materials make painting line art much easier and more enjoyable. Here’s what you’ll need:
Canvas Or Paper
- Canvas: Stretched canvas is sturdy and ready to hang.
- Art Paper: Thick, smooth paper (like 200gsm or above) works well if you want to frame your art.
- Size: For wall art, aim for at least 16×20 inches so the lines can be seen from a distance.
Drawing Tools
- Pencil: For sketching your lines first.
- Eraser: Soft erasers won’t damage your surface.
Painting Tools
- Acrylic Paint: Dries fast, easy to use, and doesn’t fade.
- Brushes: A set with thin, round tips (sizes 0–2) is ideal for precise lines.
- Paint Marker or Pen: Some artists use black paint pens for extra clean lines.
- Palette: For mixing paint if you want colored lines.
Other Supplies
- Ruler or Stencil: For straight or repeatable shapes.
- Painter’s Tape: Helps create clean edges or mask areas.
- Apron and Drop Cloth: Keeps your clothes and floor clean.
A non-obvious tip: test your paint or pen on a scrap piece first. Some markers bleed or skip, and some paints are too watery for clean lines.
Planning Your Design
Before you start painting, spend some time on your design. Good planning prevents mistakes that are hard to fix later.
Find Inspiration
Look for images with clear outlines and not too many details. Faces, hands, flowers, and geometric shapes are popular choices. Try sketching a few on paper to see which ones you like most.
Make A Sketch
Use a pencil to lightly sketch your design on the canvas or paper. Keep your lines gentle so they’re easy to erase or paint over. This is your chance to adjust proportions or fix any odd shapes.
Decide On Scale
For wall art, your lines should be bold enough to see from a distance. If you’re unsure, step back from your work and check if the lines are visible and clear.
Plan The Line Path
If you’re doing a “one-line drawing,” decide where the line will start and finish. Practicing the movement in the air or on a spare sheet helps your hand memorize the motion.
Transferring The Design
Once you’re happy with your sketch, you need to transfer it to your final surface.
Freehand Drawing
Many artists draw directly onto the canvas with pencil. This works well for simple designs.
Grid Method
If your design is complex or you want perfect proportions, try the grid method:
- Draw a grid (like 2-inch squares) on both your reference image and canvas.
- Copy the design square by square.
- Erase the grid lines before painting.
Projector Method
If you have access to a projector, you can display your design onto the canvas and trace it. This is especially useful for large pieces.
A smart tip: If you want to reuse your design, draw it on tracing paper first. You can then transfer it multiple times without redrawing.

Credit: www.amazon.com
Painting The Lines
This is where your artwork comes to life. Take your time, and remember: smooth, confident lines look better than wobbly, hesitant ones.
Choosing Paint Or Marker
- Acrylic Paint: Gives you a classic, hand-painted look. Use a thin brush for precision.
- Paint Marker: Easier for beginners. Look for one labeled as “artist-grade” for smooth ink flow.
Painting Techniques
- Load Your Brush: Dip your brush in paint, but don’t overload it. Tap off excess to avoid drips.
- Start from the Middle: For long lines, start in the center and work outwards. This helps keep your hand steady.
- Keep a Steady Hand: Rest your pinky on the canvas for support. Move your whole arm instead of just your wrist.
- One Continuous Stroke: Where possible, paint the line in one smooth motion. This prevents uneven thickness.
- Let It Dry: Don’t rush. Let each section dry before painting lines that cross over.
A beginner mistake is going back over a wet line to “fix” it. This usually smears the paint. Wait until it dries, then touch up if needed.
Fixing Errors
If you make a mistake:
- Let the paint dry completely.
- Use a small brush and background color to cover mistakes.
- Repaint the line once the patch dries.
Adding Color And Backgrounds
Line art can be black and white, or you can add color for extra impact.
Solid Background
Painting the background a solid color before adding lines makes your art pop. Use a large brush for even coverage and let it dry fully.
Color Blocks
Some artists add simple shapes of color—circles, blobs, or rectangles—behind or around the lines. This gives a modern, abstract feel.
Keeping It Minimal
Don’t overdo it. Too much color can make the piece busy and distract from the lines. Stick to two or three colors that match your room’s decor.
A secret: test color combinations on a scrap sheet first. Some colors look dull or clash when dry.
Finishing Touches
After the painting is done, a few finishing steps help your piece last longer and look professional.
Erase Pencil Marks
Once the paint is dry, gently erase any visible pencil lines.
Seal The Painting
Spray or brush on a clear acrylic varnish. This protects the paint from dust, sunlight, and smudges. Matte varnish gives a modern look; gloss adds shine.
Framing
If you worked on paper, frame your art behind glass. For canvas, you can hang it as-is or add a simple floating frame.
Hanging Your Art
Hang your piece at eye level for the best effect. Use strong hooks or wall anchors if it’s heavy. Consider the lighting—soft, indirect light works best for line art.
Common Beginner Mistakes And How To Avoid Them
- Lines too thin or faint: Use a slightly larger brush or marker than you think you need. Lines look smaller from a distance.
- Overworking lines: Don’t try to “perfect” every line. Small imperfections make the piece unique.
- Skipping the planning stage: Rushing into painting without a clear sketch leads to awkward shapes.
- Using cheap materials: Low-quality paint or markers can fade or bleed.
- Ignoring drying times: Painting over wet areas causes smudges.
A surprising fact: Many famous line artists leave visible “mistakes.” These show that the art was made by a human, not a machine.
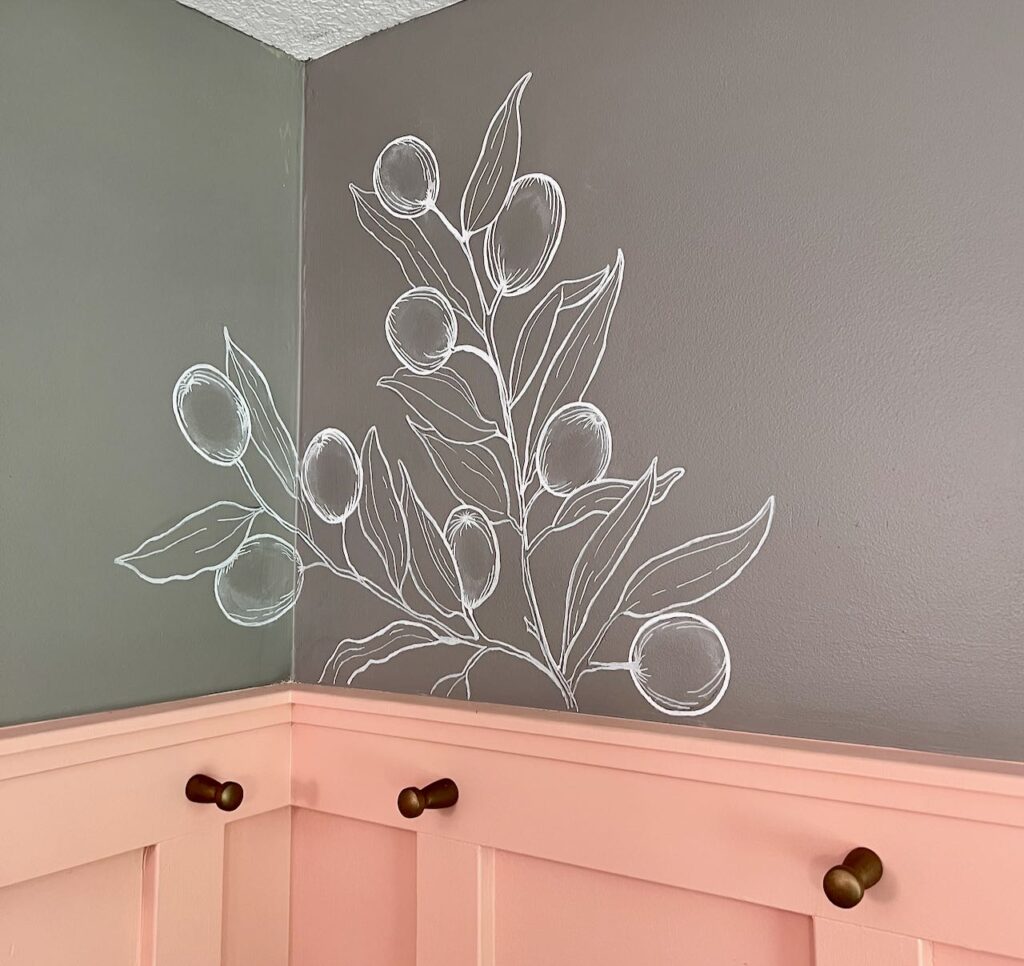
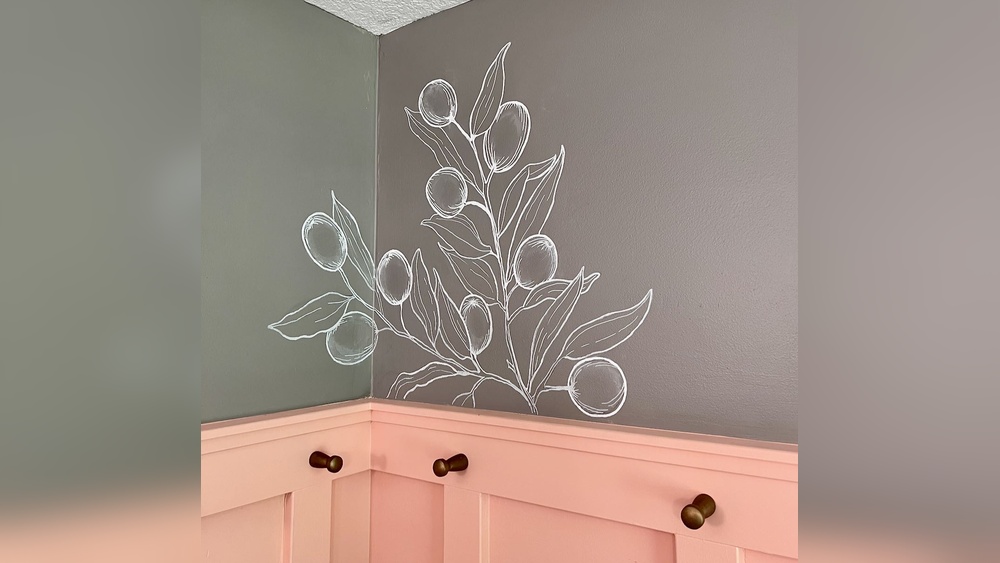
Credit: southhousedesigns.com
Example: Step-by-step Simple Face Line Art
To make this practical, here’s how to create a basic one-line face:
- Prepare your canvas (16×20 inches, stretched canvas works well).
- Sketch a simple face with a pencil. Use a reference if needed.
- Decide where your line will start (often at the forehead or chin).
- Practice the movement in the air, tracing the line path.
- Paint the line in one motion with a thin brush and black acrylic paint.
- Let it dry, then erase any visible pencil.
- Seal with acrylic varnish.
- Hang at eye level in a well-lit spot.
Your first piece won’t be perfect, but you’ll learn a lot. Each new artwork will be easier and better.
Sample Material Comparison
Here’s a quick comparison of common surfaces for line art wall pieces:
| Material | Pros | Cons |
|---|---|---|
| Stretched Canvas | Ready to hang, durable, doesn’t need a frame | More expensive, harder to erase pencil |
| Art Paper | Easy to frame, smooth surface | Needs framing, can bend if thin |
| Wood Panel | Very sturdy, unique look | Heavier, can be hard to paint smooth lines |
Paint Vs. Paint Marker
Choosing between paint and marker depends on your skill level and desired look:
| Tool | Best For | Drawbacks |
|---|---|---|
| Acrylic Paint & Brush | Classic look, textured lines | Requires steady hand, longer drying time |
| Paint Marker | Clean lines, easy for beginners | May fade over time, limited line thickness |
How To Choose The Right Frame
Your frame affects how your art looks on the wall.
| Frame Type | Effect | Best For |
|---|---|---|
| Floating Frame | Modern, makes art look 3D | Canvas pieces |
| Simple Black Frame | Classic, draws focus to art | Papers or prints |
| No Frame | Minimalist, casual | Stretched canvas |

Credit: www.amazon.com
Where To Learn More
If you’re interested in famous examples or want to see more techniques, you can explore the history of line art and notable artists on Wikipedia.
Frequently Asked Questions
What Kind Of Paint Is Best For Line Art On Canvas?
Acrylic paint is best for most line art on canvas. It dries quickly, is easy to handle, and doesn’t fade. Some artists also use oil paint for a richer color, but it takes much longer to dry.
Can I Use Regular Markers Instead Of Paint Markers?
Regular markers often bleed or fade, especially on canvas. Paint markers are made for art surfaces and give a bold, long-lasting line. Always check if the marker is “artist grade” before using it for a wall piece.
How Do I Keep My Lines From Wobbling?
Practice the line on a spare sheet first. Use your whole arm to move, not just your wrist. Resting your pinky on the canvas helps keep your hand steady. Don’t rush—slow, steady motion leads to smoother lines.
Is It Okay To Erase Pencil Lines After Painting?
Yes, but only after the paint is completely dry. Use a soft eraser and gentle pressure to avoid damaging the paint or paper. If the pencil won’t erase, you can touch up with background paint.
What Size Should I Make My Line Art For The Wall?
For most wall art, start with at least 16×20 inches. This size makes the lines visible from across the room. If you have a bigger wall, you can go larger, but keep your design bold and simple.
Line art is a fun, creative way to make your space unique. With a bit of planning, the right tools, and a steady hand, anyone can create a striking piece of wall art. Each time you finish a new piece, you’ll gain confidence and skill—so enjoy the process and let your creativity flow.


