Have you ever wanted to add that mysterious, dreamy touch to your digital artwork? Painting fog and atmosphere can transform a flat scene into a breathtaking visual experience.
But getting it right can feel tricky—how do you make fog look soft, natural, and convincing without overpowering your composition? In this guide, you’ll discover simple, step-by-step techniques that will help you bring your digital paintings to life with realistic fog and atmospheric effects.
By mastering these tips, your art will gain depth, mood, and a captivating sense of space that draws viewers in every time. Ready to elevate your skills and create stunning atmospheric scenes? Let’s dive in.
Tools And Software
Creating digital fog and atmosphere requires the right tools and software. These help artists achieve soft, natural effects with ease. The choice of brushes, layers, and colors shapes the final look. Proper tools make the process smooth and enjoyable.
Recommended Digital Brushes
Use soft, round brushes for smooth gradients. Cloud and smoke brushes add texture and depth. Look for brushes with low opacity and flow settings. These brushes help blend colors softly. Experiment with scatter and texture brushes for natural fog effects.
Layer Management Tips
Keep fog and atmosphere on separate layers. Use multiple layers for different fog densities. Set layers to blend modes like Screen or Overlay. This creates light, transparent effects. Rename layers clearly to stay organized. Group layers to manage complex scenes easily.
Color Palette Selection
Choose muted, cool colors like pale blues and grays. Soft whites work well for highlights in fog. Avoid bright, saturated colors that break the mood. Use gradient shifts for depth and distance. Keep the palette simple to maintain harmony in your artwork.

Credit: www.vecteezy.com
Basic Fog Techniques
Basic fog techniques lay the foundation for creating realistic digital fog and atmosphere. These methods focus on layering, transparency, and edge softness to mimic natural fog effects. Understanding these basics helps artists add depth and mood to their digital paintings with ease.
Building Layers From Dark To Light
Start by painting the darkest parts of the fog first. Use a low opacity brush to apply subtle shades. Gradually add lighter layers on top to build depth. This technique creates a sense of distance and volume within the fog. Each layer should be softer and lighter than the one below it.
Using Opacity And Blending Modes
Adjust the opacity of your brush to control fog density. Lower opacity creates a thin, misty look. Higher opacity produces thicker fog patches. Experiment with blending modes like “Screen” or “Overlay” to enhance light interaction. These modes help the fog blend naturally with the background and objects.
Creating Soft Edges
Fog rarely has sharp edges. Use soft brushes to paint the edges gently. Blur or smudge tools also help smooth transitions. Soft edges make the fog feel more natural and less artificial. Avoid harsh lines to keep the atmosphere immersive and believable.
Adding Depth With Atmosphere
Adding depth with atmosphere transforms flat digital paintings into vivid scenes. It creates space, distance, and mood. Atmosphere softens shapes and adds a sense of scale. This section explains key techniques to add depth using fog and atmospheric effects.
Applying Atmospheric Perspective
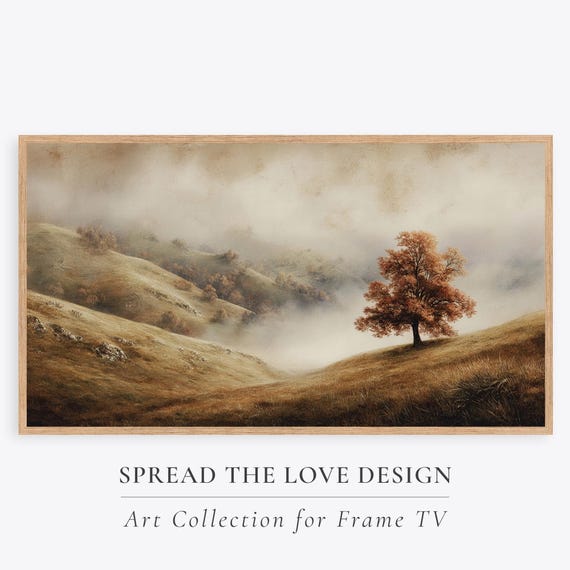
Atmospheric perspective means objects farther away appear lighter and less detailed. Use lighter colors with less contrast for distant parts. Cool colors like blues and grays work well for far elements. Gradually reduce sharpness to show distance. This helps viewers feel the space in your scene.
Blurring And Desaturation Tricks
Blurring distant objects mimics how fog softens vision. Use a soft brush or blur filter to reduce details. Desaturate colors far away by adding gray or blue tones. This lowers color intensity and helps layers blend naturally. Combining blur and desaturation creates a smooth, foggy effect.
Manipulating Light And Shadow
Light changes in foggy scenes. Shadows become softer and less defined. Use light tones to suggest sunlight filtering through fog. Add gentle gradients to show light fading with distance. Darken areas close to the viewer for contrast. Careful light and shadow balance adds mood and depth.

Credit: www.dreamstime.com
Painting Realistic Clouds
Painting realistic clouds adds life to digital fog and atmosphere. Clouds vary in shape, texture, and light. Capturing these details makes the scene believable and vibrant. Use simple steps to create clouds that feel soft and natural.
Start with the basic forms and build up layers. Think about how light interacts with cloud edges and how fog blends with cloud bodies. This approach gives depth and realism to your digital paintings.
Shapes And Textures
Clouds rarely look uniform or flat. Use soft, rounded shapes for fluffy cumulus clouds. Layer different cloud shapes to add variety. Add subtle texture with a textured brush or a scatter brush. This creates a natural, uneven look. Avoid hard edges except for sharp cloud outlines lit by sunlight.
Lighting Effects On Clouds
Clouds change color and brightness with light. Paint bright highlights where sunlight hits. Use warm colors like soft yellows and pinks for sunlight areas. Darker parts of clouds show shadow and depth. Use cool grays and blues for shaded areas. Blend these colors smoothly for a soft look.
Integrating Clouds With Fog
Fog softens cloud edges and blends them into the air. Use low opacity brushes to paint fog around and through clouds. This creates a misty effect. Light fog near the ground or in valleys adds realism. Make sure fog colors match the overall lighting to keep harmony.
Enhancing Mood And Ambience
Enhancing mood and ambience is key to making digital fog and atmosphere feel real and immersive. The right mood pulls viewers into the scene and sets the emotional tone. Soft fog can create calmness, mystery, or eeriness depending on how you paint it. Subtle changes in color and light shape the atmosphere and guide the viewer’s eye. Focus on small details that bring life and depth to your digital fog. These techniques make your artwork more engaging and believable.
Color Grading For Atmosphere
Color grading adjusts the overall colors to fit the scene’s mood. Cool tones like blues and purples suggest calm or cold fog. Warm colors such as oranges and reds add warmth or a sunset glow. Use gentle gradients to blend colors smoothly. Avoid harsh shifts to keep the fog feeling soft and natural. Experiment with opacity and layer modes to achieve the desired effect. Color grading helps unify the scene and enhances emotional impact.
Using Contrast To Create Focus
Contrast defines where the viewer looks first. Keep fog areas low in contrast for softness. Use higher contrast around main subjects to draw attention. Dark shapes against light fog create clear silhouettes. Light highlights can separate objects from fog layers. Balance contrast carefully to maintain the fog’s softness while guiding the eye. Contrast adds depth and dimension to your painting.
Subtle Details And Highlights
Small details make fog feel alive and three-dimensional. Add faint light spots or tiny particles floating in the air. Use soft brushes to paint gentle highlights on edges where light hits fog. Avoid sharp lines; keep details diffuse and blurry. These subtle touches break up flat areas and add realism. Highlights and small textures give your atmosphere a delicate, natural quality.
Common Mistakes To Avoid
Painting digital fog and atmosphere adds depth and mood to your artwork. Avoiding common mistakes can improve your results quickly. Many beginners struggle with certain pitfalls that make fog look unnatural. Focusing on key errors helps create realistic and engaging scenes.
Overusing Fog Effects
Applying too much fog can overwhelm the scene. It hides details and flattens the image. Use fog sparingly to keep important elements visible. Balance fog density with clarity to maintain interest. Less fog often looks more natural and appealing.
Ignoring Light Source Consistency
Fog reacts to light in specific ways. Ignoring light direction breaks realism. Match fog color and brightness to the light source. Shadows and highlights must align with the environment. Consistent lighting makes fog believable and integrated.
Flat And Unconvincing Layers
Fog should have depth through multiple layers. Flat fog looks artificial and dull. Build layers with varying opacity and softness. Use gradients and textured brushes for dimension. Layering creates a rich, immersive atmosphere in your art.
Final Touches And Adjustments
Final touches and adjustments give your digital fog and atmosphere painting its true depth. These last steps refine the mood and bring everything together. Small changes can make a big difference in realism and impact.
Focus on balancing opacity, adding subtle details, and sharpening parts that need clarity. This careful work creates a natural and immersive scene. Each step builds on the last to enhance the overall feel.
Fine-tuning Opacity Levels
Adjust the opacity of your fog layers to control visibility and depth. Lower opacity for distant fog makes the scene feel vast and soft. Higher opacity near the foreground adds density and weight.
Use layer masks to erase or reduce fog in specific areas. This technique shapes the atmosphere and guides the viewer’s eye. Experiment with different levels until the fog looks natural and balanced.
Adding Mist And Smoke Elements
Include mist or smoke to enrich the atmosphere and add texture. Use soft brushes and low opacity to create gentle wisps. Place these elements in front of or behind objects for realism.
Vary the size and shape of mist to avoid flatness. Subtle motion blur can simulate drifting smoke. These details add life and movement to your painting.
Sharpening Key Areas
Sharpen edges of important objects to increase focus and contrast. Clear outlines help separate subjects from the foggy background. Use a small brush with high opacity for this step.
Do not over-sharpen, as it can reduce the fog’s softness. Balance sharp and blurred areas to maintain atmosphere and depth. This contrast guides attention and improves composition.
Credit: www.etsy.com
Frequently Asked Questions
What Is The 80/20 Rule In Painting?
The 80/20 rule in painting means 80% of your effort focuses on core techniques, while 20% refines details. This boosts efficiency and results.
What Is The 70 30 Rule In Drawing?
The 70 30 rule in drawing means allocating 70% of detail to the main subject and 30% to the background. This balance enhances focus and composition.
How To Create An Atmosphere In A Painting?
Create atmosphere in a painting by layering colors, using light and shadow contrasts, and adding depth with atmospheric perspective. Use soft edges and muted tones to suggest distance. Incorporate fog, haze, or light effects to enhance mood and realism.
How To Draw Transparent Objects Digitally?
Draw transparent objects digitally by layering colors with low opacity and using soft brushes. Add highlights and reflections to enhance realism. Use blending modes like “screen” or “overlay” to simulate light passing through. Study real transparent materials to capture accurate light and shadow effects.
Conclusion
Painting digital fog and atmosphere adds depth to your art. Use soft brushes and layer colors gently. Play with light and shadow for a natural feel. Keep practicing to improve your technique over time. Enjoy the process and watch your scenes come alive.