
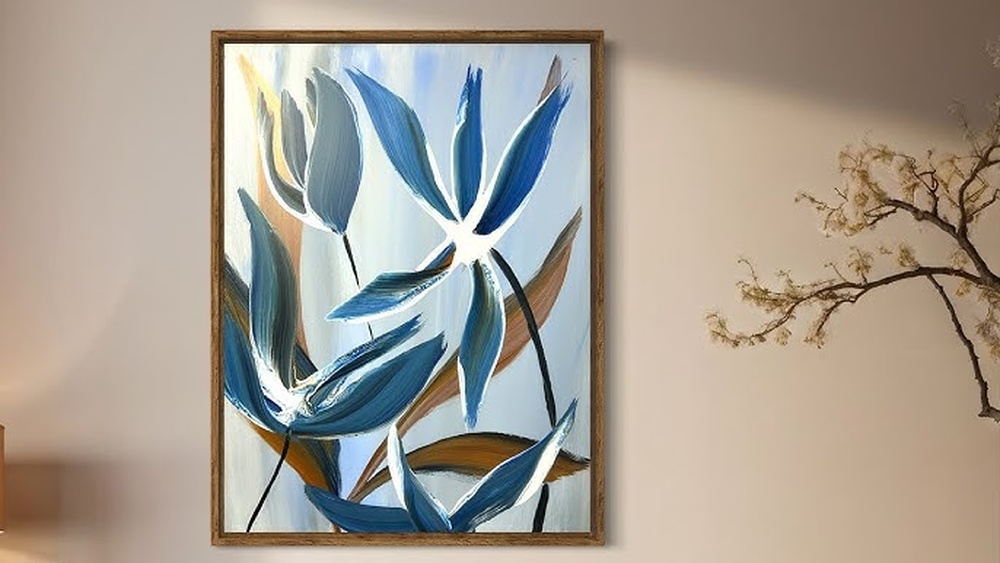
Botanical prints sell for real money in home decor stores, yet most of them are built from a handful of simple shapes: a curved stem, a few repeated leaves, and a lot of breathing room. That is good news if you want to learn how to paint botanical wall art DIY style, because the skills you need are more about planning and restraint than about advanced brushwork.
This guide walks through the full process, from choosing a plant reference to sealing the finished canvas, with specific mixing ratios, drying times, and layout measurements you can follow on your first attempt.
Quick answer: To paint botanical wall art, prime a canvas or heavy paper, sketch one or two plant stems lightly in pencil, and block in leaves with a mid-tone green mixed from a base green plus a little white. Add a darker shade on one side of each leaf and a lighter tint on the other, paint thin vein lines once the base is dry, and leave plenty of empty background. Finish with a satin or matte varnish after the acrylic has cured for at least 24 to 72 hours.
What Makes Botanical Wall Art Look Professional
The botanical style comes from scientific plant illustration, where the goal was to show a plant clearly on a plain background. Modern decor versions keep that clarity but simplify the detail. When a homemade piece looks amateur, the cause is usually one of three things: too many elements crowded together, flat single-color leaves, or a background that competes with the plant.
Professional-looking pieces share a few traits. The subject takes up roughly 50 to 65 percent of the canvas, leaving clear margins. Leaves have at least two values, so they read as three-dimensional. The palette is limited, often just two or three greens plus one accent, and the background is a quiet off-white, cream, sage, or deep charcoal.
Keep those traits in mind as you plan, and your painting will look intentional rather than busy.
Art Supplies for DIY Botanical Painting
You do not need a large kit. A focused set of materials gives you better control than a box of fifty colors. Here is what a typical botanical project calls for.
- Surface: A stretched canvas (16 x 20 inches is a comfortable first size), canvas panel, or 140 lb (300 gsm) cold-press watercolor paper if you plan to frame under glass.
- Paint: Acrylic in a medium or heavy body. Useful colors are titanium white, a cool green (phthalo green or a similar blue-leaning green), a warm yellow, burnt umber or raw umber, and ultramarine blue.
- Brushes: A 1-inch flat for backgrounds, a size 8 or 10 filbert for leaves, a size 2 round for stems, and a size 0 liner for veins.
- Extras: HB pencil, kneaded eraser, palette or paper plate, two water jars, paper towels, painter’s tape, and a spray bottle to keep acrylics workable.
- Finish: Acrylic varnish in matte or satin, plus a sawtooth hanger or wire if the canvas lacks hardware.
Paint quality matters more than brush count. Student-grade acrylics can work, but very cheap craft paint often has weak pigment and dries streaky, which forces you into four or five coats. For brand-level picks suited to canvas pieces that will hang for years, see our roundup of the best paints for wall art projects.
Choosing a Plant and a Layout
Start with plants that have strong, readable silhouettes. Good beginner subjects include eucalyptus, olive branches, monstera leaves, ferns, fiddle-leaf fig, and simple wildflowers. Plants with tiny clustered flowers, such as baby’s breath, are harder because the detail turns muddy at small scale.
Collect two or three reference photos, or press a real stem flat under a heavy book for a day so you can trace its outline. Pressed specimens are helpful because you can see exactly how leaves attach to the stem.
Three Reliable Layouts
| Layout | How It Works | Best For |
|---|---|---|
| Single centered stem | One stem runs vertically, slightly off center, with leaves alternating left and right | Narrow spaces, hallways, pairs of canvases |
| Diagonal sprig | Stem enters from a lower corner and arcs toward the opposite upper third | Square canvases, above a bed or sofa |
| Loose trio | Three stems of varied height grouped like a vase arrangement | Large canvases, 24 x 36 inches and up |
Whatever layout you choose, leave at least 2 inches of margin on a 16 x 20 canvas and keep the stem tip from touching the edge. Crowded edges make a botanical piece feel cropped by accident.
How to Paint Botanical Wall Art Step by Step
The steps below assume acrylic on canvas. If you work on paper with gouache or watercolor, the sequence is the same, but you will skip priming and use thinner layers.
- Prepare the surface. Most pre-stretched canvases are already primed with gesso. If yours feels rough or absorbent, brush on one extra thin coat of gesso and let it dry for about an hour. Sand lightly with 220-grit paper for a smoother surface that suits fine lines.
- Paint the background. Mix your background color in a generous amount, enough to cover the canvas twice. A warm off-white works well: about 10 parts titanium white to 1 part raw umber or yellow ochre. Apply with the 1-inch flat in crisscross strokes, then finish with light strokes in one direction. Paint the canvas edges too. Allow 30 to 60 minutes to dry, then add a second coat.
- Sketch the plant. Once the background is fully dry, draw the stem as a single flowing line using very light pencil pressure. Mark each leaf as a simple oval or teardrop, noting which way it points. Avoid shading in pencil, because graphite can smear into light acrylic.
- Paint the stem. Mix a muted green-brown, roughly 2 parts green to 1 part burnt umber. Use the size 2 round and pull the stroke from the base upward, lifting pressure near the tip so the line tapers naturally.
- Block in the leaves. Mix a mid-tone leaf green. A dependable starting mix is 2 parts green, 1 part yellow, and a small touch of white. Use the filbert and paint each leaf in two strokes, one on each side of the center line, starting at the base and pressing then lifting toward the tip.
- Add shadow. While the base is still slightly damp or after it dries, mix your mid-green with a little ultramarine or umber. Paint this darker shade along the side of each leaf that faces away from your light source, and near where the leaf meets the stem.
- Add highlight. Mix mid-green with white and a little yellow. Apply a thin stroke along the lit edge of each leaf. Keep highlights narrower than shadows, which makes leaves look curved rather than striped.
- Paint veins. After the leaves are dry to the touch (usually 15 to 20 minutes), thin a light green or pale cream with water until it flows like ink. Use the liner brush to paint a center vein and a few angled side veins. Stop each vein short of the leaf edge.
- Refine and clean edges. Touch up the background around leaves where shapes look ragged. A crisp leaf edge against the background is a big part of the botanical look.
- Sign, dry, and varnish. Sign in a corner with the liner brush. Let the painting cure for at least 24 hours for thin layers, or up to 72 hours for thicker work, before applying varnish.
Color Mixing for Natural-Looking Leaves
Straight-from-the-tube green is the number one giveaway of a beginner botanical painting. Tube greens tend to be very saturated and cool, while real foliage is often grayer, warmer, or bluer depending on the plant.
| Plant Type | Starting Mix | Adjustment |
|---|---|---|
| Eucalyptus | Green + white + small amount of blue | Add a speck of gray or the background color to soften |
| Olive branch | Green + yellow ochre + white | Underside of leaves is lighter and silvery |
| Monstera | Green + touch of blue | Deep and glossy, use strong contrast in highlights |
| Fern | Green + warm yellow | Brighter yellow-green at frond tips |
| Dried or autumn stems | Yellow ochre + burnt umber | Add orange or red sparingly as an accent |
A simple trick is to add a tiny amount of your background color to every green you mix. This ties the plant to the canvas and keeps the palette harmonious, the same way a bit of a shared color unifies a room.
DIY Large Canvas Art Ideas for Beginners
Large canvases make a strong statement, but they magnify mistakes. A few adjustments help a beginner handle sizes like 24 x 36 or 30 x 40 inches.
- Scale the subject up, not the detail. On a large canvas, paint fewer, bigger leaves. A single monstera leaf filling half the canvas reads better than thirty small leaves.
- Use a bigger brush. Switch to a 2-inch flat for the background and a size 12 filbert for leaves so strokes stay smooth and confident.
- Grid your sketch. Draw a light grid on your reference photo and a matching, larger grid on the canvas. Transfer the plant square by square for accurate proportions.
- Mix more paint than you think. Running out of a custom green halfway through creates visible color shifts. Store extra mix in an airtight container.
- Try a diptych. Two 16 x 20 canvases hung side by side, with the stem continuing across both, create a large effect with manageable surfaces.
For a related project that uses the same leaf-shaping strokes on a larger, airy subject, the pampas grass wall art tutorial pairs well with a botanical piece on the same wall.
Style Variations to Try
Once you are comfortable with the basic stem-and-leaf method, the same skills transfer to several popular decor styles.
Minimal Line Botanical
Paint only the outline of each leaf with a liner brush in black, charcoal, or deep green on a white ground. This style dries quickly and suits modern rooms. Steady your hand by resting your pinky on the canvas or on a mahl stick.
Silhouette Botanical
Fill each leaf with a single flat dark color, such as deep green on cream or white on navy. Without shading, the strength of the piece comes entirely from shape, so spend extra time on the sketch.
Vintage Specimen Style
Use a warm parchment background, muted greens, and add a small hand-lettered plant name below the stem. Glazing a thin wash of raw umber over the finished, dry painting can give an aged look.
Abstract Botanical
Paint loose, overlapping leaf shapes in blocks of color without veins or highlights. Overlapping semi-transparent layers creates new colors where shapes cross.
Common Mistakes and How to Fix Them
Streaky background. This usually happens when paint is applied too thin or brushed after it starts drying. Add a second coat and keep a wet edge by working in sections. A small amount of acrylic flow improver or glazing medium can help.
Leaves look flat. You likely have too little value contrast. Squint at the painting. If the shadows and highlights disappear, darken the shadows and keep the highlights thin and lighter.
Stem looks stiff. Straight, uniform lines read as artificial. Repaint with a slight curve and taper the end. Real stems are thicker at the base.
Leaves all identical. Vary size, angle, and how much of each leaf you see. Make leaves smaller toward the tip, turn a few so they show their edge, and let one or two overlap.
Pencil lines show through. Erase lightly with a kneaded eraser before painting, or cover lines with a second layer of paint once the first is dry.
Finishing, Varnishing, and Hanging
Varnish protects acrylic from dust, UV light, and yellowing grime. Wait until the paint has cured; thin layers often feel dry in an hour but remain soft underneath for a day or more. Apply varnish in thin, even coats with a wide soft brush, working in one direction, and allow each coat to dry per the product label before adding another.
Matte varnish suits muted, vintage-style botanicals. Satin gives a soft sheen that deepens greens without strong glare. Gloss makes colors pop but can reflect window light, so consider where the piece will hang.
For hanging, place the center of the artwork roughly 57 to 60 inches from the floor, a common gallery guideline. Above furniture, leave about 6 to 10 inches between the furniture top and the bottom of the frame or canvas.
Tips by Skill Level
First-time painters: Start with a single stem of five to seven leaves on a 11 x 14 canvas. Use only two greens and white. Your goal is clean shapes and a smooth background.
Intermediate painters: Add a cast shadow beneath the stem, as if it were lying on paper. Use a soft, low-contrast gray slightly offset from the plant to give a gentle 3D effect.
Confident painters: Try a series of three plants painted with a shared palette and background, sized for a gallery wall. Consistency across the series is what makes it look like purchased art.
A matching set of small natural-motif pieces works well, too. The feather wall art guide uses similar soft blending if you want a companion canvas.
FAQs
What paint is best for DIY botanical wall art?
Acrylic is the most practical choice for canvas because it dries quickly, layers well, and cleans up with water. Gouache gives a lovely matte look on paper but needs to be framed under glass. Choose artist or student grade over thin craft paint for better coverage.
How long does a botanical painting take?
A simple single-stem piece on a 16 x 20 canvas typically takes two to four hours of active painting, plus drying time between the background coats and before varnishing. Larger or more detailed pieces can take several sessions.
Do I need to know how to draw to paint botanicals?
No. You can trace a pressed leaf, use a printed reference with a grid, or transfer an outline with graphite paper. Botanical shapes are forgiving because natural leaves vary anyway.
What are good art supplies for DIY beginners?
A primed canvas, a small set of acrylics (white, a green, a yellow, a blue, and an umber), three or four brushes, a palette, and a varnish cover nearly every botanical project. Adding more colors is less useful than learning to mix the ones you have.
Are DIY art kits for adults worth it for botanical painting?
Kits can be convenient because they bundle canvas, paint, and brushes, sometimes with a printed outline. The trade-off is that included paints may be lower quality. If a kit’s results look streaky, upgrading only the white and green paints often makes a noticeable difference.
How do I keep my botanical painting from looking cartoonish?
Use muted greens mixed with a touch of their complement or the background color, add both a shadow and a highlight to each leaf, and avoid heavy black outlines. Leaving generous empty space around the plant also helps it read as refined decor.
Final Thoughts
Botanical wall art rewards patience in planning more than speed with the brush. Pick a plant with a clear shape, keep your palette tight, give every leaf a light side and a dark side, and protect the empty space around it. Your second and third pieces will come together much faster once the leaf stroke becomes second nature.
Your paint choice affects coverage, color richness, and how well the piece holds up on the wall. Before you start your next canvas, compare the options in our guide to top acrylic and craft paints for canvas decor so your supplies match the effort you are putting in.




One Comment