Have you ever wanted to bring your digital artwork to life with breathtaking skies that captivate and set the perfect mood? Learning how to paint digital sky and atmosphere can transform your scenes from ordinary to extraordinary.
Whether you’re aiming for a calm sunset, a stormy horizon, or a dreamy cloudscape, mastering these techniques will elevate your art instantly. In this guide, you’ll discover simple, effective steps to create realistic skies that draw viewers in and make your digital paintings truly unforgettable.
Ready to unlock the secrets of atmospheric digital art? Let’s dive in!
Color Foundations
Understanding color foundations is key to painting a realistic digital sky and atmosphere. Colors set the mood and depth of your artwork. They help show time, weather, and distance. Starting with a solid color base creates a natural look and guides your painting process.
Choosing the right colors for the sky and atmosphere gives your scene life. Mixing atmospheric hues adds richness and complexity. Using color temperature helps create a sense of space and light. Each step builds on the last to make your digital sky feel alive.
Choosing Sky Colors
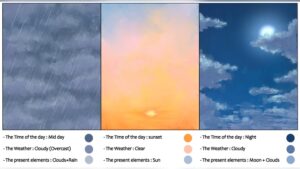
Select sky colors based on the time of day and weather. Bright blues work well for clear midday skies. Soft pinks, oranges, and purples suit dawn or dusk. For stormy or cloudy skies, use grays mixed with muted blues and greens. Keep colors simple and close in value for a smooth gradient effect.
Mixing Atmospheric Hues
Mix colors to show depth and light scattering in the atmosphere. Use lighter tones near the horizon, blending into darker shades above. Add subtle hints of warm or cool colors to mimic air particles and pollution. Layering transparent colors helps create a soft, glowing effect that looks natural.
Using Color Temperature
Warm colors like reds and yellows suggest sunlight and warmth. Cool colors like blues and purples evoke shade and distance. Balance these temperatures to add realism. Warmer colors usually appear closer, while cooler colors recede. This contrast helps give your sky a three-dimensional feel.
Brush Techniques
Brush techniques shape the look of your digital sky and atmosphere. Using the right brush strokes brings life and depth to your painting. Control over texture and blending creates a realistic or stylized effect. Each brush has a unique role in building the sky’s mood and space.
Selecting Brushes
Choose brushes that suit the type of sky you want to paint. Soft round brushes work well for smooth gradients and light clouds. Textured brushes add detail and roughness to stormy or dramatic skies. Experiment with scatter and opacity settings to mimic natural air patterns. Use custom brushes for unique cloud shapes and atmospheric effects.
Creating Cloud Textures
Start with a base shape using a round or soft brush. Add fluffy edges with a textured brush for realism. Use short, random strokes to build volume and depth. Layer different brush sizes to vary cloud density and form. Avoid hard lines by varying pressure and opacity. This technique simulates the lightness and airiness of real clouds.
Blending And Softening
Blending smooths transitions between colors and shapes in the sky. Use a soft brush or smudge tool with low strength. Gently blend edges of clouds to merge them into the atmosphere. Avoid over-blending to keep texture and detail visible. Softening helps create a natural gradient from horizon to zenith. This step enhances the sense of distance and light diffusion.
Layer Management
Managing layers well is essential for painting a digital sky and atmosphere. Layers let you separate parts of your artwork. This way, you can edit each part without changing others. Good layer management saves time and keeps your work organized.
It helps you try different effects easily. You can adjust colors, lights, and shadows on separate layers. This control makes your sky look more natural and detailed. Using layers smartly improves the overall quality of your digital painting.
Organizing Layers
Start by naming each layer clearly. Use simple names like “Base Sky,” “Clouds,” or “Light Glow.” Group related layers in folders. This keeps your workspace tidy. Arrange layers from background to foreground. The base sky layer goes at the bottom. Clouds and lighting layers stay on top. This order helps you paint without confusion.
Layer Modes For Effects
Layer modes change how layers blend with each other. Use “Multiply” to add shadows and depth. “Screen” mode brightens areas and creates light effects. “Overlay” boosts colors and contrast. Test different modes on your clouds and light. This helps create realistic atmosphere effects quickly. Changing modes often gives your sky more life.
Using Opacity Variations
Opacity controls how transparent a layer is. Lower opacity makes layers softer and lighter. Use low opacity for mist and distant clouds. High opacity works well for solid shapes. Adjust opacity to blend layers smoothly. This technique adds depth and realism to your sky. Small changes in opacity can make big visual differences.

Credit: pngtree.com
Lighting And Mood
Lighting and mood are key to making a digital sky feel alive and real. The way light changes the colors and shapes in the sky sets the atmosphere. It tells a story about the time and weather. Careful use of light creates emotion and depth.
Focus on how light interacts with clouds, air, and horizon. This interaction shapes the mood and guides the viewer’s eye. Subtle shifts in color and brightness can turn a plain sky into something magical.
Capturing Time Of Day
Different times of day have unique light qualities. Morning light is soft and cool, with pinks and blues. Midday light is bright and clear, with strong contrasts. Evening light glows warm, with oranges and purples. Use these colors to set your sky’s time.
Adjust shadows and highlights to match the sun’s position. Low sun angles create long shadows and rich colors. Higher sun means shorter shadows and brighter light. These details make your sky feel natural and believable.
Adding Glow And Highlights
Glow adds warmth and life to your digital sky. Highlight edges of clouds where light hits. Use soft brushes to blend glows into the sky smoothly. Bright spots can show sunlight breaking through clouds or fading light at dusk.
Keep glow subtle to avoid harsh or fake effects. Layer glows with different intensities for depth. Highlights help clouds pop and add contrast. They guide the viewer’s eye and enhance the sky’s texture.
Simulating Weather Conditions
Weather changes the look and mood of the sky. Clear skies have crisp blues and soft clouds. Rainy skies are duller, with grays and muted tones. Stormy skies show dramatic contrasts and dynamic cloud shapes.
Add haze for foggy or misty effects. Use gradients to show fading light through clouds or rain. Small details like scattered light or rain streaks build realism. Match your colors and lighting to the weather type for mood.
Composition Tips
Good composition shapes how viewers feel about your digital sky and atmosphere. It guides the eye and sets the mood. Use simple rules to plan your artwork. Focus on how the sky interacts with the land and key elements. This helps create depth and balance.
Planning The Horizon
Place the horizon carefully. It divides the sky and ground. A low horizon shows more sky, giving a vast feeling. A high horizon focuses on the land. Keep the horizon straight or slightly curved for realism. Use it to control the mood and space in your scene.
Balancing Sky And Landscape
Balance the sky size with the landscape. Too much sky can feel empty. Too little sky makes the scene tight. Use colors and light to link sky and land. Soft transitions help them blend naturally. Contrast can highlight shapes and draw attention.
Focal Points In Atmosphere
Choose a clear focal point in the sky or atmosphere. It could be a bright sun, dramatic clouds, or light rays. Use size, color, and brightness to make it stand out. Focal points add interest and guide the viewer’s eye. Keep other details simple to avoid clutter.

Credit: www.vecteezy.com
Advanced Effects
Advanced effects add depth and realism to digital skies and atmospheres. They bring life to your artwork by simulating natural light and weather conditions. These techniques help create mood and enhance the overall visual impact. Here are some advanced effects to try in your digital paintings.
Subsurface Scattering
Subsurface scattering mimics light passing through thin objects like clouds or fog. It creates a soft glow that brightens the edges. Use a light brush with low opacity to apply subtle color variations. This effect adds volume and softness to clouds, making them look more natural and luminous.
Rain And Mist Effects
Rain and mist bring atmosphere and motion to your sky scenes. Use thin, angled lines or small dots to show falling rain. For mist, apply a soft, semi-transparent layer over parts of the landscape or sky. Blur the edges slightly to create a smooth, hazy look. These effects add mood and realism to your painting.
Stormy Sky Techniques
Stormy skies require dark, heavy clouds and dynamic lighting. Use deep blues, grays, and purples to paint thick clouds. Add sharp highlights where lightning or sun breaks through. Blend edges to show turbulence and movement. Use contrast to emphasize the dramatic feel of the storm.
Common Challenges
Painting digital skies and atmospheres poses unique challenges. These issues can make your artwork look dull or unrealistic. Understanding common problems helps you create vivid, believable skies. Focus on key aspects to improve your digital sky paintings.
Avoiding Flatness
Flat skies lack dimension and look lifeless. Use gradients to blend colors smoothly. Add subtle variations in tone to mimic natural light changes. Avoid using one solid color for the entire sky. Incorporate soft clouds or light beams to add interest. Layering helps create a more dynamic scene.
Maintaining Depth
Depth gives the sky a three-dimensional feel. Paint distant elements with lighter, less saturated colors. Closer clouds or atmospheric features should be richer and more detailed. Use atmospheric perspective to show distance. Darker and sharper shapes appear nearer. This contrast helps viewers feel the space in your scene.
Correcting Color Shifts
Color shifts occur when colors look unnatural or clash. Check your color palette for harmony. Use warm and cool tones to balance the sky’s mood. Adjust colors to fit the time of day or weather. Avoid harsh transitions between colors. Soft blending creates a smooth, natural look that feels real.
Practice Exercises
Practice exercises help improve your skills in painting digital skies and atmospheres. They train your eye to see color, light, and shapes. Regular practice builds confidence and speed. Below are key exercises to focus on.
Speed Painting Skies
Speed painting trains you to capture the sky’s essence quickly. Set a timer for 10 to 15 minutes. Use broad strokes and simple shapes. Focus on colors and gradients rather than details. This exercise improves your ability to work fast and trust your instincts.
Cloud Variation Drills
Clouds come in many shapes and sizes. Practice painting different types like cumulus, cirrus, and stratus. Change their size, density, and edges. Try soft, fluffy clouds and sharp, wispy ones. This drill helps you understand cloud structure and adds variety to your skies.
Atmosphere Studies
Atmosphere affects how distant objects look. Paint scenes with different weather and lighting. Include fog, haze, or clear skies. Study how colors fade with distance and how light changes tones. These studies sharpen your ability to create depth and mood in your paintings.

Credit: www.dreamstime.com
Frequently Asked Questions
How To Paint Atmospheric Skies?
Use a soft brush to blend blues, whites, and warm tones. Layer colors for depth, add subtle highlights, and vary opacity for realism.
What Is The 80/20 Rule In Painting?
The 80/20 rule in painting means 80% of effort focuses on preparation and base layers, while 20% refines details and finishing touches.
What Is The 70 30 Rule In Art?
The 70 30 rule in art suggests dedicating 70% of your work to main elements and 30% to supporting details. This balance enhances composition and visual interest.
How To Start Digital Painting As A Beginner?
Start digital painting by choosing software like Photoshop or Procreate. Learn basic tools, practice brush settings, and experiment with layers regularly. Watch tutorials and create simple sketches to build skills. Consistent practice improves technique and creativity in digital art.
Conclusion
Painting digital skies and atmosphere takes practice and patience. Start with simple shapes and colors. Use layers to build depth and light effects. Observe real skies to capture natural tones and moods. Experiment with brushes to add texture and detail.
Keep your strokes soft and blend smoothly for realism. Remember, every digital sky you paint improves your skills. Enjoy the process and keep creating beautiful skies.