Have you ever wanted to create stunning digital skies that captivate and bring your artwork to life? Painting the sky and atmosphere digitally might seem tricky at first, but with the right techniques, you can master the art of crafting breathtaking skies that set the mood and depth of any scene.
In this guide, you’ll discover simple steps and insider tips to paint skies filled with vibrant colors, realistic clouds, and atmospheric effects. Whether you’re aiming for a calm sunset or a dramatic stormy sky, this article will help you transform your digital canvas into a masterpiece that draws viewers in and keeps them engaged.
Ready to elevate your digital painting skills? Let’s dive in!
Color Choices For Digital Skies
Choosing the right colors for digital skies shapes the mood and realism of your artwork. Colors set the tone and depth of the atmosphere. They help viewers connect with the scene instantly.
Understanding basic sky colors and how to blend them creates a natural look. Different hues also reflect various times of day and weather conditions. Effective color use can transform a flat background into a vivid sky.
Essential Sky Colors
Start with fundamental sky colors like cerulean blue, ultramarine, and titanium white. These create a bright, clear sky base. Adding soft gradients with light blues and pale cyans builds depth.
Use warm colors like pale yellows and light oranges near the horizon. These mimic sunlight and add warmth. Darker blues and indigos suit the upper sky for contrast.
Mixing Atmospheric Hues
Mix colors gently to simulate atmospheric effects such as haze and light scattering. Add subtle touches of pink, lavender, or peach for soft clouds or sunsets.
Introduce muted grays and blues to convey distance and air density. Blending these tones reduces harsh edges and creates smooth transitions.
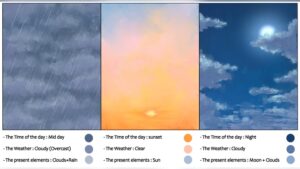
Using Color To Convey Time And Weather
Bright blues and whites suggest midday with clear weather. Soft pinks and purples signal sunrise or sunset moments.
Gray and slate tones depict overcast or stormy skies. Cool blues and greens hint at rain or fog.
Adjust saturation and brightness to reflect sunlight intensity and cloud cover. This helps show different times and weather without extra detail.

Credit: pngtree.com
Brush Techniques
Brush techniques play a key role in painting digital skies and atmospheres. The right brushwork brings clouds and air to life. It adds softness, sharpness, and texture. These effects create a more natural and immersive sky. Understanding how to use brushes helps build depth and mood in your digital artwork.
Selecting Brushes For Clouds
Choose brushes that mimic natural cloud shapes. Soft round brushes work well for smooth, fluffy clouds. Textured brushes add detail and complexity. Experiment with scatter and opacity settings. This variety helps recreate the randomness of real clouds. Use larger brushes for big cloud masses and smaller ones for fine details.
Creating Soft And Hard Edges
Soft edges blend clouds into the sky smoothly. Use low opacity and soft brushes for this effect. Hard edges define cloud shapes and add contrast. Switch to harder brushes with sharp edges when outlining clouds. Mixing soft and hard edges makes your sky look realistic and dynamic.
Layering For Depth And Texture
Layer your brush strokes to build volume in the sky. Start with broad, light layers for the base. Add darker and more detailed strokes on top. Each layer adds depth and texture. This technique simulates how light interacts with clouds and atmosphere. Keep layers semi-transparent to maintain a natural look.
Layer Management
Managing layers is key to painting a believable digital sky and atmosphere. Layers help separate different parts of your painting. This separation allows easy changes without disturbing other elements. Good layer management speeds up your workflow and keeps your work neat.
Organizing Elements With Layers
Start by creating separate layers for each element. Use one layer for the sky base color. Add another layer for clouds and one more for atmospheric effects like fog or light rays. Naming layers clearly helps you find them fast. Group related layers to keep the layer panel clean. This structure avoids confusion and makes editing simple.
Using Layer Modes For Atmosphere
Layer modes change how colors blend between layers. Use modes like “Overlay” or “Soft Light” to add glow or haze. “Multiply” darkens areas, perfect for shadows in clouds. Experiment with different modes to achieve natural lighting effects. Layer modes let you create depth and mood without painting new details.
Adjusting Opacity For Realism
Opacity controls the transparency of each layer. Lower opacity creates soft, subtle effects. This helps blend clouds into the sky smoothly. Adjust opacity for atmospheric layers to mimic light scattering. Small opacity tweaks add realism and make your sky look alive. Check your work often to balance all layers well.
Painting Clouds
Painting clouds adds life and depth to any digital sky. Clouds create mood and atmosphere in your artwork. They vary in shape, size, and density. Capturing these differences makes the sky feel real and dynamic. The process starts with simple shapes and builds up to detailed textures. Lighting plays a key role in showing volume and space within clouds. Below are steps to paint clouds effectively in your digital scenes.
Blocking In Basic Shapes
Begin by sketching large cloud shapes with a soft brush. Use simple, rounded forms to map out cloud clusters. Avoid sharp edges at this stage. Focus on overall size and placement in the sky. Choose light colors for the base to represent sunlight hitting the clouds. Keep the shapes loose and fluid to mimic natural cloud flow.
Adding Light And Shadow
Introduce light and shadow to add volume. Use a brighter tone where sunlight strikes the cloud. Apply darker shades in shaded areas to create depth. Blend edges softly for smooth transitions. Shadows give clouds a three-dimensional look. Observe real clouds to understand how light falls and changes.
Detailing Cloud Textures
Use smaller brushes to add texture and softness to clouds. Paint wispy edges and subtle highlights to show fluffiness. Add tiny specks and strokes to mimic air movement. Vary brush opacity to build natural layers. Avoid over-detailing; keep clouds light and airy. Texture makes clouds feel alive and part of the sky.
Lighting And Atmosphere
Lighting and atmosphere bring life to a digital sky. They set the mood and depth of your scene. Proper use of light makes the sky feel real and inviting. Atmosphere adds softness and distance, creating a sense of space. Understanding these elements helps you paint skies that captivate and inspire.
Simulating Sunlight Effects
Sunlight shapes the sky’s colors and shadows. Start by choosing a clear light source, usually the sun. Paint bright highlights near the sun’s position. Use warm colors like yellows and oranges for sunlight areas. Soften edges around the light to mimic natural glow. Shadows in the sky appear cooler and less intense. Add subtle gradients to show light fading across the sky. These steps create a believable sunlight effect in your digital painting.
Creating Glow And Radiance
Glow makes the sky appear alive and vibrant. Use soft brushes to paint light halos around the sun or bright spots. Blend colors smoothly to avoid harsh lines. Radiance occurs when light spreads through thin clouds or mist. Add layers with low opacity to simulate this effect. Brighten edges of clouds catching sunlight. This technique adds depth and a magical feel to your sky. Glow and radiance highlight key areas and add visual interest.
Incorporating Atmospheric Perspective
Atmospheric perspective gives a sense of distance in the sky. Objects far away look lighter and less detailed. Use cooler and paler colors for distant clouds and sky parts. Increase haze or mist by lowering contrast in far areas. This softens shapes and blends them with the horizon. Closer elements should have stronger colors and sharper edges. This method creates layers of depth that feel natural and realistic. Atmospheric perspective makes your sky feel vast and open.
Weather Effects
Weather effects bring life and mood to your digital sky paintings. They change the atmosphere and tell a story. Painting different weather types helps create more realistic and dynamic scenes. Each weather effect has unique colors, shapes, and light behavior. Understanding these details improves your art and draws viewers in.
Painting Stormy Skies
Stormy skies look dramatic and full of energy. Use dark, heavy clouds with sharp edges. Blend deep grays, blues, and purples for the cloud base. Add bright highlights where lightning or sunlight peek through. Create a sense of movement by painting swirling cloud shapes. Keep contrast high to show the storm’s power.
Rain And Mist Techniques
Rain softens the sky and lowers visibility. Use semi-transparent layers to simulate rain streaks. Paint thin, diagonal lines for falling rain. Mist blurs distant objects and creates depth. Apply light gray or white with low opacity for mist. Blur edges gently to mimic the soft, wet air. These effects add mood and mystery.
Dynamic Sky Elements
Dynamic elements like lightning, birds, or flying debris add action. Lightning bolts need sharp, bright lines against dark clouds. Paint glowing edges to show light emission. Birds and debris break the sky’s stillness and add scale. Use small, quick strokes for these details. These touches make your sky feel alive and real.
Composition Tips
Creating a digital sky and atmosphere involves more than colors and brushes. Composition plays a key role in making your artwork feel real and inviting. Thoughtful composition guides the viewer’s eye and sets the mood. Use these tips to arrange your sky elements effectively.
Planning Sky Layouts
Start by deciding the main focus of your sky. Clouds, stars, or light gradients can all shape the mood. Sketch simple shapes to map where these elements will go. Keep space open for a natural feel. Avoid crowding the sky with too many details. A balanced layout helps viewers enjoy the scene without confusion.
Balancing Sky With Landscape
Match the sky’s intensity with the landscape below. Bright skies suit calm, peaceful land. Dark or stormy skies pair well with rugged or dramatic terrain. Use color harmony to connect sky and land. Reflect sky colors on water or surfaces for unity. This balance makes your painting feel complete and believable.
Using Horizon Lines Effectively
Place the horizon line carefully to control focus and depth. A low horizon shows more sky, emphasizing clouds or light effects. A high horizon highlights the ground, making the sky a background element. Horizon lines can guide viewers through the scene. Use them to create distance and scale in your artwork.

Credit: www.vecteezy.com
Final Touches
Final touches bring your digital sky and atmosphere painting to life. This stage polishes the work, giving it depth and realism. Small adjustments make a big difference. Focus on subtle blending, delicate details, and overall polish to enhance your artwork.
Blending And Refining
Use soft brushes to blend colors smoothly. Blend edges where sky meets clouds or horizon. Avoid harsh lines to keep the atmosphere natural. Refine color transitions with gentle strokes. Check for any abrupt color changes and soften them. This step helps create a cohesive, dreamy look.
Adding Subtle Details
Add fine elements like faint clouds, light glows, or distant stars. Use low opacity brushes for subtlety. These tiny details enrich the scene without overpowering it. Introduce slight color variations to suggest depth. Small highlights can mimic sunlight or moonlight reflections. These touches add realism and interest.
Polishing For Impact
Adjust contrast to make your sky pop. Increase brightness selectively on highlights. Enhance shadows for a stronger mood. Use layer effects like soft light or overlay for vibrance. Zoom out to review the entire image balance. This final polish ensures your sky feels alive and captivating.

Credit: www.dreamstime.com
Frequently Asked Questions
How To Paint Atmospheric Skies?
Paint atmospheric skies by layering blues, whites, and subtle warm tones. Blend colors smoothly to create depth. Add soft clouds and light effects for realism. Use gradient transitions and vary brush opacity to enhance atmosphere. Focus on light direction and color harmony for a natural look.
What Is The 80/20 Rule In Painting?
The 80/20 rule in painting means focusing 80% effort on key areas and 20% on details, enhancing overall impact efficiently.
What Is The 70 30 Rule In Art?
The 70/30 rule in art means 70% of the artwork uses dominant colors, while 30% uses contrasting or accent colors.
How To Start Digital Painting As A Beginner?
Start digital painting by choosing software like Photoshop or Procreate. Learn to use layers and brushes. Practice simple sketches, experiment with colors, and watch tutorials to improve skills gradually.
Conclusion
Painting a digital sky and atmosphere takes practice and patience. Start with simple shapes and colors. Use layers to build depth and light effects. Experiment with blending to create smooth transitions. Observe real skies to capture natural colors and moods.
Keep your strokes soft for a realistic look. Try different brushes to add texture and detail. Remember, every digital painting improves with time. Enjoy the process and watch your skies come to life.