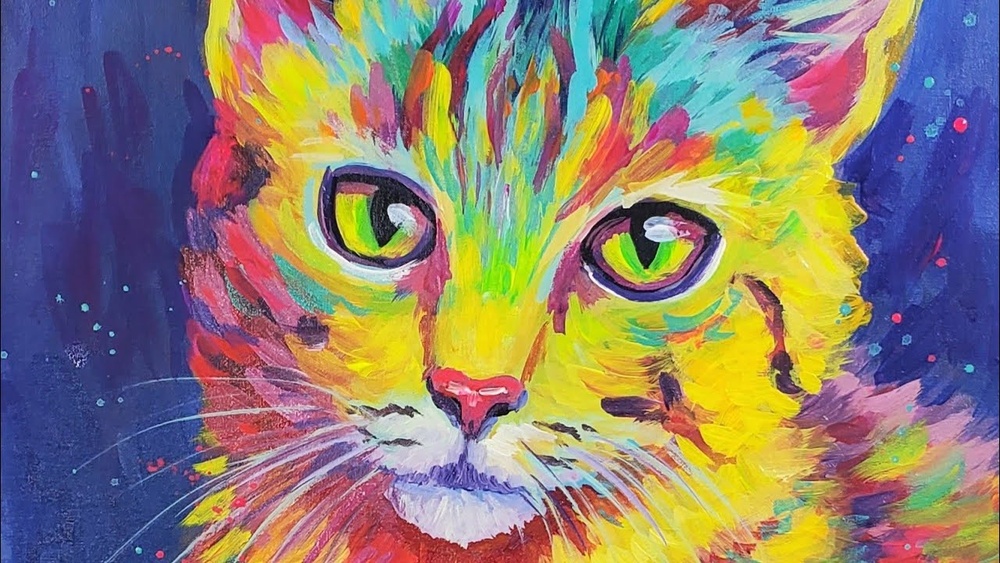
Quick answer: To paint a cat with acrylic paint, start from a clear reference photo, sketch the head and body as simple circles and ovals, and block in the darkest and middle fur values first. Build the coat with short strokes that follow the direction of hair growth, working from dark to light, then paint the eyes with a dark pupil, a colored iris and one sharp white catchlight. Finish with whiskers in thinned white or light gray using a liner brush.
Cats are one of the most requested subjects in acrylic, and also one of the easiest to get almost right. The difference between a cat that looks alive and one that looks like a stuffed toy usually comes down to three things: the shape of the head, the direction of the fur strokes, and the eyes. Get those right and the rest is patience.
Below you will find a full method for how to paint a cat with acrylic paint, from picking a reference to the final whisker. There are coat-color mixing recipes for tabbies, black cats, gingers, white cats and calicos, plus a list of the mistakes that most often make cat portraits look off.
Start With the Right Reference Photo
A good reference does half the work. Look for these qualities:
- One clear light source. Window light from one side gives you shadows that describe the shape of the skull and body. Flash photos flatten everything.
- Sharp eyes. If the eyes are blurry in the photo, you will be guessing at the most important part of the painting.
- Eye-level angle. Photos taken looking down on a cat shorten the body and make the head look oversized.
- Visible fur direction. You need to see how the hair flows around the cheeks, chest and ears.
If you are painting someone’s pet, ask for several photos. One may show the eye color well, another the markings on the back.
Supplies You Need
- Surface: An 8×10 or 11×14 inch canvas panel or primed hardboard. Smooth surfaces make fine fur easier than coarse canvas weave.
- Paints: Titanium white, mars or ivory black, burnt umber, burnt sienna, raw sienna or yellow ochre, ultramarine blue, cadmium yellow (or hue), cadmium red light (or hue), and a small amount of phthalo green or viridian for green eyes.
- Brushes: #8 flat for blocking, #4 and #6 filberts, a #2 round, a #0 or #00 liner for whiskers, and a small fan or worn flat for fur texture.
- Extras: Stay-wet palette, spray bottle, transfer paper or graphite, and slow-drying medium (optional).
Pigment strength matters for fur. Cheap paints with low pigment load tend to look chalky when lightened with white, and soft gray-browns are exactly what most cat coats need. For a breakdown of which tube paints hold their color in tints, see our guide to the top acrylic paint brands for artists.
Understanding Cat Anatomy in Simple Shapes
You do not need to study skeletons, but a few proportions keep the cat looking like a cat:
- Head: Roughly a circle, slightly wider than tall in most domestic cats. The muzzle is a smaller, flattened oval on the lower half.
- Eyes: Set about halfway down the head, with roughly one eye-width between them. They tilt slightly upward at the outer corners.
- Ears: Triangles set on the upper outer edge of the head, with bases about as wide as the eye spacing.
- Nose: A small, rounded triangle pointing down, sitting just above the split of the upper lip.
- Body: A sitting cat is a pear shape. A lying cat is a long, soft oval with the head overlapping one end.
Draw these as light construction lines first. Check placement by measuring with your pencil against the reference before committing paint.
Coat Color Mixing Guide
Few cats are pure gray or pure orange. Mixing the coat colors yourself gives natural variation that tube colors cannot match.
| Coat | Shadow mix | Midtone mix | Highlight mix |
|---|---|---|---|
| Brown tabby | Burnt umber + ultramarine | Raw sienna + burnt umber + white | Yellow ochre + white |
| Gray tabby | Ultramarine + burnt umber (near black) | Black + white + touch of burnt umber | White + tiny touch of ultramarine |
| Ginger / orange | Burnt sienna + touch of burnt umber | Burnt sienna + cadmium yellow + white | Yellow ochre + cadmium yellow + white |
| Black | Ultramarine + burnt umber | Same mix + small amount of white | Blue-gray (white + ultramarine + black) |
| White | White + ultramarine + touch of burnt umber | Warm off-white (white + yellow ochre) | Pure titanium white |
| Calico | Combine ginger, black and white mixes in patches | Keep patch edges soft and fur-textured, not hard-edged | |
Two tips apply to every coat. First, mix black from ultramarine and burnt umber instead of using tube black alone; it gives richer, less flat darks. Second, white fur is never painted white everywhere. It is mostly cool and warm grays with a few pure white highlights.
How to Paint a Cat With Acrylic Paint: The Full Process
1. Tone and Transfer
Cover the surface with a thin wash of a neutral midtone, such as burnt sienna mixed with white or a soft gray. A toned ground makes it easier to judge both lights and darks. Once dry, transfer or sketch the construction shapes, then refine them into the cat’s outline. Mark the eye placement, nose, and the main pattern boundaries like tabby stripes or calico patches.
2. Paint the Background First
Painting the background before the cat lets you overlap fur onto it later, which gives soft, natural edges. Choose a color that contrasts with the coat: a cool blue-gray behind a ginger cat, a warm ochre behind a black cat. Keep it simple and slightly out of focus. Let the background run just inside the cat’s outline.
3. Block In the Darks
Using a flat or filbert, lay in the darkest areas: the shadow side of the body, inside the ears, the deepest stripes, under the chin and where the body meets the ground. Use the shadow mix from the table. Do not worry about texture yet. You are building a map of where light is not.
4. Add the Midtones
Fill the remaining areas with the midtone mix. Where midtones meet darks, use short strokes that follow fur direction so the transition already starts to look furry. On the face, fur radiates outward from the nose; on the body, it flows from head toward tail and downward on the legs.
5. Build Fur Texture in Layers
This is where the cat comes to life. Load a small filbert or a worn flat with slightly thinned paint and flick short strokes in the direction of growth. Work in three or four passes, each a little lighter than the last. A fan brush with most of the paint wiped off is useful for soft chest fur and fluffy tails. Keep strokes shorter on the face and longer on the chest, belly and tail.
Let some underlayer show between strokes. If you cover every area completely, fur looks like a solid surface. Gaps create the impression of individual hairs.
6. Paint the Eyes
Eyes deserve their own careful session. Work at a small scale with a #2 round.
- Paint the entire eye shape a dark outline color, close to black.
- Paint the iris, leaving a thin dark rim. For green eyes, mix phthalo green, cadmium yellow and a little white. For amber, use yellow ochre and cadmium yellow. For blue, use ultramarine and white with a touch of gray.
- Darken the top of the iris slightly where the eyelid casts a shadow. This step is often missed and makes a huge difference.
- Add the pupil. In bright light it is a vertical slit; in dim light it is round and large.
- Place a single crisp white catchlight on the same side as your light source, overlapping the pupil and iris edge.
7. Nose, Mouth and Ears
The nose leather is often pink (white, cadmium red and a touch of burnt sienna) or dark gray in darker cats. Add a small highlight on top. Paint the mouth line as a soft dark curve, never a hard line. For ears, add thin translucent pink inside and flick a few long, pale hairs from the inner edge outward.
8. Whiskers and Final Highlights
Whiskers go on last. Thin white or pale gray paint with water until it flows like ink, load a liner brush, and pull each whisker in one confident curved stroke from the muzzle outward. Lift the brush as you finish so the tip tapers. A fluid acrylic or acrylic ink flows more easily for this step; our review of a popular acrylic ink explains how inks behave for fine lines. Finally, add the brightest highlights on the top of the head, the cheek and the shoulder facing the light.
Painting Different Poses
The steps above work for any pose, but each has its own trap:
- Sitting front view: Watch symmetry. Draw a center line through the nose and check both eyes sit evenly on either side.
- Curled up asleep: Closed eyes are just a curved dark line. The challenge is showing the body as a soft, round mass, so focus on gradual shading.
- Side profile: The forehead slopes into the nose with a gentle dip. The ear sits farther back on the head than most people expect.
- Stretching or walking: Pay attention to the spine curve and the angle of the legs. Use the reference closely for leg joints.
Common Mistakes When Painting Cats
- Outlining the cat. Real fur has soft edges. A dark outline makes the painting look like a cartoon. Let the background meet the fur with broken strokes instead.
- Eyes too far apart or too high. Measure. Most cat eyes sit near the horizontal midline of the head.
- Fur strokes going the wrong direction. Study the reference. Strokes against the growth pattern read as messy hair.
- Too much white in white cats. Without grays, there is no form. Use cool shadows.
- Flat black cats. Black fur reflects the sky and surroundings. Add blue-gray highlights to show shape.
- Thick, straight whiskers. Thin the paint more than you think and pull in one curved motion.
Tips for Beginners vs Experienced Painters
If you are new: Try a cat silhouette against a sunset or a stylized cat with simple shapes and bold colors. These teach shape and value without the pressure of realistic fur. A sleeping cat is also forgiving because there are no eyes to align.
If you have some practice: Paint a tabby, which teaches pattern following form. The stripes must curve around the body to show volume.
If you are confident: Attempt a long-haired white cat in backlight. You will need careful control of subtle grays and a glowing rim light around the edges of the fur.
Keeping Paint Workable for Soft Fur
Acrylic’s quick drying can make soft fur transitions difficult. A few ways to slow things down:
- Use a stay-wet palette so mixed colors last for hours or even days.
- Mist the painting lightly with water as you work.
- Add a small amount of acrylic retarder to mixes, following the label ratio. Too much makes paint sticky.
- Work in small sections rather than covering the whole cat at once.
Related Reading
FAQs
What colors do I need to paint a cat?
A basic set of titanium white, burnt umber, burnt sienna, yellow ochre, ultramarine blue, cadmium yellow and cadmium red can mix nearly every cat coat. Add a green for green eyes if needed.
How do you paint realistic cat fur with acrylics?
Build fur in layers from dark to light, using short, flicked strokes that follow the direction of growth. Leave gaps between strokes so lower layers show through, and keep edges soft against the background.
What brush is best for cat whiskers?
A liner or rigger brush, size #0 or #1, works best. Thin the paint to an ink-like consistency and pull each whisker in one smooth, curved stroke.
How long does it take to paint a cat in acrylic?
A simple stylized cat can take under an hour. A detailed realistic portrait on an 8×10 panel often takes four to eight hours spread over a few sessions.
Should I paint the background before the cat?
Usually yes. Painting the background first lets you overlap fur strokes onto it, which creates natural soft edges and avoids a cut-out look.
How do I make cat eyes look shiny?
Darken the top of the iris where the lid shades it, keep the pupil very dark, and add one small, crisp white catchlight. A thin coat of gloss medium over the eyes only can add extra shine.
Final Thoughts
Painting cats rewards patience more than talent. Focus on head shape, fur direction and eyes, and each portrait will improve on the last. Try painting the same cat twice, once loose and once detailed, to see which style suits you. When you are ready to upgrade your palette, our guide to choosing high-pigment acrylics for portraits and pets compares brands by coverage, tinting strength and value for money.