
Quick answer: A paint and sip tutorial at home has four parts: set up a covered table with a canvas, acrylic paints, three brush sizes and a water cup; pour a drink; paint in layers from background to foreground; and let each layer dry briefly before adding details. A simple sunset over water is the classic beginner subject because it uses only a few colors and forgives mistakes.
The appeal of a paint and sip night is that nobody is supposed to be good at it. The point is to follow along, relax, and end up with something you made. At a studio, an instructor does the talking. At home you need to be your own instructor, which is easy if the plan is clear and the first painting is simple enough.
This tutorial is built for a first-timer. It covers what to set up, how to pace the evening, and a full step-by-step painting of a sunset seascape, with timings for each layer. If you would rather start with everything in one box, a curated sip and paint at home kit for adults bundles the canvas, paints and guide so you can skip the shopping.
Plan the Evening First
Decide how long you want to spend. A first paint and sip usually takes about two hours, including setup and cleanup. That breaks down roughly like this:
- 15 minutes: set up the table and pour drinks
- 10 minutes: warm-up and brush practice
- 75 minutes: painting in layers, with short drying breaks
- 15 minutes: final touches, photos and cleanup
Keep the drinking light. Paint is easier to control with a steady hand and a clear head, and mixing colors while tipsy is a quick route to mud. A glass of wine, a mocktail or sparkling water all work. Keep drinks away from the painting area, with a separate side table if possible, so a spill does not ruin the canvas.
What You Need for a Paint and Sip Tutorial for Beginners
If you search for a paint and sip tutorial for beginners, supplies are the first hurdle. The list is short. A fuller breakdown lives in this guide to a sip and paint supplies list, but here are the essentials for the sunset project below:
- Canvas: an 11×14 or 16×20 inch stretched canvas or canvas panel, one per person
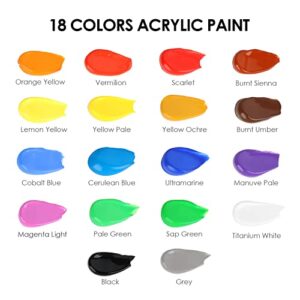
- Acrylic paint: titanium white, ultramarine blue, cadmium-style yellow, a red or crimson, and black (or you can mix dark from blue and red)
- Brushes: one flat 1-inch brush, one medium round or flat brush, and one small round brush for detail
- Palette: a paper plate, disposable palette pad or tray
- Water cup and paper towels
- Apron or old shirt
- Table cover: a plastic cloth or newspaper
- Easel (optional): or lay the canvas flat on the table
Squeeze out only a small amount of each color. Acrylic dries quickly on a palette, so start with roughly a coin-sized dab, and add more as needed.
Set Up Your Space
- Cover the table fully and tape down the corners if the surface slides.
- Put the palette on your dominant-hand side, with the water cup beside it and paper towels within reach.
- Prop up a phone or tablet with the reference photo of a sunset, or use a printed copy.
- Place the canvas in front of you, flat or on an easel, and check the lighting. Overhead light works, but avoid casting a shadow with your hand.
- Put on music. A playlist of an hour or so keeps the pace relaxed.
Warm-Up: Practice Your Brush Strokes
Before you touch the canvas, spend ten minutes on scrap paper or the back of a cardboard box. Try these three marks:
- Flat horizontal strokes with the wide brush, for sky and water
- Dabs with the round brush, for clouds and highlights
- Thin lines with the small brush, for horizon lines and tiny details
Also practice blending two colors while both are wet. Lay yellow next to orange and sweep a clean, slightly damp brush across the border until the edge softens. This is the main skill the sunset needs.
Step-by-Step Sunset Seascape Tutorial
Step 1: Mark the horizon
Use a pencil or a thin line of light paint to mark the horizon about one-third from the bottom of the canvas. A low horizon gives the sky more room, which is where the color is. A ruler or the edge of a piece of paper helps keep the line level.
Step 2: Paint the sky gradient
With the large flat brush, paint the top of the sky in a mix of blue and a little white, then work downward. Next to the blue, add a purple made from blue and red, then pink, then orange, and finally pale yellow near the horizon. Overlap the bands slightly and blend lightly with horizontal strokes. Work quickly, since you want the paint to remain wet while blending. Allow about ten minutes to dry.
Step 3: Add the sun
Mix white with a little yellow. Dab a circle or half circle sitting on the horizon with the round brush, and soften the outer edge with a damp brush so it glows. If you want a stronger glow, dab a faint ring of pale orange around it.
Step 4: Paint the water
Fill the lower third with horizontal strokes. At the horizon, use a color close to the sky, then shift to darker blue and purple toward the bottom of the canvas. Leave a vertical gap below the sun, where you will paint the reflection.
Step 5: Add the sun reflection
With the small brush, paint short horizontal dashes of pale yellow and white in a column beneath the sun. Make the dashes wider near the bottom and keep them uneven. This gives the impression of light shimmering on moving water.
Step 6: Paint clouds
Mix pink or orange with white, and dab elongated cloud shapes across the sky using the medium brush. Place a few clouds near the sun to catch its warm light, and a few higher up with a touch of purple. Soften the lower edges slightly. Do not overdo it: three or four clouds are plenty.
Step 7: Add a silhouette
Mix black, or a deep blue and red, and paint a simple silhouette such as a distant hill, a small boat, a palm tree or a bird or two. Keep it small and simple. Silhouettes are forgiving because there is no interior detail to get wrong. Use the small brush for thin lines like masts or palm fronds.
Step 8: Final touches
Step back and look at the whole painting. Add a few sparkles on the water or a brighter dab at the sun center. Sign your name in a corner with the small brush and a dark color. Let the piece dry flat for at least an hour before moving it.
Color Mixing Cheat Sheet for the Sunset
Mixing a few colors yourself keeps the palette small and the painting cohesive. These are general starting points, and small variations are fine.
| Area | Mix | Notes |
|---|---|---|
| Upper sky | Blue + plenty of white | Add a dot of red for a slightly violet tone |
| Purple band | Blue + red + white | More red for warmer, more blue for cooler |
| Pink band | Red + white | Add a touch of yellow for a coral tone |
| Orange band | Yellow + red | Use more yellow for a lighter orange |
| Horizon glow | Yellow + white | Keep this the lightest area of the sky |
| Deep water | Blue + red + a little black | Darkest at the bottom of the canvas |
| Silhouette | Black, or blue + red | Mixing gives a richer dark than straight black |
Fixing Common Problems During the Painting
- The sky bands look striped: go back over the borders with a clean, barely damp brush, sweeping side to side. If the paint has dried, glaze a thin layer of the lighter color across the seam.
- Colors turned muddy brown: too many colors were stirred together while wet. Let it dry, then repaint the area with clean, fresh color and fewer passes.
- The horizon is crooked: paint a straight dark line with a flat brush, or cover the edge with water paint and redraw it using a ruler as a guide.
- The sun looks flat: add a second, lighter dab in the center and soften the outer edge so it glows rather than looks like a sticker.
- The paint is drying too fast: squeeze out less paint at a time, and mist the palette lightly with water. Acrylic retarder or a drop of glazing medium also slows drying, though neither is necessary for a beginner project.
- Brush marks are too visible: use a wider brush and lighter pressure, and make the last pass in one direction with a nearly dry brush.
Other Easy Subjects for a Home Paint Night
After the sunset, there are plenty of beginner-friendly subjects that follow the same layering approach.
- Starry night sky: a dark blue to purple gradient with spattered white stars and a simple pine tree silhouette.
- Mountain landscape: three overlapping mountain shapes in diminishing darkness, with a pale sky.
- Cherry blossom branch: a dark branch across a soft pink or teal background, with dabbed pink and white blossoms.
- Abstract color field: broad, overlapping blocks of color with no subject at all, which is perfect for people who feel nervous about drawing.
- Tropical leaves: overlapping green shapes on a dark background.
Tips to Keep the Evening Smooth
Work from background to foreground
Paint big, far-away shapes first, such as sky and water, and add small, close details last. This is why the silhouette goes on near the end.
Do not fix too much while wet
Overworking wet acrylic is the most common reason colors turn muddy. If something is wrong, let it dry and paint over it. Acrylic is opaque enough to cover most errors.
Keep brushes damp, not soaked
Dripping brushes thin the paint and cause runs. Dab the brush on a paper towel after rinsing.
Rinse between colors
Swirl the brush in water and dry it lightly before picking up a new color. Change the water when it turns cloudy.
Take breaks
Step away for a minute and look at the painting from a distance. Small problems often disappear when you view it from further back.
Hosting It With Friends
The same tutorial works for a group, with a few changes. Everyone follows the same steps at the same pace, so assign one person to read each step aloud, or play a video tutorial on a TV. Give each guest their own palette, brushes and water cup so no one has to share. If you plan to run a bigger evening, the detailed guide on how to host a paint and sip party covers invitations, seating and timing.
Cleanup
- Wipe excess paint from palettes with paper towels before it dries.
- Wash brushes with mild soap and lukewarm water, working paint out of the bristles near the ferrule.
- Reshape the bristles and let brushes dry flat or bristles up.
- Avoid pouring large amounts of paint water down the drain. Wipe thick paint into the trash first.
- Keep wet canvases flat until dry, away from pets and children.
FAQs
What do I need for a paint and sip night at home?
A canvas, acrylic paint in a few colors, three brushes, a palette, a water cup, paper towels and a table cover are enough. A drink and a reference photo complete the setup.
What is the easiest painting for a beginner paint and sip?
A sunset seascape is among the easiest, because it uses a blended gradient and a simple silhouette. Starry skies and abstract color fields are also beginner-friendly.
How long does a paint and sip take?
About two hours is typical for a first painting, including setup and cleanup. Painting itself takes roughly 60 to 90 minutes with drying breaks.
Is acrylic paint best for paint and sip?
Acrylic is the usual choice because it dries quickly, cleans up with water and covers mistakes. Oil paint is slower and requires solvents, so it is less suited to a casual evening.
Can I do a paint and sip alone?
Yes. Follow a written or video tutorial at your own pace. Many people find it a relaxing solo activity as well as a social one.
What size canvas is best for beginners?
An 11×14 or 16×20 inch canvas gives enough room for a simple scene without taking too long to cover.
Final Thoughts
A good paint and sip tutorial at home is mostly about preparation and pacing: simple supplies, a layered plan and an easy subject. Practice a few strokes, paint the sunset from sky to foreground, and keep the mood relaxed.
If you would like the materials and instructions gathered into one package, explore the options for date night painting kits for adults and pick the one that suits your evening.



One Comment