
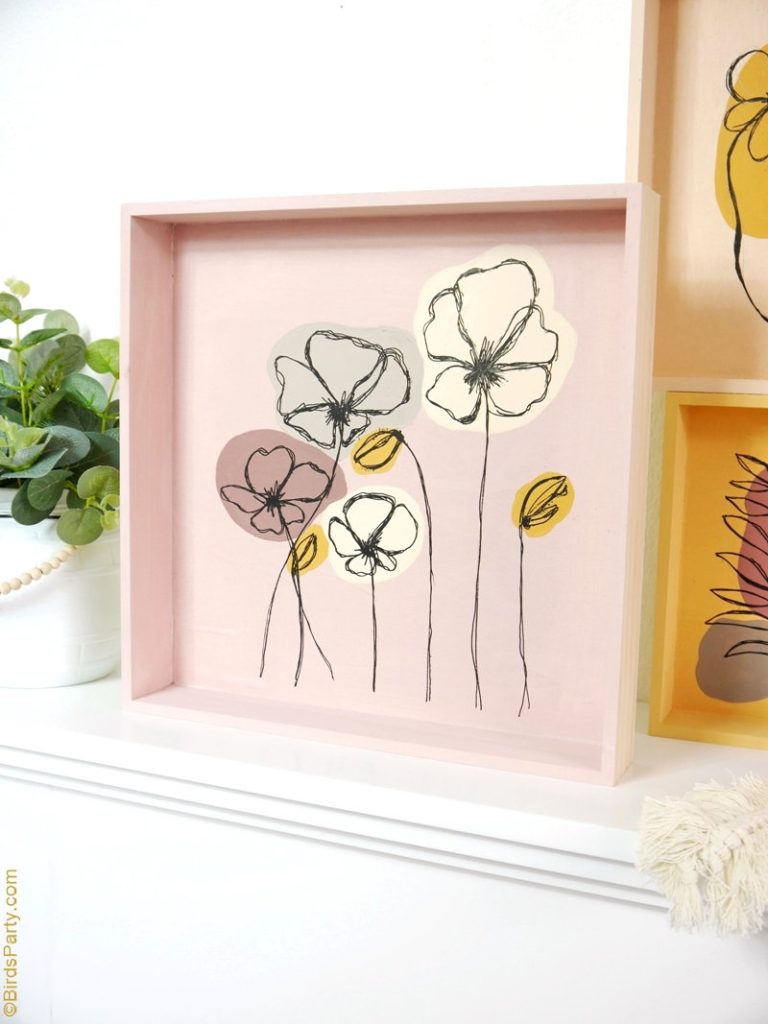
Large framed prints are expensive, and they rarely match your room exactly. A blank canvas and a few tubes of acrylic paint can fill the same wall for a fraction of the cost, in your colors, at the size you actually need. You don’t need to draw well for most of these projects; many rely on tape, texture, pouring or simple repeated shapes.
Quick answer: The easiest DIY wall art ideas using acrylic paint are color-block abstracts made with painter’s tape, textured knife paintings, acrylic pours, minimalist line art, botanical silhouettes, ombré gradients and multi-panel sets that span several canvases. Choose a palette from colors already in the room, size the piece to roughly two-thirds the width of the furniture below it, paint in thin layers, and finish with a varnish so it looks professional and stays clean.
Below you will find 16 project ideas with difficulty, time and step outlines, plus practical guidance on sizing, color choice, supplies and finishing. The paint you use affects coverage on large canvases more than almost anything else; our guide to paints and supplies for DIY wall art compares options for big projects.
Before You Start: Plan the Piece for the Wall
Pick the size first
Wall art that is too small is the most common decorating mistake. A widely used rule of thumb is to make art about two-thirds to three-quarters the width of the sofa, bed or console beneath it. On an empty wall, larger is usually better than smaller, or use a grouping of canvases.
| Location | Typical canvas size | Alternative |
|---|---|---|
| Above an 84-inch sofa | About 48 x 36 inches or larger | Two 24 x 36 panels side by side |
| Above a queen bed | About 40 x 30 to 48 x 36 inches | Three 16 x 20 panels |
| Hallway or narrow wall | 12 x 36 or 18 x 48 vertical | A column of small squares |
| Above a console table | 24 x 36 to 30 x 40 inches | Two stacked 16 x 20 canvases |
| Bathroom or nook | 11 x 14 to 16 x 20 inches | Pair of 8 x 10s |
Pull colors from the room
Choose two or three colors from pillows, rugs or curtains, add one neutral (white, cream, charcoal or a warm gray) and, if you like, one accent such as metallic gold. Limiting the palette makes the piece look intentional and helps it belong in the space.
Decide on a mood
Soft blends and muted colors feel calm, suiting bedrooms. High contrast, bold shapes and saturated color feel energetic, suiting living spaces and offices. Texture adds warmth and works well in minimalist rooms.
Art Supplies for DIY Wall Art
- Canvas: pre-primed stretched canvas or a wood panel. Gallery-wrapped (deep-edge) canvases look finished without a frame.
- Acrylic paint: larger tubes or jars of your main colors, especially white, which you’ll use more than anything else.
- Brushes: a 2- to 3-inch flat or a foam roller for backgrounds, a 1-inch flat, a medium round and a liner.
- Palette knives: for texture and impasto.
- Painter’s tape: for clean geometric lines.
- Mediums (optional): gel medium for texture, glazing medium for transparent layers, pouring medium for fluid art.
- Acrylic paint markers: for line art, lettering and detail.
- Varnish: matte, satin or gloss.
- Drop cloth, palette, water containers, paper towels.
Abstract Wall Art Ideas
1. Color-Block Tape Abstract
Difficulty: Easy. Time: 2 to 3 hours.
- Paint the canvas with a base color and let it dry.
- Apply painter’s tape in intersecting diagonal or straight lines.
- Seal tape edges with a thin coat of the base color to prevent bleeding.
- Fill each section with a different color from your palette.
- Peel tape while the last coat is slightly damp for crisp lines.
2. Soft Ombré Gradient
Difficulty: Easy. Time: 1 to 2 hours.
Lay three to five bands of color from dark to light, then blend each join with a large, damp flat brush using long horizontal strokes. Work quickly and mist the canvas lightly to keep paint workable. Hanging two or three ombré canvases in a row creates a calm, spa-like feel.
3. Expressive Brushstroke Abstract
Difficulty: Easy to moderate. Time: 1 to 3 hours.
Load a wide brush with two colors at once and make bold, sweeping strokes. Layer strokes of different values, leave some negative space, and stop before the canvas feels crowded.
How to Paint Abstract Art With Acrylics That Looks Intentional
- Limit yourself to three colors plus white.
- Include a range of values, from light to dark.
- Repeat each color in at least two or three places so the eye travels around the canvas.
- Combine large calm areas with small busy ones.
- Step back often, and take a photo to view it with fresh eyes.
Textured Wall Art Ideas
4. Palette Knife Texture Painting
Difficulty: Easy. Time: 2 hours plus drying.
Mix acrylic paint with gel medium or modeling paste, then spread it with a palette knife in overlapping arcs, ridges and swipes. Neutral textures, such as white on white or warm beige, look elegant and modern. Thick layers may take a day or more to dry.
5. Plaster-Look Minimal Art
Difficulty: Easy. Time: 2 hours plus drying.
Apply modeling paste in a large shape, such as an arch or circle, and leave the rest of the canvas smooth. Once dry, paint it in soft earth tones or leave it white, then add a thin line of contrasting color for definition.
6. Raised Floral Texture
Difficulty: Moderate. Time: 3 hours plus drying.
Use a palette knife to sculpt petal shapes with thick paint or tinted paste. Single-color white or blush flowers on a neutral background are especially striking under side lighting.
Nature and Botanical Ideas
7. Botanical Silhouettes
Difficulty: Easy. Time: 1 to 2 hours.
Paint simple leaf shapes, such as monstera, eucalyptus or palm fronds, in one dark color on a light background. Use a real leaf as a stencil or trace a printed template.
8. Feathers, Grasses and Coastal Motifs
Difficulty: Easy to moderate. Time: 1 to 3 hours.
Single, elegant motifs look beautiful on tall, narrow canvases. A painted feather or soft pampas grass stems in neutrals suit boho and coastal rooms. For full walkthroughs, try our guides on painting a feather for wall art and painting pampas grass wall art.
9. Minimal Landscape
Difficulty: Easy. Time: 1 to 2 hours.
Paint three or four overlapping hill or mountain shapes, each a slightly different shade of the same color family, with a sun or moon circle. Lighter shapes recede, darker ones come forward.
10. Ocean Horizon
Difficulty: Moderate. Time: 2 to 3 hours.
Blend a sky gradient, place the horizon a third of the way up or down, and dry brush white foam lines across the water. A large horizontal canvas makes a peaceful focal point.
Geometric and Graphic Ideas
11. Mid-Century Shapes
Difficulty: Easy. Time: 2 hours.
Trace circles, arches and half-moons using bowls, plates and lids. Fill them with flat colors such as mustard, terracotta, sage and navy on a cream background.
12. Line Art With Acrylic Markers
Difficulty: Easy to moderate. Time: 1 hour.
Acrylic markers give confident, even lines. Draw a single continuous-line face, a botanical outline or abstract loops over a painted background. Practice on paper first, and let the base coat dry completely so the marker glides smoothly.
Acrylic Markers Art Ideas
- Continuous-line portraits on a blush background.
- Mandala patterns on a dark canvas.
- Hand-lettered quotes over a soft gradient.
- Pattern grids of dots, dashes and chevrons.
- Outline details over a pour painting.
Fluid and Pouring Ideas
13. Acrylic Pouring Art
Difficulty: Easy to moderate. Time: 1 hour plus 1 to 3 days drying.
Mix acrylic paint with pouring medium, often around 1 part paint to 1 or 2 parts medium, until it flows like warm honey. Try a dirty pour or flip cup in your room’s colors, tilt to cover the canvas, and let it dry flat and level. Metallic gold or white veins make pours look luxurious.
14. Resin-Look Pour Without Resin
Difficulty: Easy. Time: 1 hour plus drying.
After a pour has dried, apply two or three coats of high-gloss varnish. It deepens colors and gives much of the glossy appearance of resin with less mess and fewer hazards.
Large-Scale and Multi-Panel Ideas
15. Split-Canvas Triptych
Difficulty: Moderate. Time: 3 to 4 hours.
Place three canvases side by side and paint them as one image, such as an abstract wave or a landscape. Hang them with 2 to 3 inches between panels for a gallery look.
16. Oversized Statement Abstract
Difficulty: Moderate. Time: 3 to 5 hours.
Use a foam roller for the background, then add large gestural strokes with a wide brush. Keep the design simple; big canvases need fewer, bigger shapes.
DIY Large Canvas Art Ideas for Beginners
The most forgiving big projects are color-block tape abstracts, soft gradients, neutral knife textures and pours. All of them hide small imperfections and don’t rely on drawing skill. Buy paint in larger tubes or jars to keep color consistent across a big surface, and mix more of each color than you think you’ll need.
How to Thin Acrylic Paint for Art Projects
For washes and backgrounds, a few drops of water at a time is fine. Many manufacturers suggest keeping water modest on primed canvas, often cited as up to around 30 percent, to avoid weakening the paint film. For transparent glazes, fluid lines or pouring, use the appropriate medium instead. Thinning with medium also keeps the paint’s sheen even across large areas.
Finishing and Hanging
- Paint the edges. Continue the design around the sides, or paint them a solid color, so the canvas looks finished without a frame.
- Let it cure. Allow at least a few days, longer for thick texture.
- Varnish. Two thin coats even out the sheen, deepen colors and protect against dust and fading.
- Add hardware. Use sawtooth hangers for small pieces and a wire with D-rings for larger ones.
- Hang at eye level. A common guideline is to place the center of the art about 57 to 60 inches from the floor, or 8 to 10 inches above furniture.
Common Mistakes With DIY Wall Art
| Mistake | Result | Fix |
|---|---|---|
| Canvas too small for the wall | Art looks lost | Go bigger or use a grouping |
| Too many colors | Busy, unrelated to the room | Limit to 3 colors plus a neutral |
| Streaky backgrounds | Unprofessional look | Use a roller or wide brush and two thin coats |
| Tape bleed | Fuzzy lines | Seal tape edges with base color first |
| Unpainted staple edges | Looks unfinished | Paint the sides or frame the canvas |
| No varnish | Uneven shine; dust sticks | Varnish after curing |
FAQs
What is the easiest DIY wall art to make with acrylic paint?
Color-block abstracts made with painter’s tape are among the easiest, followed by ombré gradients and pour paintings. None of them require drawing skills.
What size canvas should I use for wall art?
Aim for roughly two-thirds the width of the furniture below the art. Above an average sofa, that often means a canvas around 40 to 48 inches wide, or several smaller canvases grouped together.
Do I need to varnish acrylic wall art?
Varnish isn’t required, but it evens out the sheen, deepens colors and protects against dust and light, which makes DIY art look more polished.
What are good canvas art ideas for beginners?
Botanical silhouettes, minimal landscapes, mid-century shapes, tape abstracts, line art with acrylic markers and acrylic pours are great starting points because they rely on simple shapes and techniques.
Can I use craft acrylic paint for wall art?
Yes. Craft acrylic works for many wall art projects, especially those using flat color. For large canvases or vibrant, lightfast color, higher-pigment paints usually cover better and need fewer coats.
How long does acrylic wall art take to dry?
Thin layers are touch-dry in minutes to an hour. Textured knife paintings and pours can take one to several days. Wait until the painting is fully cured before varnishing.
Next Step
Pick one idea that matches your room and your patience level, size it properly for the wall, and limit your palette. A tape abstract or knife-texture canvas is a great first project, and a triptych or oversized statement piece is a satisfying second. Once those feel comfortable, single-subject pieces such as coastal animals or botanicals make a natural next challenge.
Big canvases use a lot of paint, and coverage determines whether you need two coats or five. To choose paint and supplies that make large projects easier, compare our picks for the best acrylic and craft paints for wall art.


One Comment