
PaintingProGuide is reader-supported. When you buy through links on this page we may earn an affiliate commission at no extra cost to you.
The best Ibis Paint X tutorial is one that gets you from a blank canvas to a finished, colored illustration without drowning you in menus. Ibis Paint X is free, runs on phones and tablets, and packs in a huge brush library, layers, rulers, filters and automatic time-lapse recording. That richness is exactly why beginners get stuck. This guide is a complete, structured Ibis Paint X tutorial: setting up a canvas, choosing brushes, using the stabilizer, working with layers and clipping, coloring, shading, adding effects and exporting both the image and the process video.
Follow it in order the first time. After that, use the section headings as a reference whenever you forget where a tool lives. App layouts can shift slightly between updates, but the tools and workflow below have been central to Ibis Paint X for a long time.
Quick answer: To learn Ibis Paint X fast, follow a single project from start to finish: create a canvas at your final size, sketch on one layer, lower its opacity, ink on a new layer with the stabilizer turned on, add flat colors on a layer beneath the line art, shade with clipping layers set to Multiply, add highlights with clipping layers set to Add or Screen, then export a PNG and your time-lapse video. Repeat that same workflow on three different drawings and the app will feel familiar.
Our Top Picks at a Glance
- Project-based learning — Best way to learn Ibis Paint X for most beginners
- Layer and clipping mastery — The single most important skill to learn early
- Stabilizer and rulers — Best tools for clean line art on a phone
- Studying time-lapse videos — Best way to learn from other artists’ process
- Short daily exercises — Best for building speed and confidence
Ibis Paint X Learning Path at a Glance
| Stage | What to learn | Practice exercise |
|---|---|---|
| 1. Setup | Canvas size, interface, gestures | Create three canvases at different sizes |
| 2. Brushes | Choosing, sizing, opacity, stabilizer | Fill a page with strokes from five brushes |
| 3. Layers | Adding, ordering, opacity, clipping | Sketch, ink and color a simple fruit on separate layers |
| 4. Color | Color picker, fill, eyedropper | Flat-color a character with bucket fill |
| 5. Shading | Blend modes, clipping, soft brushes | Shade a sphere with one light source |
| 6. Finishing | Filters, text, export, time-lapse | Finish and export one complete illustration |
How We Built This Tutorial
This tutorial is based on Ibis Paint X’s long-standing tool set and on standard digital illustration workflow used across drawing apps. We do not quote version numbers or subscription prices, which change frequently. The only products on this page are a few styluses and drawing gloves near the end, picked from Amazon listing details checked in October 2026 rather than hands-on testing. If you are still choosing an app, read our comparison of MediBang vs Ibis Paint X, and if you are unsure which version to download, see Ibis Paint vs Ibis Paint X.
Step 1: Set Up Your Canvas and Learn the Interface
Open the app, tap My Gallery and create a new canvas. Choose a size based on where the image will end up: a square canvas suits social posts, a portrait canvas suits phone wallpapers and character art. Pick a larger size than you think you need; you can always scale down at export, but scaling up loses quality.
Once the canvas opens, notice the main areas: the toolbar for brushes, eraser, fill and selection; the brush and color controls; and the layer button. Learn the gestures early. Two-finger pinch zooms and rotates, and tap gestures are commonly used for undo and redo. These save constant trips to the menus.
- Create the canvas at your final aspect ratio and a generous resolution.
- Rotate the canvas with two fingers to match your natural stroke direction.
- Practice undo and redo gestures until they are automatic.
- Find the settings for pen pressure if you use a stylus.
Step 2: Choose Brushes and Turn On the Stabilizer
Ibis Paint X has a very large brush library, which is overwhelming at first. Start with only a few: a pen or dip pen for line art, a pencil for sketching, an airbrush or soft brush for shading and a flat or textured brush for coloring. Adjust thickness and opacity with the sliders beside the canvas.
The stabilizer is the key to clean lines on a glass screen. It smooths the wobble in your strokes by slightly delaying and averaging them. Set it to a low to moderate value for inking; too high, and lines lag behind your finger or stylus. You can also use the ruler tools for perfect straight lines, circles, ellipses and symmetry.
- Pick four brushes and add them to favorites so you are not scrolling.
- Set the stabilizer to a moderate value for line art and lower it for sketching.
- Use the symmetry ruler for faces, mandalas and logos.
- Practice pressure: make lines that go thin, thick and thin again.
Step 3: Master Layers and Clipping
Layers are where Ibis Paint X becomes powerful. Open the layer window and keep a simple structure: a sketch layer at the bottom, a line art layer above it, and color layers between them. Lower the sketch layer’s opacity before inking so you can see your clean lines clearly, then hide it when you are done.
Clipping is the most useful layer feature for beginners. A clipping layer only shows paint where the layer below has pixels. Put flat colors on one layer, add a new layer above it, turn on clipping, and you can shade freely without painting outside the shape. Alpha lock (sometimes labeled protect alpha) does something similar on a single layer by locking transparent areas.
- Sketch on Layer 1 and lower its opacity.
- Add Layer 2 for line art above the sketch.
- Add a color layer beneath the line art.
- Add a clipping layer above the color layer for shading.
- Add another clipping layer for highlights.
For a deeper walkthrough of the interface and layer panel, see our guide on how to use Ibis Paint X.
Step 4: Add Flat Colors
Flat colors are the base of most illustrations. Select the color layer beneath your line art and use the bucket fill tool, set to reference the line art layer, so fills stop at your lines. Small gaps in line art cause fills to leak; close gaps or use a lasso fill tool to paint shapes directly.
Use the eyedropper to sample colors you have already used, keeping the palette consistent. Many artists keep each major area, such as skin, hair and clothing, on its own layer so they can adjust colors later without repainting.
- Set the fill tool to reference the line art layer.
- Close gaps in line art before filling.
- Keep major color areas on separate layers.
- Use the eyedropper rather than guessing colors.
Step 5: Shade and Highlight With Blend Modes
Decide where your light is coming from before you shade. On a clipping layer above the flat colors, set the blend mode to Multiply and paint shadows with a soft, slightly cool color; Multiply darkens the colors beneath while keeping them visible. On another clipping layer, set the blend mode to Add or Screen and paint highlights where the light hits.
Keep shading simple at first: one shadow shape and one highlight per form. Adjust the layer opacity to soften the effect. Practicing on a simple sphere teaches more than a full character.
- Choose one light direction and stick to it.
- Use Multiply for shadows and Add or Screen for highlights.
- Lower layer opacity rather than repainting.
- Soften edges with a soft eraser or airbrush.
Step 6: Add Effects, Text and Backgrounds
Ibis Paint X includes filters for adjusting hue, saturation, brightness and contrast, plus effects such as blurs and glows. Apply them to a duplicate layer so you can compare and undo. The text tool adds titles and speech bubbles, and frame tools divide a canvas into comic panels.
For backgrounds, a simple gradient or a blurred color field keeps attention on your subject. If you want to try a dramatic background, our space and galaxy painting tutorial adapts well to digital brushes.
Step 7: Export Your Art and Time-Lapse
When you are finished, save the artwork to your gallery and export it. PNG keeps quality high, and a transparent PNG is useful for stickers and overlays. If you want to continue work in another app, export a layered file. Ibis Paint X also records your drawing automatically, so you can export a time-lapse video of the whole process to share.
- Save the project in the app.
- Export a PNG for sharing or printing.
- Export a layered file if you will edit elsewhere.
- Export the time-lapse video and trim it if needed.
A Recommended Layer Structure
Keeping the same layer order on every piece makes Ibis Paint X much easier to manage. From top to bottom, a reliable structure looks like this:
| Layer (top to bottom) | Purpose | Blend mode |
|---|---|---|
| Effects and glow | Final light effects and color adjustments | Add or Screen |
| Line art | Clean inked lines | Normal |
| Highlights (clipped) | Light where the source hits | Add or Screen |
| Shadows (clipped) | Form and cast shadows | Multiply |
| Flat colors | Base colors for each area | Normal |
| Sketch | Rough drawing, low opacity, hidden at the end | Normal |
| Background | Color, gradient or scene | Normal |
Name your layers as you go. It takes a second and saves minutes of confusion when a piece has twenty layers.
Three Coloring Styles to Try
Cel shading
Cel shading uses hard-edged shadow shapes and no blending, like animation frames. Use a hard brush on a Multiply clipping layer and keep shadows to one or two tones. It is fast, clean and forgiving for beginners.
Soft shading
Soft shading blends shadows smoothly with an airbrush or soft brush. Paint the shadow shape with a hard brush first, then soften only the edges where the form turns gradually, such as cheeks or folds of fabric.
Painterly
Painterly coloring uses textured brushes and visible strokes, often without line art. Work from large shapes to small, picking colors with the eyedropper as you blend. It takes longer but looks closest to traditional painting.
Troubleshooting Common Problems
| Problem | Likely cause | Fix |
|---|---|---|
| Bucket fill floods the whole canvas | Gap in line art or wrong reference layer | Close gaps; set fill to reference the line layer |
| Shading appears outside the shape | Clipping not turned on | Enable clipping on the shading layer |
| Lines lag behind the pen | Stabilizer too high | Lower the stabilizer value |
| Cannot draw on a layer | Layer hidden, locked or alpha-locked on empty area | Check visibility and lock settings |
| Export looks blurry | Canvas too small | Start future pieces at a larger canvas size |
Buying Guide: Getting More From Ibis Paint X
Use a stylus
A stylus makes Ibis Paint X far more precise than a finger. Pressure-sensitive styluses on compatible tablets give natural line weight; even a basic capacitive stylus improves accuracy over a fingertip.
Consider removing ads
The free version shows ads. If you use the app daily, the paid options that remove ads and unlock extra features may be worth it. Check the in-app store for current terms.
Pick a device with enough screen
Phones work well for sketches, but a tablet gives more room for detailed illustrations and easier layer management.
Back up your work
Export important pieces regularly. Phones get lost and apps get reinstalled.
Learn from time-lapses
Watching other artists’ process videos is one of the fastest ways to learn layer structures and shading approaches.
Your First Complete Project: A Simple Character Bust
Put the steps together on one small project. A head-and-shoulders bust is ideal because it uses every core skill without needing a full figure or background.
- Create a portrait canvas and sketch the head shape, neck and shoulders loosely on a low-opacity layer.
- Ink the outline on a new layer with a pen brush and the stabilizer on; keep lines closed around each area.
- Bucket-fill skin, hair and clothing on separate layers under the line art.
- Add a Multiply clipping layer to each and paint one shadow shape from a single light direction.
- Add an Add or Screen clipping layer for a few highlights on hair and cheeks.
- Place a simple gradient behind the figure, adjust colors with a filter, and export the PNG and time-lapse.
Repeat the same bust with different hair, colors and lighting three times. By the third version, the workflow will feel natural and you will be ready to try full illustrations.
Daily Practice Exercises
- Five-minute line warm-up: straight lines, curves and circles with the stabilizer on.
- Value study: shade a sphere, cube and cylinder in grayscale.
- Clipping practice: flat-color a simple object and shade it on clipping layers.
- Color swap: repaint the same drawing with three different palettes.
- Speed piece: finish a small illustration in 20 minutes, then watch your time-lapse.
Common Mistakes to Avoid
- Drawing everything on one layer. It makes edits nearly impossible.
- Setting the stabilizer too high. Lines lag and feel unnatural.
- Working on a tiny canvas. Low resolution limits printing and detail.
- Leaving gaps in line art. Bucket fills leak through.
- Shading with pure black. Use darker, slightly cooler versions of your base colors.
- Never exporting backups. Save copies outside the app.
Stylus and Glove Picks for This Tutorial
The “Use a stylus” advice in the buying guide above is the single biggest upgrade for following this tutorial on an iPad, and a drawing glove helps once you start resting your hand on the screen during inking. These four were chosen from Amazon listings checked in October 2026 for compatibility, features and how widely buyers review them; we have not tested them. The styluses are for 2018 and later iPads, and their listings do not claim pressure sensitivity, so use the stabilizer from Step 2 to get clean, tapered lines. The gloves work on any tablet, including Android.
Hastraith Stylus — Best Budget Stylus With Tilt

Hastraith’s stylus adds tilt sensing, which the listing says changes line thickness with the pen angle, alongside palm rejection and a battery indicator. It charges over USB-C in about 13 minutes, turns on with a touch of the cap without Bluetooth, and ships with three replacement nibs and a silicone cover.
Best suited for: beginners following Steps 1 to 5 who want shading strokes that respond to pen angle.
Key features:
- Tilt sensitivity and palm rejection
- About 13-minute USB-C charge
- Includes 3 spare nibs and a silicone cover
DEGGE Stylus — Best for Spare Nibs

DEGGE’s aluminum stylus works without Bluetooth on 2018 to 2026 iPads, offers palm rejection, and according to the listing charges in 15 minutes for about 9 hours of use. It comes with four replaceable nibs, handy if you practice the daily exercises later in this guide and wear tips down.
Best suited for: daily practicers who go through stylus tips quickly.
Key features:
- Palm rejection
- 15-minute charge, about 9 hours of use
- Four replacement nibs included
HUION Artist Drawing Glove — Best Simple Glove

HUION’s two-finger glove fits either hand and is made from soft Lycra and nylon. The listing says it reduces friction between your hand and the screen and prevents smudges; it is a single glove in one size, about 20 cm long and 8 cm wide.
Best suited for: artists who rest the side of their hand on the screen while inking.
Key features:
- Two-finger design, fits left or right hand
- Lycra and nylon
- Reduces smudges and drag
Kortimu Artist Drawing Glove, 2-Pack — Best for Choosing a Size
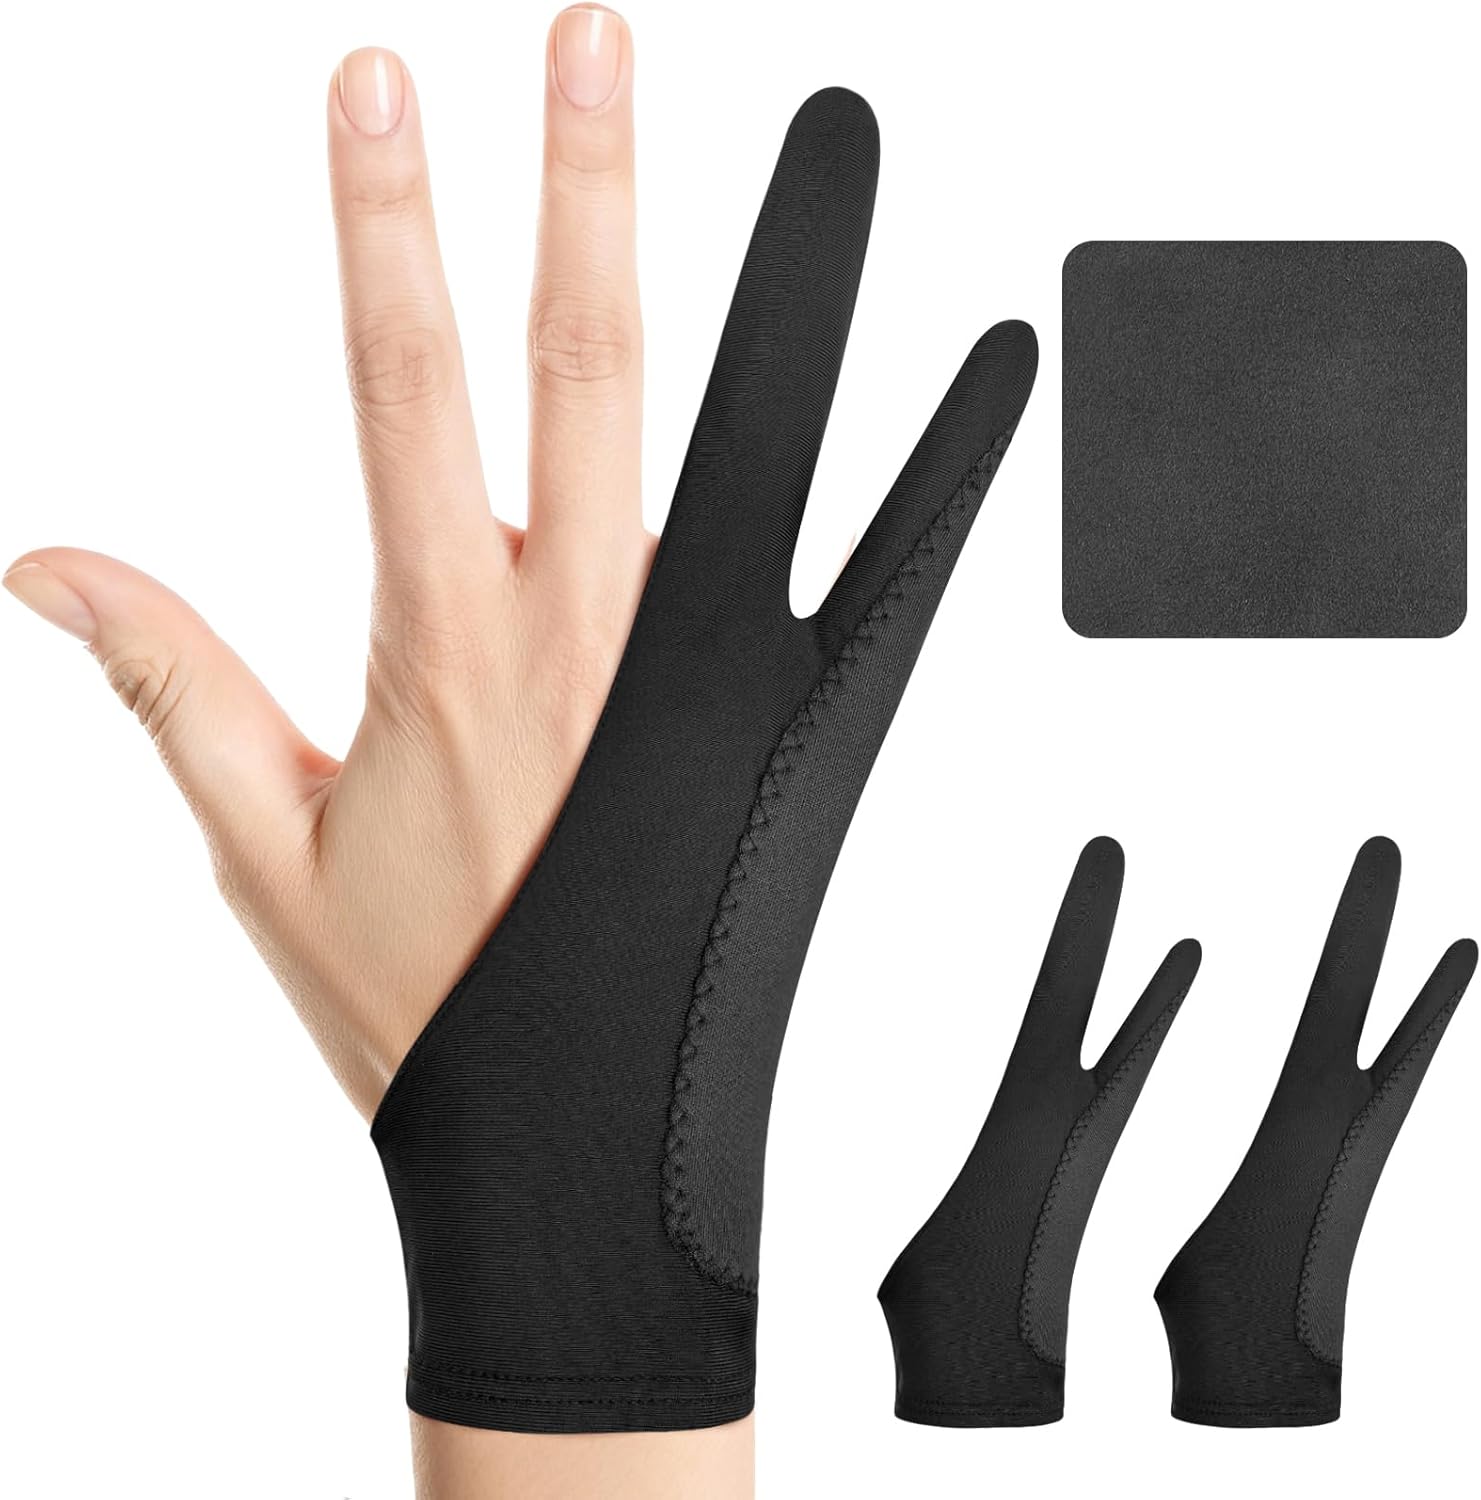
Kortimu’s set includes two gloves and a cleaning cloth, and the listing offers three sizes, which helps if one-size gloves feel loose. It describes a three-layer anti-slip design to stop accidental palm touches, in breathable fabric for longer sessions.
Best suited for: artists with smaller or larger hands, or anyone who wants a spare glove.
Key features:
- Two gloves plus cleaning cloth
- Three sizes available
- Three-layer anti-slip palm design
FAQs
Is Ibis Paint X good for beginners?
Yes. It is free, designed for touch screens and includes stabilization, rulers and a large brush library that help beginners get clean results quickly.
How do I make clean lines in Ibis Paint X?
Turn on the stabilizer at a moderate setting, zoom in for detail, use a pen brush and draw confident strokes. Ruler tools help with straight lines and symmetry.
What is clipping in Ibis Paint X?
A clipping layer shows paint only where the layer beneath it has content. It lets you shade and highlight inside shapes without going over the edges.
Can I export layers from Ibis Paint X?
Yes. You can export a layered file to continue working in other software, as well as flattened image formats such as PNG.
How do I record my drawing process?
Ibis Paint X records automatically. When you finish, export the time-lapse video from the artwork’s options.
Should I use Ibis Paint X or Ibis Paint?
They are closely related versions of the same app with different pricing and ad models. Our guide on Ibis Paint vs Ibis Paint X explains the difference.
Final Recommendation
The best way to learn Ibis Paint X is to follow one complete workflow and repeat it: canvas, sketch, ink with stabilizer, flat colors, clipping-layer shading and highlights, effects, then export. Learn layers and clipping first; they unlock almost everything else.
After three or four complete pieces, start experimenting with blend modes, filters and rulers, and study time-lapse videos from artists you admire. With short daily practice, Ibis Paint X becomes a genuinely powerful, free studio in your pocket.




One Comment