Marbling nail art has become a creative trend for people who love unique and colorful nails. This technique brings swirls of color and interesting patterns to your fingertips, making every manicure one of a kind. If you want nails that look artistic, eye-catching, and fun, learning how to do marbling nail art with paint is a great choice. While it may look complicated, it’s actually easy to do at home when you know the right steps and tips.
This guide will show you exactly how to create marbling nail art using regular paint, not just nail polish. You’ll learn about the materials you need, different marbling methods, step-by-step instructions, and tips for beautiful results. Whether you’re new to nail art or want to improve your skills, you’ll find everything here to get started and make your next manicure stand out.
What Is Marbling Nail Art?
Marbling nail art is a method of creating swirling, multi-color patterns on nails. The designs look similar to marble stone, with colors blending and twisting together. There are many ways to marble nails, but the most popular techniques include water marbling, dry marbling, and drag marbling.
Most people use nail polish for marbling, but you can also use acrylic paint or other types of paint. Paint is often cheaper, dries quickly, and allows for more color mixing. Marbling with paint gives you more control and opens up creative possibilities for your nail designs.
Why Choose Paint For Marbling Nails?
Using paint for marbling nail art has several benefits:
- Cost-effective: Acrylic paint is usually less expensive than nail polish.
- Easy to mix: Paint can be blended to create custom colors.
- Quick drying: Many paints dry faster than nail polish.
- Thin layers: Paint allows you to create thin, precise designs.
- Cleanup is simple: Mistakes can be wiped away with water before the paint dries.
However, not all paints work for marbling. Acrylic paint is best because it is water-based, safe for skin, and easy to handle. Avoid oil paints, which are sticky and hard to remove.

Credit: www.amazon.com
Essential Materials For Marbling Nail Art With Paint
Before you start, gather these materials:
- Acrylic paint (at least 2-3 colors)
- Base coat and top coat nail polish
- White or light-colored nail polish (as a base color)
- Small cup of water (for water marbling)
- Thin nail art brush or dotting tool
- Toothpicks or orange sticks (for swirling)
- Tape or liquid latex (to protect skin)
- Cotton swabs and nail polish remover (for cleanup)
- Paper towels or napkins
- Small palette or plastic plate (for mixing paint)
Optional: Glitter, stickers, or nail gems for extra decoration.
Having everything ready will make the process smoother and help you avoid mistakes.
Popular Marbling Techniques With Paint
There are several ways to marble your nails using paint. Here are three of the most popular methods:
Water Marbling
This method uses water to float and blend paint colors. It creates soft, swirling patterns and works best with thin paints.
Dry Marbling
In dry marbling, you apply wet paint directly to the nail and swirl the colors with a tool. It’s faster than water marbling and gives you more control.
Drag Marbling
Here, you apply dots or stripes of paint and then use a thin brush or toothpick to drag the colors into patterns. It’s easy for beginners and perfect for simple designs.
Here’s a quick comparison of these methods:
| Method | Difficulty | Best For | Drying Time |
|---|---|---|---|
| Water Marbling | Intermediate | Complex swirls | Medium |
| Dry Marbling | Beginner | Simple blends | Fast |
| Drag Marbling | Beginner | Lines & petals | Fast |

Credit: maniology.com
Step-by-step Guide: How To Do Marbling Nail Art With Paint
Let’s go through the steps for each marbling technique. All instructions below use acrylic paint.
1. Preparing Your Nails
Start with clean, trimmed nails. Remove any old polish and push back cuticles gently. Apply a base coat to protect your nails and let it dry. For best results, paint your nails with a white or light polish as the base color—this makes the marbling colors stand out more.
2. Setting Up Your Workspace
- Lay down paper towels to catch spills.
- Fill a small cup with room-temperature water (if doing water marbling).
- Set out your paints on a palette or plate.
- Have tape or liquid latex ready to protect the skin around your nails.
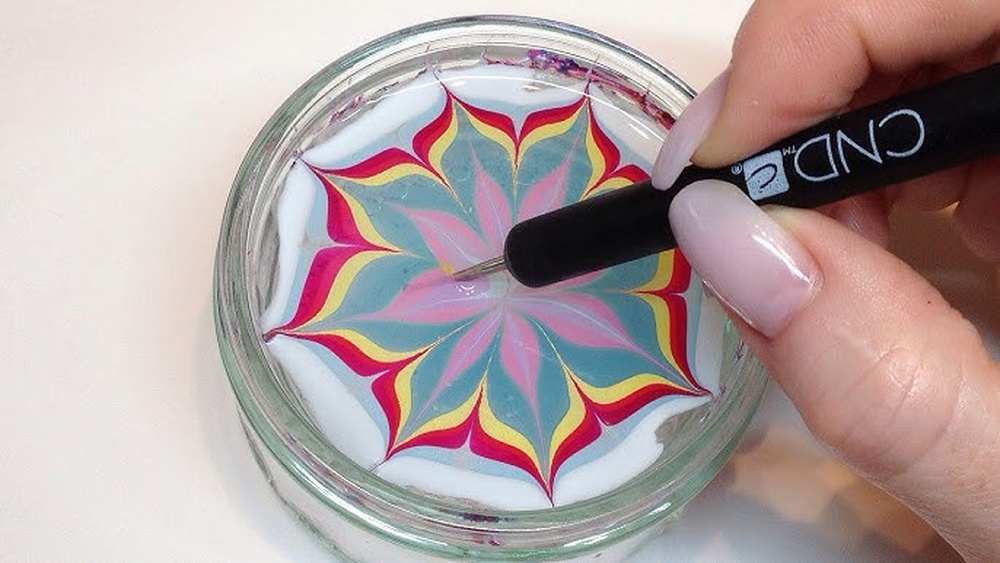
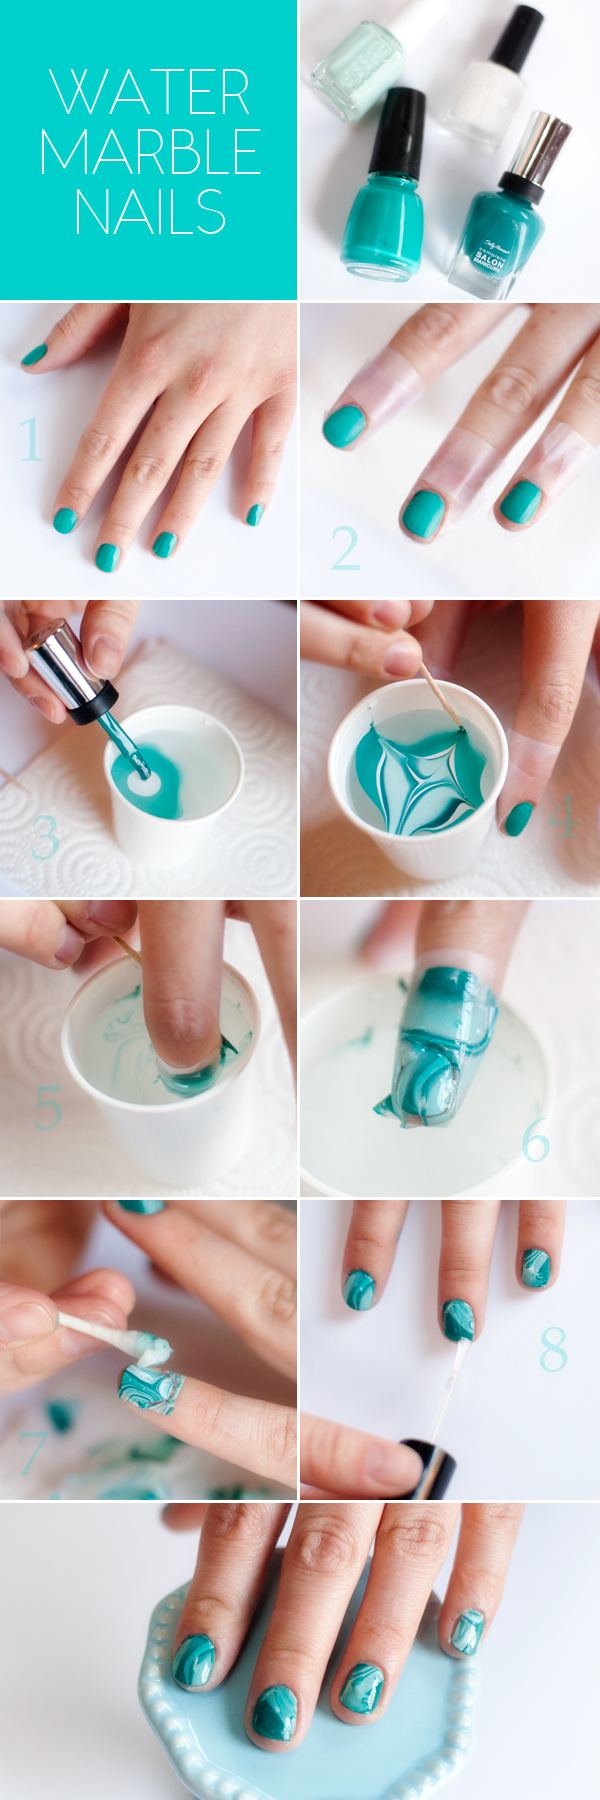
3. Water Marbling With Paint
Water marbling can give stunning effects, but it requires careful timing.
Steps:
- Protect your skin: Wrap tape or apply liquid latex around each finger, leaving only the nail exposed.
- Drop paint in water: Thin your acrylic paint slightly with water. Using a brush or dropper, add a small drop of each color to the surface of the water. The colors should spread in rings.
- Add more colors: Continue adding drops of different paints, one after another, to create concentric circles.
- Swirl the pattern: Use a toothpick or thin stick to gently drag lines through the paint, creating swirls or flower shapes.
- Dip your finger: Position your nail above the best part of the pattern and dip it into the water at a 45-degree angle.
- Clean the surface: While your finger is still in the water, use the toothpick to clean away excess paint on the surface.
- Remove and dry: Take your finger out, peel off the tape, and let your nail dry.
- Clean up: Use a cotton swab dipped in remover to tidy up edges.
- Seal the design: Finish with a top coat to protect your artwork.
Tip: If the paint doesn’t spread on water, it may be too thick. Add a little more water to thin it.
4. Dry Marbling With Paint
This method is fast and mess-free.
Steps:
- Apply the base color: Use a white or light polish and let it dry.
- Add paint: Place 2-3 small dots of different colored paint onto the nail, while the base is still tacky.
- Swirl colors: Use a toothpick or thin brush to gently swirl the dots together, creating marbled patterns.
- Let dry: Wait for the paint to fully dry before touching.
- Top coat: Seal with a top coat for shine and protection.
Pro Insight: Working quickly is important. If the base color dries fully, the paint won’t blend smoothly.
5. Drag Marbling With Paint
Drag marbling is simple and gives beautiful petal or wave effects.
Steps:
- Apply the base color and let it dry.
- Add paint lines or dots: Use a brush to paint stripes or dots of different colors on top.
- Drag the pattern: With a toothpick or fine brush, drag through the paint in different directions—outwards for petals, wavy for abstract lines.
- Wait to dry, then finish with a top coat.
Example: For a flower, make five dots in a circle and drag from the center outwards.
Choosing Colors For Marbling Nail Art
Picking the right color combination is essential for stunning marbled nails. Here are some ideas and tips:
- Contrast matters: Use a mix of light and dark shades for patterns that pop.
- Limit the palette: 2-4 colors work best. Too many colors can look messy.
- Trendy combos: Try pastel colors for a soft look, or metallics for glam nails.
- Seasonal themes: Pastels for spring, bold reds and greens for holidays, gold and silver for winter.
Here are some popular color combinations:
| Theme | Color 1 | Color 2 | Color 3 |
|---|---|---|---|
| Classic Marble | White | Black | Gray |
| Ocean Vibes | Blue | Turquoise | White |
| Rose Garden | Pink | Green | Gold |
| Galaxy | Purple | Blue | Silver |
| Sunset | Orange | Yellow | Red |
Pro Tip: If you’re unsure, test your color mix on paper before using it on your nails.
Credit: prettyplainjanes.com
Common Mistakes And How To Avoid Them
Even experienced nail artists sometimes make mistakes. Here are a few to watch out for:
- Paint too thick or too thin: Thick paint won’t spread in water; thin paint can run off the nail. Thin your paint until it drips easily but is not watery.
- Not protecting skin: Marbling can be messy. Always use tape or liquid latex around your nails.
- Moving too slowly: The paint dries fast. Work quickly, especially with dry and drag marbling.
- Skipping the top coat: Without it, your design may chip or smudge.
- Using too many colors: This can make your nails look chaotic. Stick to a small palette.
Advanced Tips For Perfect Marbling Nail Art
To take your marbling to the next level, try these expert tips:
- Use a fan brush to create fine, wispy marble lines.
- Mix in a drop of nail polish for extra shine and staying power.
- Layer marbling techniques (for example, do a dry marble first, then water marble on top).
- Try negative space designs by leaving parts of the nail bare.
- Seal with a gel top coat for longer-lasting designs.
Non-obvious insight: Many beginners forget to use room-temperature water for water marbling. Cold or hot water makes the paint clump or sink. Always use water at room temperature for best results.
Another key tip: If you make a mistake, don’t panic. Acrylic paint can be wiped off with a damp brush before it dries, so you can fix small errors without starting over.
Caring For Your Marbled Nails
To keep your marbled nail art looking fresh:
- Apply a new layer of top coat every 2-3 days.
- Avoid using nails as tools to prevent chips.
- Moisturize cuticles to keep nails healthy.
- If you need to remove the design, use acetone-free remover to be gentle on your nails.
Real-life Inspiration And Trends
Marbling nail art is seen everywhere, from fashion runways to social media. Celebrities and influencers often wear marbled nails in photoshoots and music videos. In 2023, searches for “marble nail art” grew by over 30% on Pinterest, showing how popular this style has become.
Artists are now combining marbling with other techniques, such as adding metallic foils, using matte top coats, or making negative space designs. This mix of styles helps marbling stay fresh and exciting.
If you want more inspiration, check out the designs shared on Pinterest to see what’s trending and find color ideas you love.
Frequently Asked Questions
How Long Does Marbling Nail Art Last?
With a good top coat, marbled nail art can last 7–10 days without chipping. Using a gel top coat can help it last even longer.
Can I Use Regular Watercolor Or Poster Paint For Nail Marbling?
It’s best to use acrylic paint. Watercolor and poster paints may not stick well or may wash off easily.
Do I Need A Special Top Coat After Marbling With Paint?
A standard clear top coat is enough to seal and protect your design. For even more durability, use a gel top coat.
Is Marbling Nail Art Safe For Natural Nails?
Yes, if you use non-toxic acrylic paints and a base coat, marbling nail art is safe for natural nails.
What Should I Do If The Marbling Paint Doesn’t Spread In Water?
Try thinning the paint with a bit of water and make sure the water is at room temperature. Some paints may not work well for water marbling, so testing first can help.
Marbling nail art with paint is a creative and fun way to try new nail designs at home. With the right materials, a little practice, and these tips, you can achieve stunning results—no salon visit required. Experiment with colors, try different methods, and let your imagination guide you.
Your nails can be your own tiny works of art!