How to Paint Clouds With Acrylics: Stunning Tips for Dreamy Skies

Have you ever looked at a sky filled with clouds and wished you could capture their soft, dreamy beauty on canvas? Painting clouds with acrylics might seem tricky at first, but with the right techniques, you can create stunning, lifelike skies that bring your artwork to life.

In this guide, you’ll discover simple steps and insider tips that make painting clouds easier and more fun than you ever imagined. Ready to turn your blank canvas into a breathtaking sky? Keep reading, and let’s get your creativity flowing!

Choosing The Right Supplies

Choosing the right supplies is key to painting clouds with acrylics. Good tools help create soft, fluffy clouds that look real. The right paint, brushes, and materials make the process easier and more fun. This section covers the must-have supplies for painting beautiful skies.

Best Acrylic Paints For Skies

Select paints with smooth texture and strong colors. Titanium white is essential for bright, thick clouds. Ultramarine blue and cerulean blue work well for sky backgrounds. Mixing a bit of burnt sienna adds warmth to cloud shadows. Look for paints labeled “artist quality” for better coverage and color.

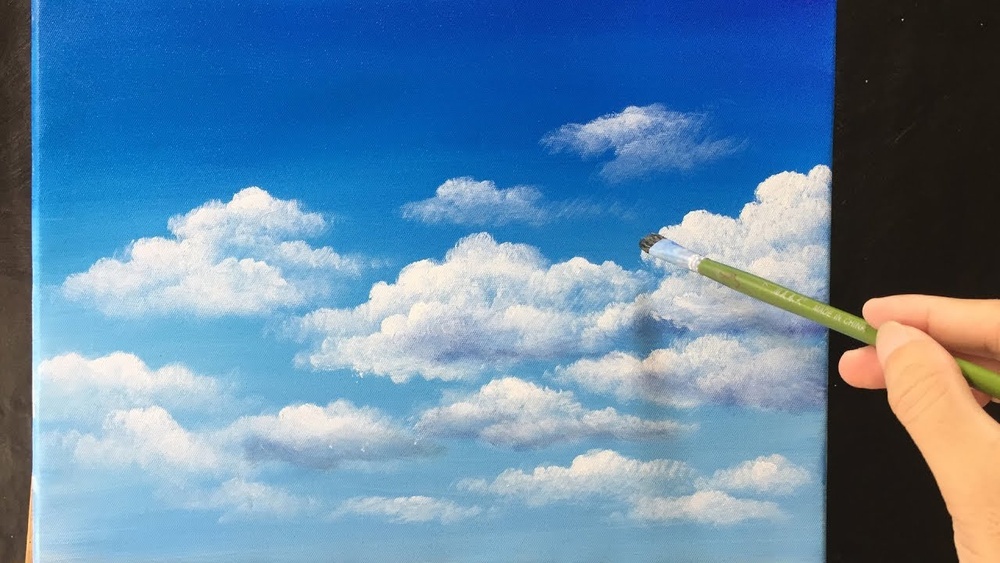
Brushes That Shape Clouds

Round brushes with soft bristles create smooth edges. Fan brushes help blend colors and soften cloud shapes. Flat brushes are useful for broad sky areas. Small detail brushes add highlights and fine cloud lines. Choose brushes with synthetic bristles for better acrylic handling.

Essential Tools And Materials

A palette for mixing colors keeps shades ready. Canvas or acrylic paper works well for painting. Use a spray bottle to keep paint moist longer. Paper towels help clean brushes and soften strokes. A palette knife can mix thick paint or add texture to clouds.

How to Paint Clouds With Acrylics: Stunning Tips for Dreamy Skies

Credit: colorbyfeliks.com

Preparing Your Canvas

Preparing your canvas is the first step in painting clouds with acrylics. It sets the stage for your artwork. Proper preparation helps your paint stick well and shows the cloud shapes clearly. Take time to get this right for better results.

Selecting The Canvas Size

Choose a canvas size that fits your space and style. Small canvases are easier to finish quickly. Large canvases give more room for detail. Think about where you want to display your painting. Also, consider how much time you want to spend painting.

Priming Techniques For Acrylics

Priming protects the canvas and helps paint last longer. Use a white or light-colored gesso primer. Apply a thin, even coat with a brush or roller. Let it dry fully before adding more coats. Two to three coats work well for smooth surfaces. This creates a good base for cloud colors.

Sketching Basic Cloud Shapes

Lightly sketch cloud outlines with a pencil. Keep shapes simple and soft. Use circles and ovals for fluffy clouds. Avoid sharp edges to keep clouds natural. This sketch guides your paint layers. It helps place highlights and shadows later.

Mixing Colors For Realistic Skies

Mixing colors for realistic skies is key to painting beautiful clouds with acrylics. The sky shows many shades of blue, white, and other colors. Getting these shades right makes your painting look natural and lively.

Understanding how to mix soft blues and whites creates the base for your clouds. Adding warm and cool tones brings depth and mood. Blending these colors smoothly gives the sky a soft, real feel.

Creating Soft Blues And Whites

Start with basic blue and white paint. Mix small amounts of white into blue to get soft sky tones. Use more white for lighter blues. Avoid pure blue; it looks harsh and unrealistic.

For clouds, use mostly white with a touch of blue or gray. This mix makes clouds look fluffy and natural. Test your mix on paper before painting.

Adding Warm And Cool Tones

Add warm colors like a little yellow or pink for sunrise or sunset skies. These tones add warmth and life to the clouds.

For cooler clouds, add tiny amounts of blue or purple. This gives shadows and depth. Warm and cool tones together make the sky more interesting and real.

Blending Techniques For Smooth Transitions

Use a dry, clean brush to blend colors softly on the canvas. Light, circular strokes work best. Blend edges where colors meet to avoid sharp lines.

Work quickly while the paint is wet for smooth transitions. Layer colors gently for a natural look. Blending makes the sky and clouds appear soft and airy.

Techniques To Paint Fluffy Clouds

Painting fluffy clouds with acrylics requires special techniques. These methods help create soft, realistic shapes that appear light and airy. Understanding how to layer paint, use brush strokes, and add light and shadow makes clouds come alive on canvas.

Layering And Building Texture

Start with a base layer of light blue or gray. Use a large brush to paint the general shape of clouds. Let the paint dry slightly before adding white or off-white tones on top. Apply thick paint for the cloud edges to add texture. Build layers gradually, blending softly to avoid harsh lines. This creates depth and volume in the clouds.

Using Dry Brush And Stippling

Use a dry brush technique to add softness. Dip the brush lightly in paint, then wipe most of it off. Lightly drag the brush over the surface to create soft, wispy edges. Stippling adds small dots and dabs for a fluffy feel. Tap the brush gently to create texture and simulate the cloud’s airy look. These techniques help clouds look natural and light.

Capturing Light And Shadow

Observe where the light hits the clouds. Use white and light colors on the sunlit parts. Apply gray or blue tones on the shadow areas. Blend the edges between light and shadow smoothly. This contrast gives clouds a three-dimensional effect. Highlighting the light and shadow shows volume and movement in the sky.

Creating Depth In Cloud Formations

Creating depth in cloud formations makes your painting look real and alive. Depth helps show space and distance in the sky. It gives clouds a three-dimensional feel. This makes your artwork more interesting and natural.

By using different shades, sizes, and edges, you can paint clouds that seem near or far. Depth also helps guide the viewer’s eye through the painting. It adds mood and atmosphere to the scene.

Foreground Vs Background Clouds

Foreground clouds appear larger and clearer. Use strong colors and sharp edges for them. Background clouds look smaller and softer. Use lighter colors and blurred edges to show distance. This difference helps create layers in your painting. It makes the sky look wide and deep.

Atmospheric Perspective Tips

Colors fade and lose contrast as they move back. Use paler blues and grays for distant clouds. Avoid strong details far away. Add a slight blue tint to background clouds. This mimics the air between us and the sky. It makes clouds look like they float in space.

Enhancing Volume With Highlights

Highlights add light and form to clouds. Paint soft white or light yellow on the parts that catch sunlight. Use gentle strokes to blend highlights into the cloud body. This creates a round, puffy effect. Highlights show the shape and volume of clouds well.

How to Paint Clouds With Acrylics: Stunning Tips for Dreamy Skies

Credit: stepbysteppainting.net

Adding Final Details And Effects

Adding final details and effects brings your acrylic cloud painting to life. This stage enhances depth and mood. It helps clouds look soft and natural. Small touches make a big difference. Focus on blending, adding sky elements, and protecting your work.

Softening Edges For Dreamy Looks

Use a clean, dry brush to gently soften cloud edges. Lightly blend the edges into the background sky. This makes clouds appear fluffy and light. Avoid harsh lines that break the soft feel. Blend in small circles for smooth transitions. Soft edges create a peaceful, dreamy atmosphere.

Incorporating Sky Elements

Add subtle details like birds, distant planes, or faint stars. These elements add interest and realism. Use a fine brush and light colors. Paint small, simple shapes without overpowering clouds. Light touches suggest depth and space in the sky. They give your painting a story and life.

Sealing And Protecting Your Artwork

Once dry, apply a clear acrylic varnish to seal your painting. This protects colors and prevents dust buildup. Use a soft brush or spray varnish for even coverage. Choose matte or glossy finish based on your preference. Proper sealing keeps your artwork vibrant for years.

How to Paint Clouds With Acrylics: Stunning Tips for Dreamy Skies

Credit: www.youtube.com

Frequently Asked Questions

How Do I Start Painting Clouds With Acrylics?

Begin with a light blue or gray background to set the sky tone. Use a dry brush to sketch cloud shapes lightly. Layer white and soft grays to add volume and depth. Blend edges gently for a fluffy, natural look.

What Brushes Work Best For Acrylic Cloud Painting?

Use soft, round, and fan brushes for cloud textures. Round brushes help create rounded cloud shapes. Fan brushes blend colors smoothly and add wispy effects. A flat brush is useful for broad sky areas.

How To Create Realistic Cloud Textures In Acrylics?

Use layering techniques with varied white and gray tones. Apply paint in circular, soft motions for fluffy textures. Add highlights where the light hits clouds. Blend edges softly to avoid harsh lines for realism.

Can I Mix Acrylic Paint For Cloud Shading?

Yes, mix white with blues, grays, or purples for shadows. Use lighter shades for highlights and darker for shadow areas. Blending these tones adds depth and realism to your clouds.

Conclusion

Painting clouds with acrylics can be fun and relaxing. Use soft brushes and light colors to create fluffy shapes. Blend edges gently for a natural look. Practice different techniques to find your favorite style. Remember, patience helps improve your skills.

Try painting clouds in various skies and times of day. Keep your strokes light and smooth. Enjoy the process and watch your paintings come alive. Clouds add beauty and depth to any artwork. Keep painting and see your art grow!

Facebook
Pinterest
Twitter
LinkedIn
Reddit
Telegram
Picture of paintingproguide

paintingproguide

Related Post

Painting a Flower With Acrylics – Step-by-Step Guide for Beginners Painting a

Choosing the right acrylic paint set for art demonstrations can be challenging.

Choosing the best canvas for acrylic paint in small sizes can be

Acrylic Painting Ideas Inspired by Nature Nature is full of beauty and

Leave a Reply

Your email address will not be published. Required fields are marked *

Picture of Paintingproguide

Paintingproguide

Painting

Welcome to PaintingProGuide, your ultimate resource for all things related to painting! Whether you’re a seasoned artist or just starting out, our mission is to inspire, educate, and empower you to create your best work. We believe that everyone has the potential to be an artist, and our goal is to help you unlock your creativity and achieve your artistic dreams.

Recent Posts