Painting fur in oil is a real test of an artist’s patience and skill. When done well, fur can look soft, realistic, and touchable—almost alive on the canvas. But many beginners struggle to make it look natural. The secret lies in understanding the structure of fur, selecting the right materials, and knowing techniques that bring out the depth and flow.
Whether you’re painting a fluffy cat, a wild wolf, or a gentle rabbit, mastering fur will lift your animal portraits to the next level.
In this guide, you’ll learn how to paint fur in oil, step by step. You’ll discover what brushes and colors work best, how to build up layers for realism, and tricks that experienced artists use to avoid flat or fake-looking results.
Along the way, you’ll find practical advice, real examples, and solutions to common mistakes. Let’s unlock the secrets of painting fur that makes viewers want to reach out and touch it.
Understanding Fur Structure And Texture
Before you pick up a brush, take time to study how fur grows and behaves. Fur is not just one mass—it’s made up of thousands of individual hairs. Each animal has different types of fur: soft undercoat, longer guard hairs, and sometimes whiskers.
Notice these details:
- Direction: Fur grows in specific directions depending on the body part. For example, on a dog, fur around the snout radiates out, while fur on the back flows downward.
- Length and density: Shorter fur looks different from long, wavy fur. Some areas are denser, others sparser.
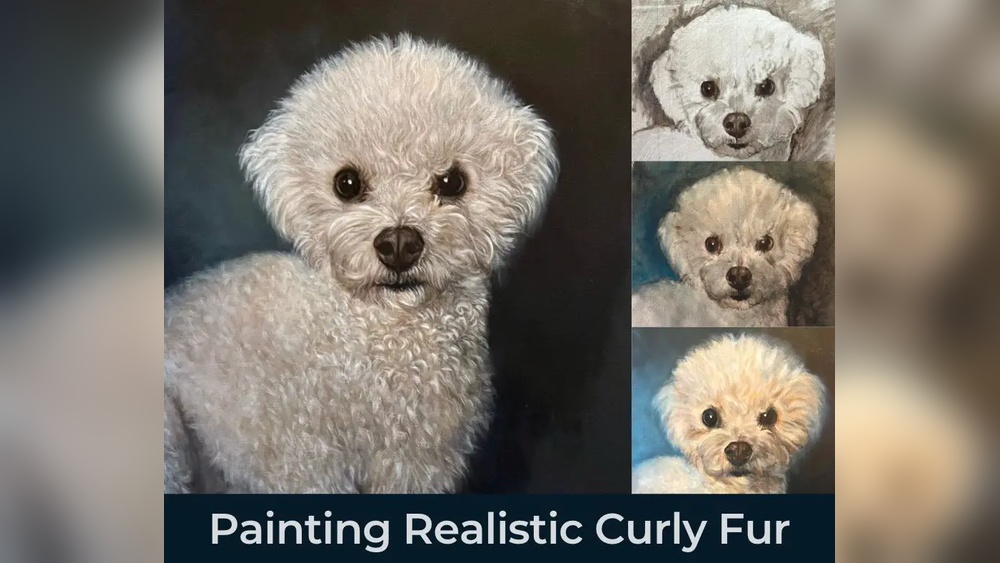
- Clumping: Fur often forms small groups or tufts, especially if it’s wet or curly.
A good practice is to observe high-quality animal photos or, if possible, study real animals. Make quick sketches to understand how fur behaves. This observation will guide your brushwork later.
Essential Materials For Painting Fur In Oil
Choosing the right materials is half the battle. While you don’t need expensive supplies, some tools make painting fur much easier.
| Material | Recommended Option | Notes |
|---|---|---|
| Brushes | Riggers, filberts, fan brushes | Use synthetic for sharper edges, natural for softer blending |
| Oil Paints | Professional-grade, various earth tones | Include titanium white, burnt umber, yellow ochre, ultramarine blue |
| Mediums | Linseed oil, Gamsol | Helps with smooth blending and glazing |
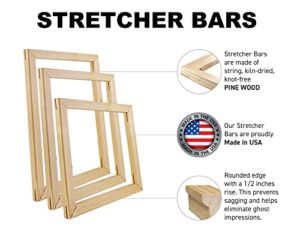
| Support | Stretched canvas or gessoed panel | Choose a smooth surface for fine detail |
| Palette | Glass or wood | Neutral color is best for mixing fur shades |
A common mistake is using only one brush for all fur. Instead, switch between a fine rigger for individual hairs, a filbert for blending, and a fan brush for softening edges.
Planning And Blocking In
Jumping straight into details is tempting, but a good foundation matters. Start by blocking in the basic shapes and colors. This first layer is about capturing the overall form and main color zones.
Steps for blocking in:
- Sketch the animal lightly with a pencil or thin paint.
- Identify shadow and light areas.
- Mix your base colors slightly duller and darker than the final look.
- Paint large shapes with soft edges—don’t worry about hairs yet.
Blocking in lets you adjust proportions and composition before adding fine details. Many artists rush this step, but careful planning saves time later.
Building Up Layers: From Underpainting To Details
Oil painting is all about layers. You’ll go from loose, soft underpainting to sharper, brighter details. This process is called “fat over lean”—each new layer has more oil than the last, so the paint dries properly.
Underpainting
Lay down the darkest shadows first. Use thin, diluted paint. This underpainting gives depth under the fur and helps guide your later strokes.
Mid-tones And Color Variation
Next, add mid-tones in the direction of fur growth. Use a slightly thicker paint and a soft brush. Here, introduce subtle color shifts—fur is rarely just brown or gray. For example, a golden retriever might have hints of red, yellow, and even blue in the shadows.
Highlights And Details
When the lower layers are dry to the touch, add highlights and fine hairs. Use a rigger or liner brush, and mix your paint with a bit of medium for flow. Paint only a few hairs at a time—less is often more.
Don’t try to paint every single hair. Instead, suggest clumps and texture. Focus on key areas: around the eyes, nose, and edges where fur catches the light.
Mastering Brush Techniques For Fur
The way you use your brush makes a huge difference. Here are some techniques that give fur its soft, realistic look:
- Dry brush: Load a small amount of paint on a dry brush and lightly drag it over the surface. This creates soft, broken edges perfect for fluffy fur.
- Feathering: Use a gentle, flicking motion to mimic the natural taper of hairs.
- Scumbling: Rub a thin, opaque layer of lighter paint over a dry, darker layer to create a sense of depth and light.
- Stippling: Tap the brush to make tiny dots—useful for short or curly fur.
Switch up your grip and pressure. Sometimes painting with your hand further back on the brush allows looser, more natural strokes.
Creating Depth And Volume
Fur looks flat if you ignore shadows and layering. To make fur stand out:
- Use strong contrasts: Place light fur next to dark, and vice versa.
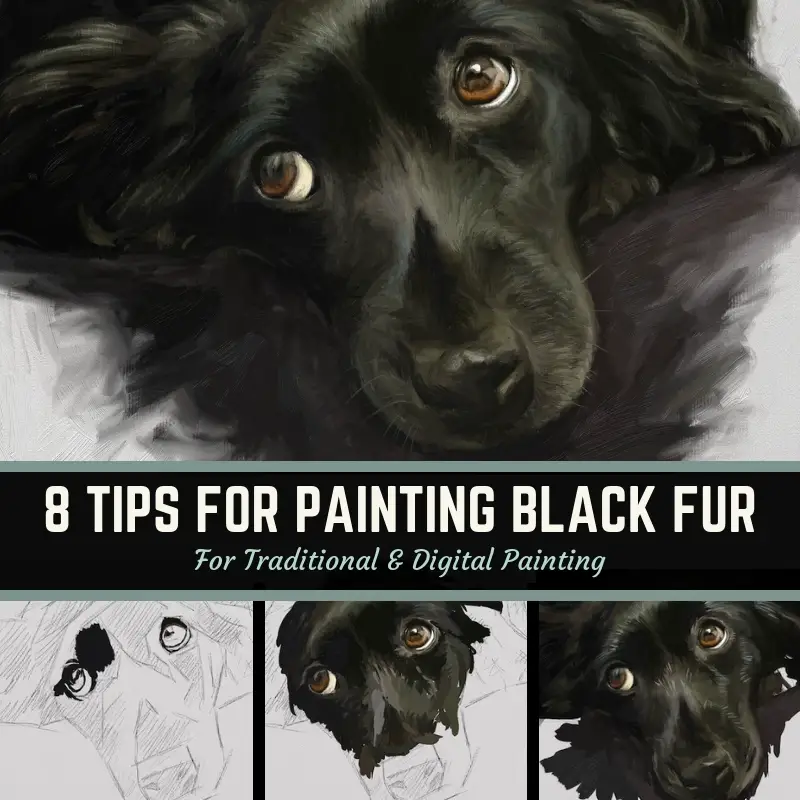
- Layer colors: Even black fur has hints of blue, brown, or purple, especially in highlights.
- Soft and hard edges: Blend edges in shadowed areas, keep highlights crisp.
A non-obvious trick: Add a hint of the background color into the fur’s shadow areas. This “color harmony” makes the animal look like it belongs in the scene, not just pasted on top.
Color Mixing Tips For Realistic Fur
Getting fur color right is challenging, especially since fur is rarely a single hue. Here’s how to mix more lifelike shades:
- Avoid pure black or white. Mix ultramarine blue and burnt umber for a rich dark; add a touch of yellow ochre or alizarin crimson to warm it up.
- For white fur, use cool blues and violets in shadows, and save pure white for the brightest highlights only.
- Use reference photos. Compare your mixed colors to the real thing; fur often surprises you with unexpected colors.
| Fur Color | Mixing Formula | Notes |
|---|---|---|
| Warm Brown | Burnt sienna + yellow ochre + white | Add ultramarine blue for shadows |
| Cool Gray | Ultramarine blue + burnt umber + white | Adjust with more blue or brown for temperature |
| Golden | Yellow ochre + cadmium red + white | Brighten with a touch of lemon yellow |
| Black | Ultramarine blue + burnt umber | Never use tube black straight from the tube |
Many beginners use straight black or white, which looks flat and fake. Always mix your own shades for a richer result.
Managing Light And Shadow On Fur
Light brings fur to life. Think about the direction and strength of your light source. Strong side lighting creates deep shadows and sparkling highlights; soft lighting gives gentle transitions.
Tips for painting light and shadow:
- Break up highlights: Don’t paint a single white stripe. Instead, use several small strokes, following the fur’s direction.
- Shadow colors: Shadows are not just black; use blues, purples, or greens depending on the environment.
- Core shadow: The darkest part of the shadow, found just opposite the light source, adds realism.
A common mistake is making all the fur equally bright. Save your lightest values for the spots that catch the most light, such as the top of the head or tips of the ears.

Credit: www.youtube.com
Adding Final Details And Whiskers
The last touches bring your animal to life. At this stage:
- Use a fine rigger brush and thinned paint for whiskers and stray hairs.
- Place these details sparingly—too many and the painting gets messy.
- Add hints of reflected light at the fur’s edges, where background color bounces back onto the animal.
For extra realism, suggest rather than describe. Your viewer’s eye will fill in the gaps.
Common Mistakes To Avoid
Even experienced artists sometimes slip up when painting fur. Here are key mistakes and how to avoid them:
- Painting every hair: This looks stiff and unnatural. Focus on clumps and areas of detail instead.
- Ignoring fur direction: Check your reference often—fur can change direction in surprising ways.
- Using the wrong brush: A stiff brush leaves scratchy lines; too soft, and you can’t create crisp hairs.
- Flat color: Never use one color for an entire area; fur is full of subtle color shifts.
- Overworking highlights: Too many bright strokes can make fur look chalky.
A useful tip: Stand back from your painting often. Details that look good up close can blur together at a distance. Adjust as needed.
Practice Exercises For Beginners
To develop your skill, try these simple exercises:
- Fur swatches: Paint small rectangles of different fur types—short, long, curly. Focus on direction and texture.
- Value studies: Paint fur in black and white only, focusing on shadows and highlights.
- Quick sketches: Spend five minutes painting a section of fur, aiming for flow rather than detail.
Over time, you’ll develop muscle memory for the right strokes and confidence with color mixing.
Comparing Approaches: Traditional Vs. Modern Techniques
Artists use different methods to paint fur. Here’s a quick comparison:
| Approach | Main Tools | Strengths | Weaknesses |
|---|---|---|---|
| Traditional Layering | Glazes, fine brushes | Deep, realistic texture | Time-consuming |
| Alla Prima | Wet-on-wet, bristle brushes | Expressive, painterly look | Less detail possible |
| Modern Mixed Media | Oil + acrylic or pastel | Unique effects, faster drying | Archival issues if not careful |
Choose the approach that fits your style and patience. For beginners, starting with traditional layering gives you the most control.

Credit: www.youtube.com
Useful Resources For Further Learning
Learning to paint fur is a journey. Don’t hesitate to study tutorials, join art groups, or take online classes. One helpful resource is the WetCanvas Artist Community, where artists share tips and feedback.
Frequently Asked Questions
How Do I Make Fur Look Soft In Oil Painting?
To create soft fur, use a dry brush or soft blending brush to gently blur the edges where fur transitions from light to shadow. Layer your paint thinly and build up from dark to light. Avoid sharp, hard lines except where you want the fur to stand out.
What Is The Best Brush For Painting Fine Fur Details?
A rigger brush or fine liner brush is best for tiny hairs and whiskers. For softer patches, a filbert or fan brush works well. Experiment with both synthetic and natural hair brushes to see which gives you the effect you want.
How Do I Avoid Muddy Colors When Painting Fur?
Always clean your brush between color changes and mix colors on your palette, not on the canvas. Let each layer dry before adding new colors, especially with oil paint, to prevent unwanted blending.
Should I Paint The Background Before Or After The Fur?
It’s best to paint the background first or at least block it in. This way, you can paint the fur over the background, letting some edges blend naturally. This technique also helps you adjust the colors for harmony.
How Long Does It Take To Master Painting Realistic Fur?
Everyone learns at a different pace, but with regular practice, you’ll see improvement within a few months. Focus on observation and technique, not just copying photos. Over time, you’ll develop your own approach and style.
Painting fur in oil is challenging, but the results are worth the effort. With the right tools, careful observation, and lots of practice, you can create animal portraits that truly come alive. Keep experimenting and learning—your best painting is always ahead of you.
Credit: shelleyhannafineart.com