You want your digital portraits to look lifelike, but painting realistic skin in Procreate can feel tricky. What colors really bring skin to life?
How do you add subtle shadows and highlights that make skin glow? If you’ve ever struggled with flat or unnatural skin tones, this guide is for you. I’ll walk you through simple, step-by-step techniques that anyone can follow to create smooth, believable skin textures.
By the end, you’ll have the confidence and skills to make your Procreate portraits truly shine. Ready to transform your digital art? Let’s dive in!

Credit: www.youtube.com
Choosing Skin Tones
Creating realistic skin in Procreate requires the right brushes. The choice of brushes affects texture, detail, and smoothness. Using essential brushes helps capture the natural look of skin. Each brush has a specific role in blending, shading, or adding texture. Understanding these brushes improves your digital painting skills and results.
Using Texture Brushes
Texture brushes add depth to skin surfaces. They mimic pores, freckles, and subtle skin details. These brushes break the flatness and give life to your painting. Applying texture brushes lightly creates a natural skin feel. Experiment with different textures for diverse skin types and ages. Use them sparingly to avoid over-texturing.
Customizing Brush Settings
Adjusting brush settings tailors them to your skin painting style. Modify opacity to control transparency and softness. Change size for fine details or broad strokes. Play with flow to manage paint buildup and smoothness. Customize jitter and spacing for more organic effects. These tweaks make brushes work better for realistic skin.
Setting Up Your Canvas
Applying base colors is the first key step in painting realistic skin in Procreate. This stage sets the foundation for the entire portrait. Base colors give your artwork a natural and believable skin tone right from the start. Choosing the right tones and blending them well is essential to achieve a lifelike effect.
Start by selecting colors that match the general skin tone of your subject. These colors will be flat and simple at first. Later, you will add details and highlights to bring depth and realism.
Blocking In Flat Tones
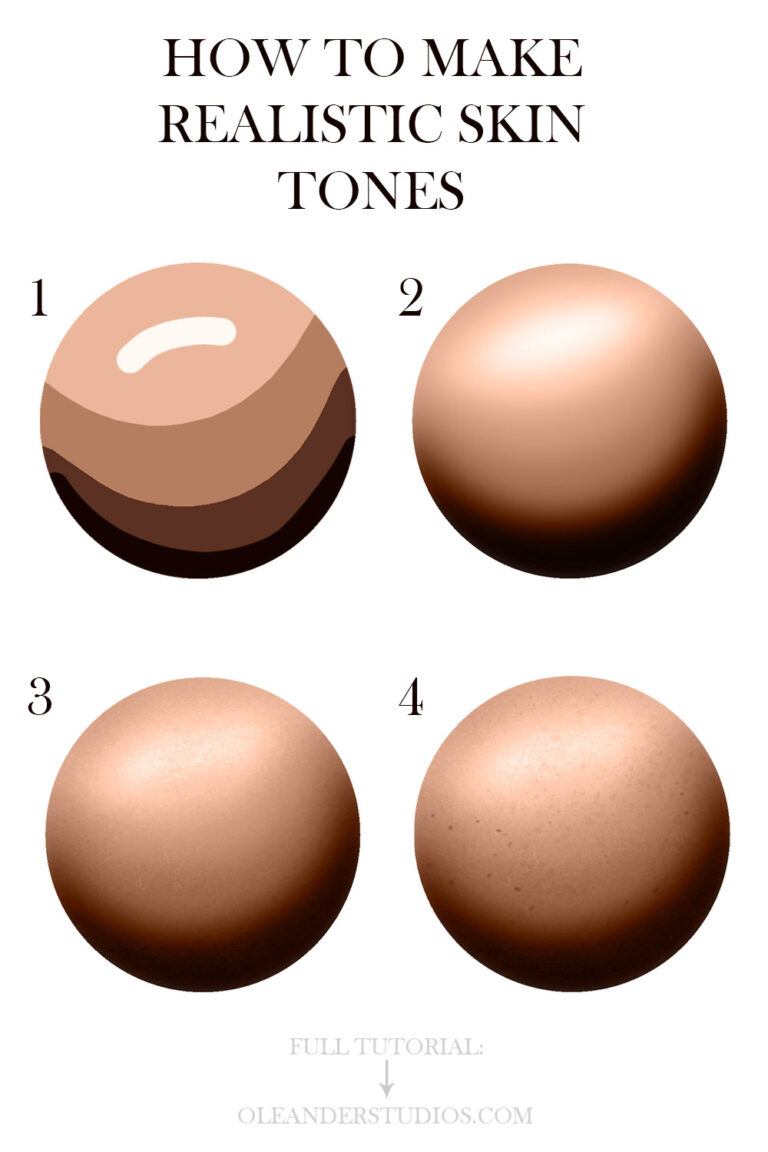
Begin by blocking in flat tones using a simple brush. Pick a mid-tone that represents the main skin color. Fill in the entire skin area with this color. Avoid worrying about details or shadows now. This step creates a clean canvas to work on. Use Procreate’s selection tool to limit the area if needed. Keep the edges soft to avoid harsh lines.
Creating Smooth Transitions
Smooth transitions between tones make skin look natural. Use a soft brush with low opacity to blend colors gently. Work by layering colors softly over the flat base. Blend mid-tones into shadows and highlights gradually. Avoid sharp contrasts that look unrealistic. Use the smudge tool carefully to soften edges. This technique helps the skin appear soft and alive.
Essential Brushes For Skin
Painting realistic skin in Procreate requires attention to detail and technique. Many artists make simple errors that reduce the lifelike quality of their work. Avoiding these common mistakes can improve your portraits quickly. Understanding what not to do helps you focus on what truly matters in skin painting.
Over-blending
Blending too much can make skin look plastic and unnatural. Real skin has texture and subtle edges. Use blending sparingly to keep some roughness and detail. Stop blending before the colors lose their depth and variation. This technique keeps the skin vibrant and believable.
Ignoring Color Variation
Skin is never one flat color. It has many hues from reds, yellows, blues, and greens. Avoid using a single tone across the whole face or body. Add small patches of warm and cool colors to mimic blood flow and shadows. Color variation adds life and realism to your painting.
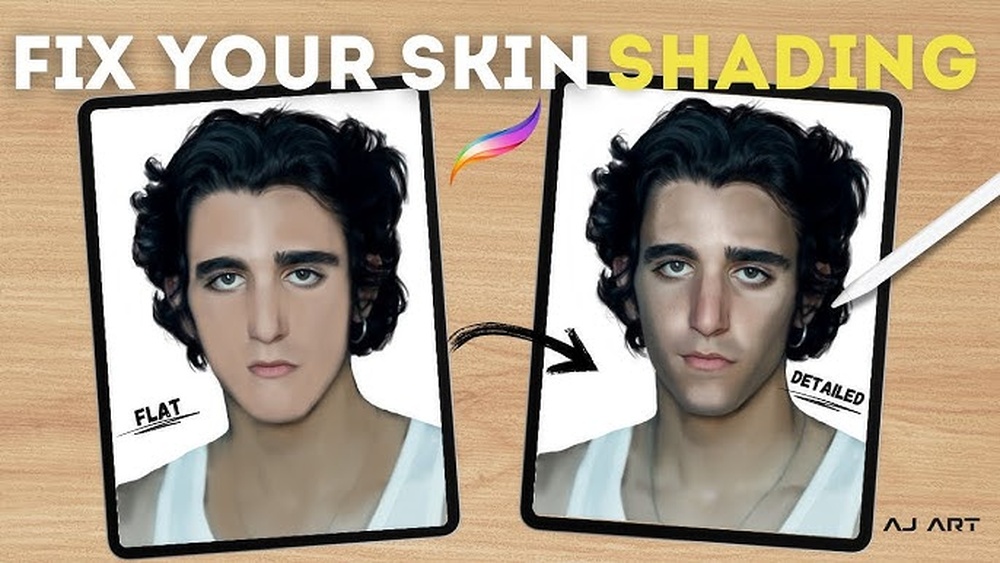
Flat Lighting
Lighting shapes the skin and gives it form. Flat lighting removes shadows and highlights, making the skin look dull. Use strong light sources to create contrast on the skin. Paint shadows softly and highlights carefully to show volume. Proper lighting helps your skin appear three-dimensional.
Credit: www.oleanderstudios.com
Applying Base Colors
Experts share simple tips to help paint realistic skin in Procreate. These tips improve your technique and make your art look natural. Focus on observation, practice, and using references smartly. Each helps you understand skin’s subtle details and colors better.
Painting From Observation
Study real skin closely before painting. Notice how light hits the skin and where shadows form. See tiny color changes and textures. Observe different skin tones and how they blend. Painting from observation trains your eye to capture realism.
Practice With Localized Areas
Start by painting small skin sections like cheeks or hands. Focus on details like pores, veins, and subtle color shifts. Practicing localized areas builds skill without overwhelming you. This approach helps you master skin textures piece by piece.
Using Reference Images Wisely
Choose clear, high-quality references with good lighting. Avoid over-relying on one photo; combine multiple images for variety. Use references to understand skin colors and shadows, not to copy exactly. This keeps your work fresh and realistic.
Credit: artwithflo.gumroad.com
Frequently Asked Questions
Can You Draw Realistic In Procreate?
Yes, Procreate allows drawing realistic art using various brushes, including texture brushes for fine details. Practice improves realism.
What Colors Make Realistic Skin Tones?
Realistic skin tones mix red, yellow, blue or black, and white. Adjust ratios for light, medium, or dark shades.
How To Draw A Human Body In Procreate?
Start with basic body shapes using simple lines and shapes in Procreate. Use layers to sketch, refine, and add details. Apply shading and color with appropriate brushes for depth. Study anatomy references to improve accuracy. Practice consistently to enhance your human body drawings.
How To Make Realistic Skin Color?
Mix red, yellow, blue, and white to create base skin tones. Add small amounts of blue and red for depth. Blend smoothly for realism. Observe natural skin shades and shadows for accuracy. Use layering and highlights to enhance texture and dimension.
Conclusion
Painting realistic skin in Procreate takes patience and practice. Use simple colors like red, yellow, and blue to mix tones. Add shadows and highlights carefully to show depth. Experiment with texture brushes for a lifelike effect. Keep your strokes soft and blend colors well.
Remember, every artist improves with time and effort. Try these tips often to see your skills grow. Enjoy the process and watch your digital portraits come alive.