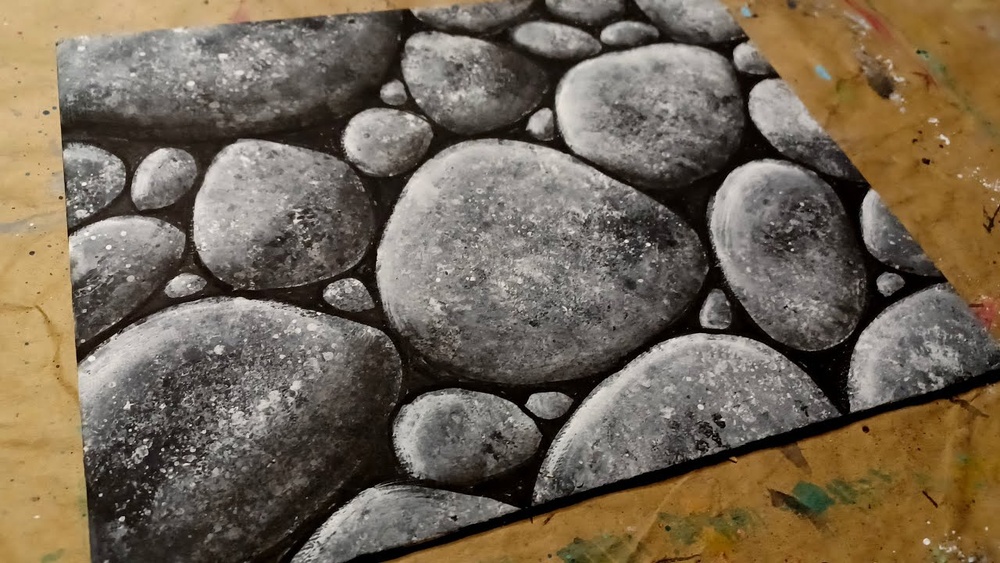
Quick answer: To paint pebbles with acrylic paint on canvas, block in each stone as a rounded shape in a mid-tone gray or earth color, then add a darker shadow on the side away from the light and a soft highlight on the top. Paint a small, dark cast shadow where the pebble meets the ground, vary the colors and sizes across the group, and finish with fine speckles. If you mean painting on real pebbles, wash and dry them, apply a basecoat, paint your design, and seal with a clear acrylic varnish.
Pebbles are an underrated subject. They teach the same lessons as painting spheres, eggs and rounded forms, but with natural color variation that makes practice interesting. They are also the foundation of beach scenes, riverbeds and garden paths.
Because people search for this topic with two different goals, this guide covers both: how to paint pebbles with acrylic paint as a realistic subject on canvas, and how to paint directly on real pebbles as decorative stones.
Part 1: Painting Realistic Pebbles on Canvas
Why Pebbles Look Round
A pebble is a smooth, rounded form. Light falling on it creates a predictable pattern that the eye reads as 3D:
- Highlight: the brightest spot, facing the light.
- Light side: the broad area turning gradually toward shadow.
- Core shadow: the darkest band on the form, where it turns fully away from the light.
- Reflected light: a slightly lighter edge inside the shadow, from light bouncing off the ground.
- Cast shadow: the shadow the pebble throws onto the surface, darkest right where the pebble touches the ground.
If you can paint those five zones on a gray oval, you can paint any pebble. Color and texture are secondary.
Supplies
| Item | Recommendation |
|---|---|
| Colors | Titanium white, burnt umber, raw umber, burnt sienna, yellow ochre, ultramarine blue, Payne’s gray (optional) |
| Brushes | Size 4 and 8 filberts, size 2 round, small flat, old toothbrush for speckles |
| Surface | Canvas panel or acrylic paper, 8×10 for studies |
| Extras | Stay-wet palette, slow-dry medium, spray bottle |
Pebble colors are mostly subtle earth tones and grays. These mixes look best when the earth pigments are strong and clean; weak umbers can produce muddy, lifeless grays. For a comparison of paint lines that handle neutral mixing well, see our guide to acrylic paints with clean earth pigments.
Mixing Natural Pebble Colors
Avoid mixing grays from black and white alone; they look flat and cold. Instead, mix neutrals from complementary or earth colors:
| Pebble type | Mix |
|---|---|
| Cool gray | Ultramarine + burnt umber + white |
| Warm gray | Raw umber + white + a touch of yellow ochre |
| Sandy beige | Yellow ochre + white + a touch of burnt sienna |
| Rust or reddish | Burnt sienna + white + a little ultramarine to tone it down |
| Slate blue-gray | Ultramarine + white + a small amount of raw umber |
| Dark basalt | Burnt umber + ultramarine, lightly touched with white |
Mix a light and dark version of each before painting. That gives you ready values for highlights and shadows.
How to Paint Pebbles With Acrylic Paint: Step-by-Step
This exercise paints a cluster of seven pebbles on sand, lit from the upper left, on an 8×10 panel. Allow about an hour.
Step 1: Paint the Ground
Paint the panel with a sandy mix of yellow ochre, white and a little burnt sienna. Make it slightly darker at the bottom. Let it dry.
Step 2: Sketch the Pebbles
Draw seven ovals of varying sizes and proportions: some round, some long, some flatter. Overlap a few and leave varied spaces between them. Odd numbers and uneven spacing look more natural than neat rows.
Step 3: Cast Shadows First
Paint cast shadows on the lower right of each pebble with a darkened sand color (sand mix plus ultramarine and burnt umber). Keep them darkest right under the pebble and softer as they extend outward. Painting shadows first anchors the stones to the ground.
Step 4: Block In Mid-Tones
Fill each pebble with its base color. Use different mixes for different pebbles so the group has variety.
Step 5: Add Core Shadows
With the darker version of each color, paint a curved band on the lower-right side of each pebble, following its form. Blend the upper edge of this band softly into the mid-tone while still damp.
Step 6: Reflected Light
Along the very bottom edge, inside the shadow, add a thin, slightly lighter strip. Keep it darker than the light side. This small touch makes pebbles look rounded rather than like flat discs.
Step 7: Highlights
Mix the lighter version of each color and paint a soft highlight on the upper-left area. For wet or polished stones, add a small, sharper spot of near-white on top of that.
Step 8: Texture and Speckles
Thin a darker and a lighter color with water and spatter tiny dots across the pebbles with a toothbrush, masking the background with paper if needed. Add a few fine veins or bands on some stones with a liner brush. Granite and speckled stones benefit most from this step.
Step 9: Ground Details
Add small grains of sand, tiny pebbles and a few shadows around the larger stones to integrate them into the ground.
Stone Textures: Granite, Quartz, Slate and Sandstone
Once the form reads as round, surface texture tells the viewer what kind of stone they are looking at. Each type needs a slightly different finishing step.
| Stone | Visual traits | How to paint it |
|---|---|---|
| Granite | Speckled with black, white and pinkish grains | Spatter dark and light dots with a toothbrush; add a few tiny pink or rust flecks with a fine brush |
| Quartz | Milky white to translucent, often with soft glowing edges | Paint in pale warm grays; glaze white over the top; keep shadows soft and slightly bluish |
| Slate | Flat, dark blue-gray, sometimes layered | Use flatter oval shapes; add thin parallel lines for layers; keep highlights subtle |
| Sandstone | Warm beige to rust, grainy, sometimes banded | Dry-brush lighter grain over dry base; paint soft curved bands in a slightly darker tone |
| Banded agate or striped pebbles | Clear stripes or rings wrapping the stone | Paint stripes that curve around the form, following its contour, not straight across |
That last point applies to any marking: veins, bands and stripes should bend with the surface of the stone. A straight line across a round pebble flattens it, while a curved band reinforces the volume you built with light and shadow.
Arranging a Pebble Group
When pebbles are the main subject, composition matters as much as rendering. Mix sizes so there is one clearly larger stone, a few medium ones and several small ones. Let some pebbles touch or overlap, and leave irregular gaps elsewhere. Vary the angle of elongated stones rather than lining them up in the same direction. A single stone with a contrasting color, such as one rust pebble among grays, gives the eye a focal point.
Dry Pebbles vs. Wet Pebbles
| Feature | Dry pebbles | Wet pebbles |
|---|---|---|
| Color | Lighter, more muted, dusty | Darker and more saturated |
| Highlights | Soft, broad | Small, sharp, bright, often reflecting the sky |
| Contrast | Moderate | High |
| Texture | Visible grain and speckles | Smoother appearance |
For a riverbed or tide pool, paint pebbles darker and richer, then add crisp white or pale blue highlights. If pebbles sit under shallow water, glaze a thin, transparent layer of blue-green over them and add a few light ripples on the surface.
Lighting Your Pebble Reference
If you paint from real stones, set them on a neutral surface under a single desk lamp placed above and to one side. One light source produces a clean highlight, a clear core shadow and a defined cast shadow, which are exactly the zones you need to see. Overhead room light plus window light creates multiple faint shadows that are confusing to paint. Wetting a few of the stones with a damp cloth lets you compare wet and dry versions side by side in the same setup.
Painting Pebbles in Larger Scenes
In beach or riverbed landscapes, pebbles follow perspective like everything else:
- Foreground: large, detailed pebbles with clear highlights, shadows and speckles.
- Middle ground: smaller, simpler stones painted as dabs with one light and one dark stroke.
- Background: a textured band of color with no individual stones.
A sponge dabbed with several neutral colors quickly builds a pebbly texture for middle and background areas. Add detailed pebbles only where the viewer’s eye will land.
Part 2: Painting on Real Pebbles
Preparing the Stones
- Choose smooth stones. Flat, smooth river or beach pebbles are easiest to paint.
- Wash them. Scrub with soapy water to remove dirt and salt, then rinse.
- Dry thoroughly. Let them dry completely, ideally overnight. Moisture trapped in porous stone can affect adhesion.
- Basecoat. Apply a coat of white or colored acrylic, or gesso, to create an even surface and make colors brighter.
Design Ideas for Painted Pebbles
- Mandala dot patterns using dotting tools or the ends of brushes
- Ladybugs, bees and other small creatures that follow the stone’s shape
- Kindness messages and inspirational words
- Garden markers with plant names
- Miniature landscapes such as sunsets, mountains or galaxy skies
- Story stones with characters and objects for children’s play
Tools for Painting on Pebbles
Small round brushes, dotting tools, and acrylic paint pens are the main tools. Paint pens give clean lines and lettering, especially on small stones. Fine-flowing paints like acrylic inks also work for delicate details; our acrylic ink review explains how inks behave in fine line work.
Sealing Painted Pebbles
Let the paint cure for at least 24 hours, then apply two or three thin coats of clear acrylic varnish, brush-on or spray. For stones that will live outdoors, choose a varnish labeled for exterior use and UV resistance. Even sealed, outdoor painted stones may fade or chip over time, so displaying them in sheltered spots extends their life.
Common Mistakes
- No cast shadow. Pebbles look like they float. Add a dark shadow where each touches the ground.
- All pebbles the same color and size. Variety makes the scene believable.
- Gray mixed from black. Use earth tones and complementary mixes for natural neutrals.
- Hard outline around each stone. Define edges with value changes instead.
- Highlight in the center. Place highlights on the side facing the light.
- Painting dirty or damp real stones. Always clean and dry them first.
- Skipping the sealant. Unsealed paint on stones scratches and fades quickly.
Tips by Skill Level
Beginner
Paint one gray pebble with highlight, core shadow and cast shadow. Repeat until it looks round. Then paint three in different colors.
Intermediate
Paint a cluster with overlapping stones and varied textures. Try wet pebbles with sharp highlights.
Advanced
Paint a riverbed with pebbles under moving water, combining transparent glazes, refraction and surface reflections.
Related Reading
FAQs
What colors do you need to paint pebbles?
Titanium white, burnt umber, raw umber, burnt sienna, yellow ochre and ultramarine blue let you mix nearly every natural stone color, from cool slate to warm sandstone.
How do I make painted pebbles look 3D?
Paint a highlight on the side facing the light, a core shadow on the opposite side, a hint of reflected light along the bottom edge and a dark cast shadow on the ground.
What kind of paint is best for painting on rocks?
Acrylic paint works well on rocks and pebbles. Acrylic paint pens are useful for fine lines and lettering. Seal finished stones with a clear acrylic varnish.
Do I need to prime rocks before painting?
It is not strictly required, but a white basecoat or gesso makes colors brighter and more even, especially on dark or porous stones.
How do I paint wet-looking pebbles?
Use darker, more saturated colors, increase contrast and add small, sharp highlights in white or pale sky blue.
How long should painted rocks dry before sealing?
Wait at least 24 hours after the last paint layer, longer for thick paint or humid conditions, before applying varnish.
Next Step
Painting pebbles with acrylic paint is one of the best ways to practice rounded forms, natural color mixing and texture. Once you can make a single stone look solid, beach scenes, riverbeds and decorative rock art all become much easier.
Clean neutral mixes depend on good earth pigments. If you are building a palette for natural subjects, read our comparison of the best acrylic paints for realistic natural textures.