Have you ever wanted to capture the calm beauty of a lake on your canvas? Painting a lake with acrylics might seem tricky, but with the right approach, you can create stunning water reflections and peaceful landscapes that bring your artwork to life.
In this guide, you’ll learn simple, step-by-step techniques to paint shimmering water, mirror-like reflections, and gentle ripples that make your lake scene feel real. Whether you’re a beginner or looking to improve your skills, you’ll discover how to blend colors and brush strokes to make your acrylic lake painting truly shine.
Ready to turn your blank canvas into a serene lakeside view? Let’s dive in and make your painting flow!
Materials And Tools
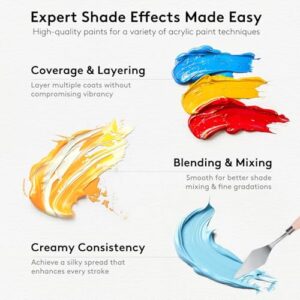
Gathering the right materials and tools makes painting a lake with acrylics easier and more fun. You will need quality paints, brushes, and some extra supplies. These help you capture the calm water and natural reflections perfectly.
Each item plays a role in shaping your artwork. Using proper tools saves time and improves your painting results. Below is a guide to essential materials and tools for this project.
Essential Acrylic Paints
Choose acrylic paints with good pigment quality for bright colors. Basic colors include blue, green, white, and brown. These shades help create water, sky, and shoreline effects. You may also add black and yellow for mixing. Select paints labeled for artists to ensure smooth application and vibrant hues.
Brush Types And Sizes
Use flat brushes for broad strokes and smooth water areas. Round brushes work well for details like trees or reflections. Small detail brushes help paint fine lines and highlights. Have various sizes ready, from large for backgrounds to tiny for touch-ups. Synthetic brushes suit acrylic paints best because they hold paint well and clean easily.
Additional Supplies
Prepare a palette for mixing colors evenly. Use a palette knife to blend paints smoothly. Keep a jar of clean water nearby to rinse brushes between colors. Paper towels or a cloth help wipe brushes and fix mistakes quickly. Consider using a canvas or acrylic paper as your painting surface. An easel can hold your work steady while painting.
Canvas Preparation
Preparing your canvas is the first step in painting a beautiful lake scene. A well-prepared canvas ensures your acrylic paint applies smoothly and lasts longer. This stage sets the foundation for your entire artwork.
Taking time to prepare helps you avoid common mistakes later. It also makes the painting process more enjoyable and less frustrating.
Choosing The Right Canvas
Select a canvas size that fits your workspace and vision. A medium-sized canvas, around 16×20 inches, works well for lake paintings. Choose a canvas with a smooth surface for better paint application. Cotton or linen canvases both work, but pre-stretched cotton canvases are easier for beginners. Make sure the canvas is primed with gesso to prevent paint from soaking in.
Sketching The Lake Scene
Lightly sketch the main elements of your lake scene with a pencil. Use simple shapes to mark trees, water, and sky. Keep the lines faint so they do not show through the paint. Sketching guides your painting and helps with proper placement. Avoid adding too many details in this step. Focus on the overall composition instead.
Setting The Horizon Line
The horizon line separates the sky from the lake. Place it carefully to create depth and balance in your painting. A low horizon line emphasizes the sky, while a high line highlights the water. Use a ruler or straight edge to draw a clean, horizontal line. This step helps keep your landscape realistic and well-proportioned.
Painting The Background
Painting the background sets the foundation for your lake scene. This step creates depth and mood in your artwork. Focus on soft colors and simple shapes. The background should not overpower the main lake area. Use smooth strokes and gentle blends for a natural look. Start with the sky, then add distant mountains and trees. Choose cool and light tones to keep the background subtle and realistic.
Sky Colors And Gradients
Begin with the sky using light blues and soft whites. Blend colors from the top down to create a gradient effect. The top should be darker, fading to lighter near the horizon. Use horizontal strokes for smooth transitions. A gentle gradient helps the sky look vast and natural. Avoid harsh lines or too many colors. Keep it simple to enhance the calmness of the lake scene.
Distant Mountains And Trees
Paint mountains and trees far away with soft edges. Use muted colors like gray-blue and dusty green. Keep details minimal to show distance. Use a dry brush to create texture without sharp lines. Place these shapes low on the canvas, near the horizon. This adds depth and frames the lake. Let the background colors blend slightly with the sky for unity.
Using Cool And Light Tones
Choose cool colors like pale blue, soft gray, and light green. These tones make the background recede, helping the lake stand out. Light colors add airiness and space. Avoid warm or bright hues here. Use thin layers of paint to keep the background light. This technique gives a peaceful and fresh feel to your painting.
Creating The Water Base
Creating the water base is a key step in painting a lake with acrylics. It sets the mood and depth of the water. Start by choosing the right colors that show the lake’s natural shades.
Use smooth brush strokes to lay down the base. This layer will hold all the reflections and light effects later. Pay attention to how water changes color near the shore and toward the center.
Mixing Deep Water Colors
Begin with dark blue, green, and a touch of black for deep water. Mix these colors on your palette to get a rich, cool tone. Avoid pure black; it looks unnatural in water.
Test the color on a scrap paper before painting the lake. Adjust the mix until it feels like deep, calm water. These colors create the illusion of depth in your lake painting.
Applying Dark Shades Near Shore
Apply the darker mix near the edges of the lake. The water is usually deeper and shadowed here. Use horizontal strokes to mimic the water’s surface.
Don’t cover the entire shore with dark color. Leave space for reflections and lighter tones. Dark shades near the shore help the water look realistic and three-dimensional.
Blending Toward Lighter Center
Gradually lighten the color as you move toward the center. Mix your deep water color with white or light blue for this part. Blend gently to create a smooth transition.
This fading effect shows how water gets shallower or reflects the sky. Use a clean brush to soften edges between dark and light areas. Blending makes the lake look calm and natural.
Adding Reflections
Adding reflections is key to making your lake painting look real and lively. Reflections show the water’s surface reacting to the landscape. They give depth and calmness to the scene. Use colors from the sky, trees, and mountains to mirror in the water. Keep the reflections softer than the objects themselves. This keeps the water looking smooth and natural.
Mirroring Trees And Mountains
Paint the shapes of trees and mountains upside down on the water. Use the same colors but make them lighter. The edges should be less sharp than the real objects. Avoid painting exact details. Instead, focus on the main forms and colors. This helps create a believable reflection that matches the scene above the water.
Softening Reflections With Brushwork
Use a soft, dry brush to blur the reflections gently. Lightly drag the brush horizontally over the reflection area. This breaks hard lines and blends colors smoothly. Softening makes the water surface look calm and glass-like. It also adds a natural feel to the painting. Avoid over-blurring, or the reflections will lose shape.
Incorporating Vertical Lines
Add thin vertical lines in the reflection to mimic water movement. These lines represent ripples and slight waves. Use a fine brush and a slightly lighter or darker color. Keep the lines short and uneven for a realistic effect. Vertical strokes bring life to the water and prevent it from looking flat or still.
Painting Ripples And Highlights
Painting ripples and highlights gives a lake scene life and movement. These small details make the water look realistic and bright. Focus on capturing the gentle waves and sparkling light on the surface. Use simple techniques to create depth and texture in your acrylic painting.
Using Horizontal Brush Strokes
Use horizontal brush strokes to mimic the natural flow of water. Lightly drag the brush side to side across the canvas. Keep the strokes smooth and even to show calm ripples. Vary the pressure to create different ripple sizes. This method adds a sense of motion to your lake painting.
Mixing Whites And Blues
Create soft highlights by mixing white with different shades of blue. Use more white for brighter spots where light hits the water. Blend these colors gently for smooth transitions. This mix helps to show the water’s reflective surface. Experiment with cool and warm blues for natural effects.
Applying Palette Knife Highlights
Use a palette knife to add sharp, bright highlights on the water. Lightly scrape or dab the paint where the light reflects the strongest. This technique adds texture and shine to your painting. It works well for small waves and sparkling points on the lake. Keep your palette knife strokes quick and light for best results.
Enhancing Foreground Details
Enhancing the foreground details in your lake painting brings your scene to life. It adds realism and draws the viewer’s eye into the artwork. Careful attention to trees, rocks, and the waterline makes the painting feel complete and vivid.
These elements create depth and give your lake a natural, inviting look. Small touches here make a big difference in the overall feel of the painting.
Painting Trees And Rocks
Start with rough shapes for trees using a dark green or brown base. Use a small brush to add leaves with light, quick strokes. Vary the shades to show sunlight and shadow. For rocks, use gray and brown tones. Paint irregular shapes with hard edges. Add highlights on the rocks where light hits. This contrast gives rocks a solid, textured look.
Adding Depth And Perspective
Make objects in the foreground larger and more detailed. Use brighter colors for closer elements. Soften colors and shapes as they move back. This technique creates a sense of space and distance. Shadows under trees and rocks anchor them to the ground. Use a thin brush to add small plants or grass near the base of trees. These details enhance the three-dimensional effect.
Final Touches On Waterline
Paint a thin, darker line where water meets land to define the edge. Use gentle horizontal strokes to suggest ripples or reflections. Add small highlights with white or light blue to show sunlight on water. Blur edges slightly to blend water and shore naturally. These final details make the lake appear calm and reflective.
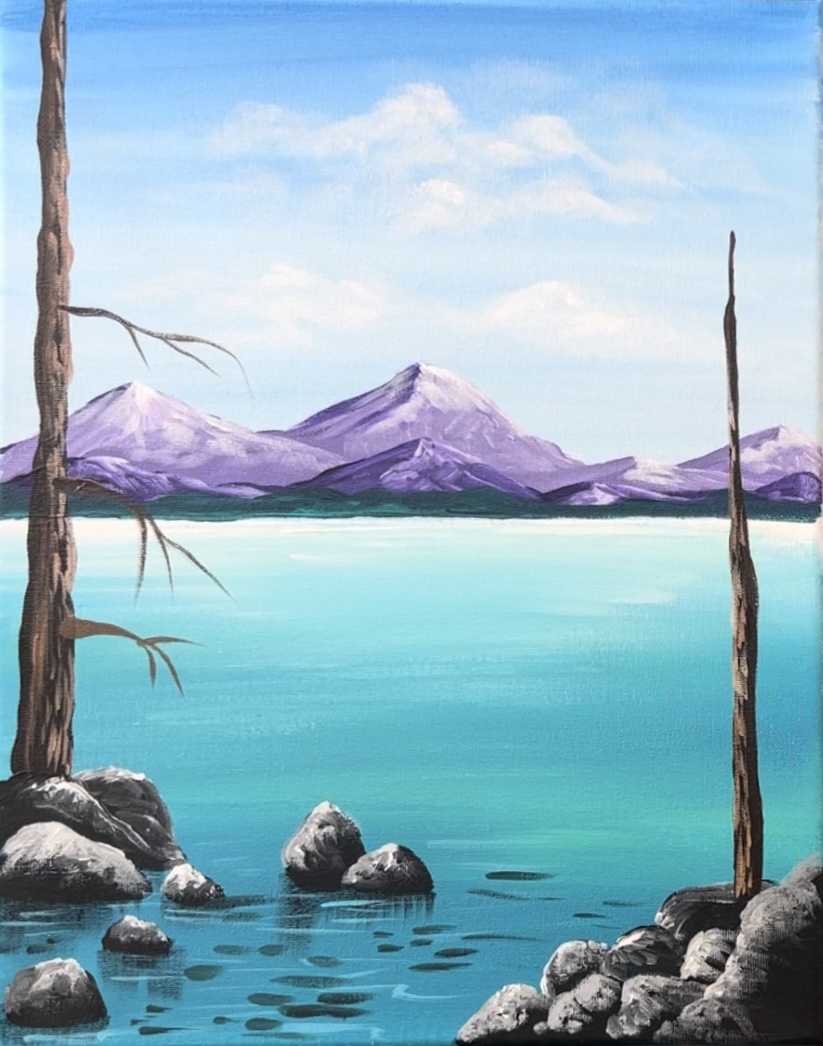
Credit: stepbysteppainting.net
Color Choices For Realism
Choosing the right colors is key to making your lake painting look real. The colors you pick bring the water, sky, and land to life. They also set the mood and time of day. Using natural colors helps the painting feel calm and believable.
Acrylic paints offer bright, clear colors. You can mix many shades to match what you see in nature. Focus on tones that reflect the sky, water, and surrounding trees. This helps your lake scene look fresh and natural.
Nature-inspired Palettes
Use colors found in real lakes and forests. Soft blues, grays, and greens work well. These tones mimic water and plants near the lake. Add touches of brown or beige for rocks and sand. These colors keep your painting grounded and natural.
Look for muted shades, not too bright or dark. These create a peaceful feeling in your artwork. Mixing white with your colors can make them softer and more realistic.
Balancing Warm And Cool Tones
Mix warm and cool colors to add depth. Warm tones like light yellows or oranges suggest sunlight. Cool tones like blues and greens show shade and water. This balance makes the painting more lively and believable.
Use warm colors near the sun or reflections. Use cool tones in shaded areas or deeper water. This contrast helps create a three-dimensional look on your flat canvas.
Creating Cozy Contrast
Contrast draws the eye and adds interest. Use darker colors like navy blue or deep green to frame lighter areas. This makes the lake pop and feel inviting.
Add small bright spots like white or light yellow for highlights. These show light reflecting on the water’s surface. Contrast also helps separate the lake from trees or sky, making each part clear and cozy.
Common Mistakes To Avoid
Painting a lake with acrylics can be rewarding but challenging. Many beginners make mistakes that affect the painting’s realism and beauty. Avoiding these errors improves your art and speeds up learning. Focus on key areas where errors often happen to create a more natural and appealing lake scene.
Overworking Reflections
Reflections in water must look soft and subtle. Too much detail or repeated brush strokes make reflections look harsh. This spoils the calm feeling of a lake. Use light, gentle strokes and avoid adding sharp lines inside reflections. Let the colors blend naturally for a smooth mirror effect.
Ignoring Light Transitions
Light changes across the lake surface. Ignoring these smooth transitions makes the water look flat and fake. Paint gradual shifts from dark to light tones carefully. Capture the way sunlight hits the water and fades gently. This adds depth and realism to your lake painting.
Neglecting Foreground Depth
The foreground gives your painting a sense of space. Without depth in the front, the lake can seem distant and empty. Add details like rocks, plants, or ripples near the bottom of the canvas. Use darker shades and sharper edges here. This draws the viewer’s eye and creates a stronger scene.

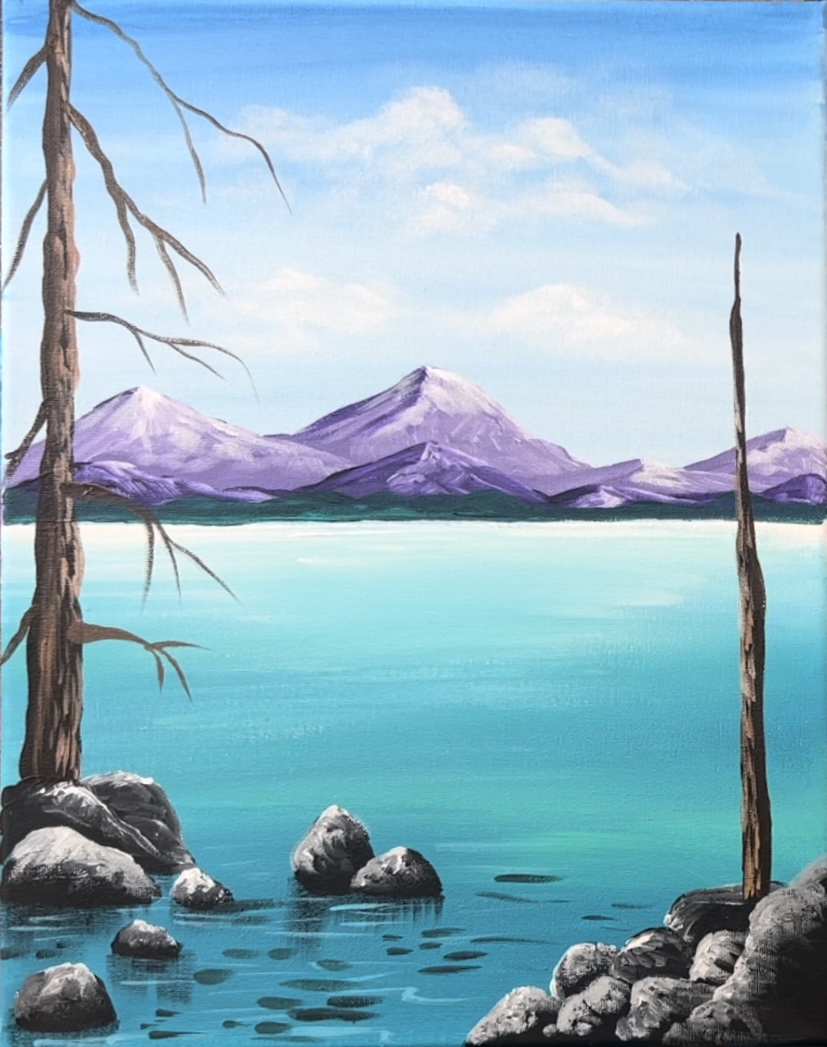
Credit: www.youtube.com
Tips For Lasting Acrylic Paint
Keeping your acrylic lake painting vibrant and durable takes care and technique. Simple steps protect your artwork from fading and damage over time. Use the right methods to make your painting last longer. This section shares key tips for lasting acrylic paint.
Water Resistance Considerations
Acrylic paint is water-resistant but not fully waterproof. After drying, it can handle light moisture. Avoid exposing your painting to heavy water or humidity. Moisture can cause paint to peel or colors to dull. Use paints labeled for outdoor or water-resistant use for better protection.
Sealing Your Painting
Apply a clear acrylic sealer after your painting dries. Sealers protect colors from dust, UV rays, and moisture. Use spray or brush-on sealers depending on your preference. Multiple thin layers work better than one thick coat. Let each layer dry fully before adding the next.
Proper Drying Techniques
Dry paint in a clean, dust-free area. Avoid direct sunlight to prevent cracking or fading. Let your painting dry slowly at room temperature. Quick drying can cause paint to shrink and crack. Give it at least 24 hours before sealing or framing.
Credit: stepbysteppainting.net
Frequently Asked Questions
What Are The Best Colors For Lake Painting?
The best colors for lake painting include deep blues, muted greens, soft grays, and earthy browns. Use lighter blues and whites for reflections and highlights. These tones create natural water effects and peaceful landscapes, enhancing depth and realism in your artwork.
Will Acrylic Paint Hold Up To Water?
Acrylic paint resists water once dry but isn’t fully waterproof. Prolonged moisture can damage it. Seal with varnish for protection.
How To Paint Water With Acrylic Paint For Beginners?
Start with a dark base color for deep water near the shore. Blend lighter blues and greens upward toward the horizon. Add horizontal brushstrokes to mimic reflections. Highlight ripples with white or light tones. Use smooth transitions for a realistic water effect.
What Are Common Mistakes When Painting Clouds?
Common mistakes when painting clouds include overblending, using harsh outlines, ignoring light direction, applying too much white, and neglecting soft edges.
Conclusion
Painting a lake with acrylics is both fun and rewarding. Start with dark tones near the shore and blend lighter colors upward. Capture reflections by painting the sky and trees, then mirror them softly in the water. Use horizontal brushstrokes to show ripples and add white highlights for realism.
Practice patience and enjoy watching your lake scene come alive. Each step builds your skills and brings nature to your canvas. Keep experimenting and have fun creating your own peaceful lake painting.