If you’ve ever painted with oil-based paint, you know how tough it can be to clean your brushes afterward. Leaving paint on your brushes can ruin them, but using harsh chemicals or the wrong method can damage the bristles or harm your health.
So, how do you clean oil-based paint brushes the right way? In this guide, you’ll discover simple, effective steps to get your brushes clean without wasting time or money. By following these easy tips, you’ll keep your brushes in great shape and ready for your next project.
Keep reading to learn how to clean your oil-based paint brushes quickly, safely, and thoroughly.
Choosing The Right Solvent
Choosing the right solvent is key to cleaning oil-based paint brushes effectively. The solvent breaks down the paint, making it easier to remove. Picking the wrong solvent can harm your brush or leave paint residue. Some solvents work faster but have stronger fumes. Others are gentler but take more time. Understanding your options helps protect your brushes and your health.
Mineral Spirits Vs. Paint Thinner
Mineral spirits and paint thinner are common choices for cleaning brushes. Mineral spirits are refined and have less odor. They clean brushes well without damaging bristles. Paint thinner is stronger and works faster. It can remove thicker paint but has a harsher smell. Both solvents are flammable and need good ventilation. Choose mineral spirits for gentler cleaning and paint thinner for tough jobs.
Non-toxic Alternatives
Non-toxic solvents offer a safer way to clean brushes. Vegetable oils like linseed oil dissolve oil paint without harsh chemicals. Soap and warm water can clean wet oil paint in some cases. These options are better for your skin and the environment. They take longer and may need more scrubbing. Use non-toxic alternatives when you want a safer, eco-friendly method.
When To Avoid Harsh Chemicals
Avoid harsh chemicals if you have asthma or sensitive skin. Strong solvents can cause headaches and irritate eyes. Use gentle cleaners in small, enclosed spaces to reduce fumes. If you clean brushes indoors, open windows and use fans. For quick cleanups, try soap and oil methods first. Protect your health by limiting exposure to strong solvents.
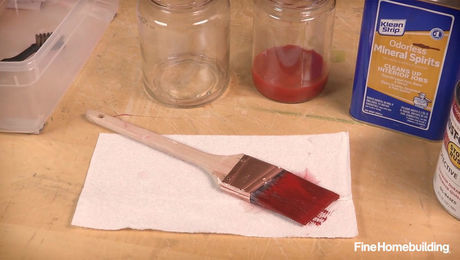
Credit: www.finehomebuilding.com
Preparing Your Workspace
Preparing your workspace is the first step to clean oil-based paint brushes effectively. A clean, organized area helps you work faster and keeps your brushes in good shape. It also protects your home from spills and fumes. Follow these simple tips to get your space ready.
Setting Up A Cleaning Station
Choose a flat surface near a sink or outside. Use a sturdy table or workbench for stability. Place a large container or tray to hold cleaning liquids. Keep paper towels or old rags handy for wiping brushes. Arrange all tools within easy reach. This setup saves time and keeps messes under control.
Protecting Surfaces And Hands
Cover your table with plastic or old newspapers. This prevents stains from paint or solvents. Wear rubber gloves to protect your skin. Oil-based paints and solvents can cause irritation. Use gloves that fit well to keep handling brushes easy. Dispose of used materials safely to avoid accidents.
Proper Ventilation Tips
Open windows and doors to let fresh air in. Avoid strong fumes by working in a well-ventilated space. Use a fan to improve air flow if needed. Proper ventilation helps reduce dizziness and headaches. Never clean brushes in a closed room with no airflow. Safety comes first during cleaning tasks.
Step-by-step Cleaning Process
Cleaning oil-based paint brushes properly extends their life and keeps them ready for your next project. Follow a clear, step-by-step process to remove paint thoroughly and avoid damage. This guide breaks down each stage to make cleaning simple and effective.
Removing Excess Paint
Start by scraping off as much paint as possible. Use the edge of a putty knife or a brush comb. Work gently to avoid bending the bristles. Removing excess paint saves time in the cleaning steps that follow.
Soaking Brushes Safely
Pour a small amount of paint thinner or mineral spirits into a container. Place the brush tip down in the liquid. Let it soak for 10 to 15 minutes. This softens the dried paint without harming the bristles.
Swirling And Wiping Techniques
Swirl the brush gently in the solvent to loosen paint. Avoid harsh scrubbing that breaks bristles. After swirling, wipe the brush on a clean rag or paper towel. Repeat until the brush looks clean.
Using Dish Soap For Final Cleaning
Rinse the brush with warm water. Apply a small amount of dish soap to the bristles. Work the soap into a lather using your fingers. Rinse well with warm water to remove all paint and solvent. Pat dry with a towel and reshape the bristles.
Drying And Storing Brushes
Proper drying and storing of oil-based paint brushes extends their life. Careful attention after cleaning prevents damage and maintains brush shape. Drying and storing are as important as cleaning for brush longevity.
Shaping Bristles For Longevity
After rinsing, gently reshape the bristles to their original form. Use your fingers to smooth out stray hairs. Avoid pressing or pulling the bristles too hard. Proper shaping keeps the brush ready for the next paint job.
Best Drying Methods
Air dry brushes flat or hanging with bristles down. Avoid drying brushes standing on their bristles. This prevents bending and damage. Keep brushes away from direct sunlight and heat sources. Let brushes dry completely before storing to avoid mildew.
Storage Tips To Prevent Damage
Store brushes in a dry, clean place. Use a brush holder or container to keep bristles straight. Avoid crowding brushes together to prevent bending. Keep brushes away from dust and dirt. Proper storage keeps brushes soft and ready for use.
Disposing Of Paint And Solvents
Proper disposal of paint and solvents is essential for environmental safety and home care. Oil-based paints contain harmful chemicals that need careful handling. Throwing these substances away without thought can cause pollution and health risks. Understanding safe disposal methods helps protect water, soil, and air quality.
Disposing of paint and solvents correctly also prevents damage to plumbing and local water treatment systems. Following simple steps can make a big difference in reducing hazardous waste.
Why Not To Pour Down The Drain
Pouring oil-based paint or solvents down the drain harms water systems. These chemicals can clog pipes and damage septic tanks. Toxic substances may reach rivers and lakes, affecting wildlife and plants. Water treatment plants cannot always remove all harmful chemicals. This pollution risks public health and the environment.
Safe Disposal Methods
Use local hazardous waste collection centers for old paint and solvents. Many communities offer special drop-off days or recycling programs. Store paint in sealed containers and label them clearly. Never mix different chemicals together. Follow local rules to avoid fines and environmental damage.
Reusing And Filtering Solvents
Reuse solvents to save money and reduce waste. Let paint particles settle at the bottom of the container. Carefully pour clean solvent into another container for future use. Use fine cloth or coffee filters to remove impurities. This process extends solvent life and cuts down on hazardous waste.
Troubleshooting Common Issues
Cleaning oil-based paint brushes can sometimes lead to common problems. These issues affect the brush’s performance and lifespan. Knowing how to address these problems helps keep brushes in good condition. Troubleshooting common issues saves time and money. Here are some frequent problems and ways to fix them.
Stiff Brushes And Residue
Stiff brushes often mean leftover paint or cleaning agents remain. Dried paint or solvent residue hardens the bristles. To fix this, soak the brush in mineral spirits for 10 to 15 minutes. Then gently comb through the bristles with a brush comb or an old fork. Rinse the brush with warm, soapy water to remove leftover solvent. Repeat if stiffness persists. Proper rinsing after each use prevents residue buildup.
Removing Dried Paint
Dried oil paint on brushes is tough to remove. Start by softening the paint with paint thinner or mineral spirits. Soak the brush for 30 minutes or longer if needed. Use a brush cleaner or wire brush to scrub dried paint gently. Avoid pulling or twisting the bristles to prevent damage. After paint removal, wash the brush with soap and warm water. Dry the brush flat or hanging to keep its shape.
Preventing Brush Damage
Brush damage happens from improper cleaning or storage. Do not leave brushes soaking in solvents for days. This causes bristles to weaken and fall out. Avoid using hot water, which can deform bristles. Always clean brushes immediately after painting. Store brushes flat or hanging to avoid bending. Use a brush cover or wrap to protect bristles from dust. Regular care extends the life of your paint brushes.
Tips For Maintaining Brush Quality
Maintaining the quality of oil-based paint brushes helps them last longer. Good care keeps the bristles soft and strong. It also ensures smooth paint application every time.
Simple habits make a big difference in brush care. Follow these tips to keep your brushes in top shape.
Cleaning Frequency
Clean brushes immediately after use. Letting paint dry hardens the bristles. Dried paint is tough to remove and damages the brush. Quick cleaning saves time and effort later.
For long projects, rinse brushes during breaks. This prevents paint buildup and keeps bristles flexible.
Choosing Quality Brushes
Invest in brushes made with natural bristles for oil paints. They hold paint better and are more durable. Cheap brushes shed bristles and wear out fast. Good brushes provide smooth, even strokes.
Look for brushes with tightly packed bristles and solid handles. These last longer and feel better in hand.
Avoiding Common Mistakes
Never soak brushes in water or solvents for too long. This weakens the glue that holds bristles. Avoid using harsh chemicals that dry out bristles. Instead, use gentle paint thinners designed for oil paints.
Do not store brushes standing on their bristles. This bends and breaks them. Store brushes flat or hanging with bristles up.

Credit: www.dummies.com

Credit: www.osons-a-stmalo.com
Frequently Asked Questions
How Do You Clean Oil-based Paint Out Of Brushes?
Dip brushes in mineral spirits or paint thinner to dissolve oil paint. Swirl gently, then rinse with warm soapy water. Repeat until clean. Dry thoroughly to maintain bristle shape. Dispose of solvents responsibly; never pour down the drain. This method preserves brush quality and prevents environmental harm.
Can You Use Dawn Dish Soap To Clean Oil Paint Brushes?
Yes, Dawn dish soap effectively cleans wet oil paint brushes with warm water. It is gentle on bristles and hands, unlike harsh solvents.
Can I Wash Oil Paint Down The Sink?
Do not wash oil paint down the sink. It can clog pipes and harm the environment. Use a separate container to clean brushes with solvents. Dispose of leftover paint and rags safely as hazardous waste to protect water supplies and plumbing.
What Product Gets Oil-based Paint Off Brushes?
Use mineral spirits or paint thinner to remove oil-based paint from brushes. Soak brushes briefly, then wipe and rinse with warm soapy water. This effectively cleans without damaging bristles. Avoid water alone, as it won’t dissolve oil-based paint. Proper disposal of solvents protects the environment.
Conclusion
Cleaning oil-based paint brushes takes care and patience. Use the right solvent like mineral spirits or paint thinner. Work gently to protect the bristles and extend brush life. Always clean brushes in a well-ventilated area. Avoid pouring leftover paint or solvents down the drain to protect pipes and the environment.
Proper cleanup keeps your tools ready for the next job. A clean brush means better painting results every time. Follow these simple steps to maintain your brushes easily and safely.