
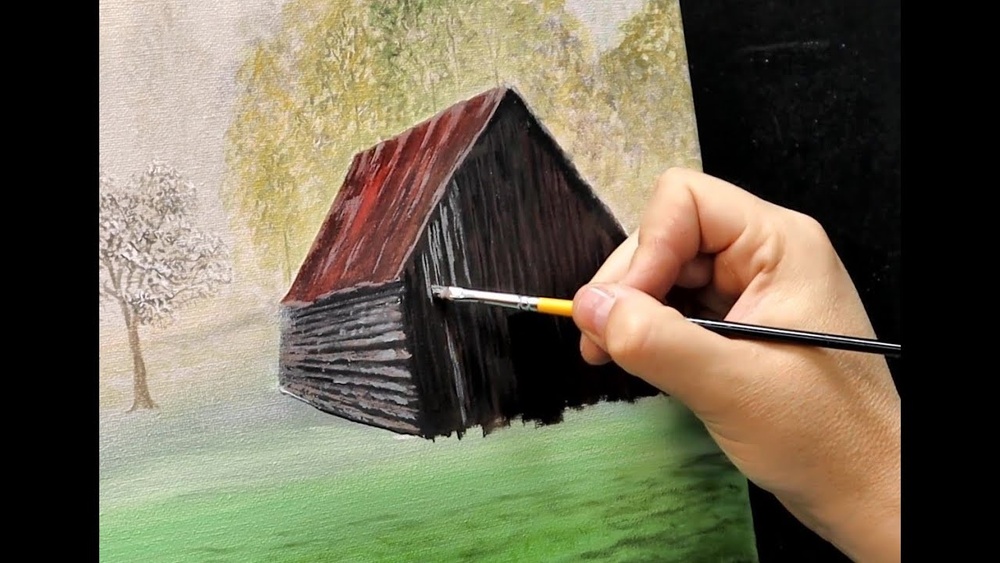
A red barn against a big sky is one of the most satisfying subjects in acrylic: strong shapes, clear light and shadow, and plenty of room for texture in weathered boards and fields. The challenge is getting the structure believable. A barn with crooked walls or a roof that tilts the wrong way reads as wrong instantly, even to people who don’t paint. This guide covers how to paint a barn with acrylic paint, from composition and simple perspective to color mixes and final details.
Quick answer: To paint a barn with acrylic paint, sketch the barn in simple perspective off-center on a toned canvas, then paint from back to front: sky, distant trees and hills, the barn’s light and shadow sides, the roof, and finally the foreground field and fence. Mix a natural barn red from cadmium red and a little burnt umber, darken the shadow side with ultramarine, and add board lines, doors and highlights last with a liner brush. Let each layer dry before adding details.
Materials You’ll Need
- Surface: stretched canvas or canvas board, 11×14 or 12×16 inches is a comfortable size.
- Acrylic paints: titanium white, cadmium red medium, alizarin crimson or quinacridone red, cadmium yellow medium, yellow ochre, ultramarine blue, phthalo blue (optional), burnt umber and burnt sienna.
- Brushes: 1 in flat for sky and fields, 1/2 in and 1/4 in flats for barn walls and roof, a small round, a liner or rigger for board lines and fence wire, an old fan brush or stiff bristle brush for grass.
- Palette knife for mixing and optional texture.
- Pencil or chalk, ruler and a strip of paper for perspective lines.
- Water containers, paper towels, spray bottle.
Paint quality matters most with the reds and white here, since you’ll mix many values of each. If you’re choosing a set, our guide to the best acrylic paint brands for landscapes compares coverage and pigment strength.
Plan the Composition
A few decisions before you touch paint make the biggest difference.
Choose a viewpoint
Showing two sides of the barn, the gable end with its peaked roof and one long side, gives depth and an instant sense of volume. A straight-on front view looks flatter and works better for stylized or folk-art paintings.
Place the barn off-center
Put the barn on one of the thirds lines rather than dead center, and avoid letting the roof peak touch the canvas edge. Leave room for the sky to breathe; a horizon about one-third up from the bottom suits most barn scenes.
Decide on the light
Pick a light direction and stick with it. If the sun comes from the left, the left-facing wall is your light side and the other wall is in shade. The roof plane facing the sun is lighter, and the barn casts a shadow on the ground to the right. Consistent light is what makes a barn look solid.
Simple Perspective for a Barn
You don’t need technical drawing skills. Two-point perspective boiled down to five steps is enough:
- Draw the horizon line lightly across the canvas at eye level.
- Draw the nearest vertical corner of the barn. This is the tallest vertical line of the walls.
- Mark two vanishing points on the horizon, one far left and one far right, often off the edge of the canvas. Tape scrap paper to the sides if you need room.
- Draw lines from the top and bottom of the corner to each vanishing point. These are the top and bottom edges of the two walls.
- Add the far verticals to end each wall, keeping all verticals truly vertical.
For the gable roof, find the center of the gable wall by drawing an X from corner to corner; a vertical line through the crossing marks where the peak sits. Then extend the ridge line toward the same vanishing point as the long wall. Most barns have a steep gable roof or a gambrel roof with two slopes on each side, which gives that classic barn silhouette.
Barn Color Mixes
| Area | Mix | Notes |
|---|---|---|
| Barn red, light side | Cadmium red medium + small amount burnt umber | Add a touch of yellow ochre in strong sunlight |
| Barn red, shadow side | Barn red + alizarin crimson + a little ultramarine | Darker and cooler, never black |
| Weathered gray barn | Burnt umber + ultramarine + white | Vary warm and cool grays for old wood |
| White trim | White + tiny touch yellow ochre (light), white + ultramarine + umber (shadow) | Pure white looks harsh |
| Tin roof | White + ultramarine + burnt umber, with burnt sienna for rust | Lighter on the sunlit plane |
| Shingle roof | Burnt umber + ultramarine, with gray highlights | Darker than the walls for contrast |
| Summer sky | White + ultramarine, lighter and warmer near the horizon | Touch of yellow ochre near horizon adds glow |
| Field grass | Cadmium yellow + ultramarine, plus yellow ochre and burnt sienna | Cooler and paler in the distance |
How to Paint a Barn With Acrylic Paint: Step by Step
Step 1: Tone the canvas
Brush a thin wash of burnt sienna or yellow ochre over the canvas and let it dry, about 10 minutes. The warm ground shows through in places and makes the whole scene feel sunlit.
Step 2: Sketch the scene
Draw the horizon, the barn in perspective, the roofline, any silo or lean-to, and the rough positions of trees and a fence. Keep lines light; thin acrylic doesn’t hide heavy graphite well.
Step 3: Paint the sky
Mix three values of sky blue. Paint the darkest at the top with a 1 in flat, the middle value in the center, and the lightest near the horizon, blending where they meet while the paint is wet. Paint right over the barn’s roofline; you’ll cover it later, and overlapping avoids a gap. Add soft clouds with white and a touch of yellow ochre, shaded underneath with a light gray.
Step 4: Distant trees and hills
Mix a muted blue-green with ultramarine, yellow, white and a speck of red. Dab in a tree line along the horizon with the corner of a flat or a stiff brush. Distant forms should be lighter, cooler and less detailed than anything in the foreground; this is what creates depth.
Step 5: Block in the barn walls
Fill the light-side wall with your sunlit barn red using a 1/2 in flat, following the perspective lines. Then fill the shadow wall with the darker, cooler red. Paint up to the roofline carefully. Two coats are often needed, since many reds are semi-transparent. Let it dry.
Step 6: Paint the roof
Paint each roof plane separately. The plane facing the light is lighter; the other is darker. For a tin roof, brush vertical strokes following the slope to suggest the metal seams. For shingles, use short horizontal dabs. Leave the roof slightly darker overall than the sky behind it so the silhouette pops.
Step 7: Add doors, windows and trim
Paint the large sliding door or hayloft door slightly darker than the wall around it, then add the classic white X brace and white trim with a small flat or round. Keep the trim on the shadow side a bluish gray, not pure white. Windows can be dark rectangles with a thin light edge on the side facing the sun.
Step 8: Board lines and texture
With a liner brush and thinned dark red, paint vertical board lines on both walls. Space them closer together as the wall recedes toward the vanishing point. Don’t make them all equally dark; break some lines and lighten others so the wood looks real. Dry-brush a little lighter red or gray across the sunny side to suggest weathering.
Step 9: The cast shadow and ground
Paint the shadow the barn casts on the ground away from the light, using a cool green or purple-gray. Then block in the field: lighter, cooler color in the distance and warmer, stronger color near the front. Use upward flicks of a fan brush or stiff brush for grass texture in the foreground.
Step 10: Fence, path and details
Add a fence with the liner brush, making posts larger and farther apart as they come forward. A dirt path leading toward the barn guides the eye in. Finish with a few highlights: a sunlit edge on the roof, a glint on a window, small light touches on the grass tops. Then stop before the painting gets overworked.
Adding a Silo, Trees or Outbuildings
A silo next to a barn adds a strong vertical that contrasts with the barn’s horizontal mass. Draw it as a tall cylinder: straight vertical sides and a curved, elliptical top and base that follow the same eye level as the barn. Shade it with a gradient from light to dark across the curve rather than flat planes, and add a domed or conical cap. Trees should overlap part of the barn or sit just behind it to anchor it in the landscape, and a small shed or lean-to can extend the barn’s shape. Keep any extra building simpler and smaller than the main barn so the focal point stays clear.
Variations to Try
Winter barn
Swap the green field for snow mixed from white with a touch of ultramarine in the shadows and yellow ochre in the sunlit areas. A red barn against snow is especially striking. Add snow along the roof edge and on top of fence rails.
Sunset barn
Paint the sky in bands of yellow, orange and magenta, and keep the barn mostly in shadow or silhouette, with warm light catching just the edges. The red walls will lean darker and more purple.
Old weathered barn
Use grays and browns instead of red, with gaps between boards, a sagging roofline and patches of rust on the tin. Dry brushing over a dark base creates convincing old wood.
Folk-art barn
Flatten the perspective to a simple front view, use pure colors, and add stylized trees, quilt-block patterns on the gable, and dotted fences. This style forgives drawing mistakes and suits decorative pieces. For crisp, flowing lines in this style, fluid acrylics can help; our fluid acrylic paint review covers how thinner paint handles for line work.
Common Mistakes When Painting Barns
- Leaning walls. Every vertical edge should be truly vertical. Check with a ruler held against the canvas.
- Too-bright red. Straight cadmium red can look like a fire engine. A little burnt umber gives a natural barn red.
- Black shadows. Shadows on red walls are deep, cool reds and purples, not black.
- Outlining everything. Dark outlines flatten the barn. Let changes in color and value define edges.
- Equal detail everywhere. Focus detail on the barn and foreground; keep the distance soft.
- Centered barn and centered horizon. Both make the scene static.
Tips for Beginners
Use a photo reference, ideally one with clear sunlight and shadow. Sketch the barn on paper first to sort out the perspective before painting. Mix your barn reds in two or three values before you start so you aren’t trying to match colors as paint dries. And keep the painting to five or six main colors to maintain harmony.
If the barn feels too complicated, start with a simple square barn with a gable roof and one door. Once that reads well, add a gambrel roof, a silo, or a lean-to shed.
FAQs
What color mix makes barn red in acrylic?
Cadmium red medium with a little burnt umber makes a natural barn red. Add alizarin crimson and a touch of ultramarine for the shadow side, and a hint of yellow ochre for sunlit walls.
How do you paint wood texture on a barn?
Paint the base wall color, let it dry, then add thin vertical board lines with a liner brush and dry-brush lighter and darker variations across them. Breaking up the lines keeps the boards from looking mechanical.
What brush is best for barn details?
A liner or rigger brush handles board lines, fence wire and grass blades. Small flats help with crisp edges on doors, trim and roof lines.
Should I paint the sky or the barn first?
Paint the sky first, working back to front. Overlapping sky paint behind the barn and then painting the barn over it avoids white gaps along the roofline.
How long does it take to paint a barn in acrylic?
A simple 11×14 inch barn landscape typically takes two to four hours, including drying time between layers. More detailed scenes can take longer across several sessions.
Can I paint a barn without drawing perspective?
Yes, especially in a folk-art or front-view style. For a realistic barn showing two sides, a few light perspective lines make it far more convincing.
Next Step
A believable barn painting rests on three things: an off-center composition, simple perspective with consistent light, and natural reds that shift cooler in shadow. Work back to front, save details for last, and the scene comes together quickly.
Rich reds and a strong white make this subject sing, and paint quality shows most in those colors. Compare coverage, pigment load and value in our guide to the best acrylic paints for every skill level before your next landscape.



One Comment