Quick answer: To create a painting station for kids at home, pick a spot with a wipeable floor and good light, set up a child-height table or easel, protect the surfaces underneath, and store a small, rotating set of washable paints, brushes and paper within the child’s reach. Add a drying spot, a water and cleanup kit, and a few simple rules, and the station becomes a place your child can use with minimal setup every time.
A painting station works when a child can walk up to it, start, and clean up without an adult rebuilding the whole thing each time. Most home setups fail on that last point. The paint lives in a high cupboard, the table needs covering every session, and wet pictures end up on the kitchen counter. The result is that painting becomes a rare event instead of an everyday option.
This guide walks through how to create a painting station for kids at home step by step: where to put it, what furniture fits which age, how to protect your floors, what to stock, and how to keep it tidy. It focuses on the setup itself. For project ideas and techniques once the station is ready, the main guide to painting activities and techniques for kids covers what to actually paint.
What a Good Kids’ Painting Station Needs
Before buying anything, it helps to know the five jobs a station has to do. Every piece of furniture or storage you add should handle at least one of them.
- A work surface at the right height. A child should be able to stand or sit with elbows roughly level with the surface. Hunching or reaching makes brush control harder and spills more likely.
- Protection for everything nearby. Floors, walls and nearby furniture need a barrier that can be wiped or washed.
- Reachable, limited supplies. A child should be able to get paper and paint without help, but the selection should be small enough that it does not end up mixed into one brown puddle.
- A water and cleanup zone. Rinse water, rags and a place to put dirty brushes.
- A drying spot. Wet paintings need somewhere flat or hanging to sit for anywhere from 20 minutes (thin tempera) to several hours (thick paint).
If your space only allows a few of these, prioritize the work surface and floor protection. Supplies and drying can be improvised; a carpet stain usually cannot.
Step-by-Step: How to Create a Painting Station for Kids at Home
Step 1: Choose the location
The best spot is usually not the most attractive one. Look for these features, roughly in this order:
- Hard flooring. Tile, vinyl, laminate or sealed concrete. Kitchens, mudrooms, laundry rooms and garages often work better than playrooms with carpet.
- Natural light. A spot near a window helps children see true colors. Avoid direct, hot sun on the paper, which can make paint dry before a child finishes a stroke.
- Close to a sink. Even 10 extra steps to water means more drips across the house.
- In view of an adult. For children under about five, a station within sight of the kitchen or living area allows supervision without hovering.
If carpet is unavoidable, plan for a large washable mat or a section of vinyl flooring offcut placed under the whole work area, extending at least 2 feet past the table on every side.
Step 2: Pick the main work surface
There are three common options, and the right one depends mostly on age and space.
| Option | Best ages | Advantages | Limitations |
|---|---|---|---|
| Child-size table and chairs | 2 to 8 | Stable, good for flat work, doubles as a craft table | Takes floor space; drips stay on the tabletop |
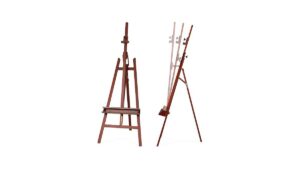
| Standing art easel | 3 to 10 | Vertical painting builds arm and shoulder control; paper roll keeps supply ready | Runny paint drips down; less stable with very young children |
| Tabletop drawing station or easel on an adult table | 4 and up | Fits small homes; stores flat when not in use | Adult table needs a cover; child may need a booster or stool |
Kids art easel with paper roll vs. tabletop drawing station
A floor easel with a paper roll at the top is popular because the paper is always there: a child pulls down a fresh sheet and clips it in place. Easels with a chalkboard or whiteboard on the back side add a second activity, and most include a tray for cups. For toddlers, check that the legs lock and the base is wide enough not to tip when a child leans on it.
A tabletop drawing station sits on an existing table. It suits apartments and children old enough to sit still for 20 to 30 minutes. Many fold flat and slide behind a bookshelf. The trade-off is that you are now protecting an adult table, so a fitted vinyl tablecloth or a large silicone mat becomes essential.
Some families use both: a floor easel for big, loose painting and a small table for detail projects like dot art or painting small objects.
Step 3: Protect the floor, walls and furniture
Protection is what turns a painting corner into a station rather than an event. Set it up once so it stays put.
- Floor: A washable splat mat, a vinyl tablecloth taped at the corners, or a cut piece of vinyl flooring. Avoid loose newspaper, which shifts, tears and lets paint through.
- Walls: If the easel is against a wall, add a strip of clear plastic or a wipeable panel behind it, about 3 feet high. Flat matte wall paint stains easily; semi-gloss wipes cleaner.
- Table: An oilcloth or vinyl cover with flannel backing grips the table and does not slide.
- Child: A smock or an old adult T-shirt worn backward. Hang it on a low hook at the station so putting it on becomes part of the routine.
Step 4: Set up storage at child height
Storage should let a child see what is available. Opaque bins with lids hide supplies, and young children often forget what is inside.
- A low shelf or a small rolling cart with two or three tiers works well. Top tier: paint cups and brushes. Middle: paper. Bottom: smocks, rags and cleanup items.
- Clear cups or jars for brushes, bristles up.
- A flat paper tray or magazine file so paper stays uncrumpled.
- Labels with both a word and a picture for pre-readers.
Keep adult-only items (scissors with sharp points, glue guns, solvent-based products) out of the station entirely, not just on a higher shelf of the same cart.
Step 5: Stock a starter supply kit
More supplies do not equal more creativity. A small kit that is always complete beats a large one with dried-out bottles and lost caps. A practical starter set:
- Washable tempera or poster paint in red, yellow, blue, white and black (children can mix secondaries themselves)
- Non-spill paint cups with lids, one per color
- 3 to 5 brushes: one large flat (around 1 inch), one medium round and one small round, plus a sponge brush
- Paper: heavier paper (around 80 lb or heavier) for paint; a paper roll for the easel
- A water cup, ideally a weighted or non-tip style
- Rags or a roll of paper towels
- A few tools for variety: sponges, cotton swabs, plastic forks, drinking straws
Swap in extras on a rotation: watercolor pans one week, dot markers the next. Rotation keeps the station interesting without adding clutter. Simple tool-based projects like straw painting for kids need almost nothing beyond the basic kit and are a good first activity for a new station.
Step 6: Create a drying area
Wet art needs a home or it migrates. Options from simplest to most space-efficient:
- A clothesline and clips strung along a wall at about adult shoulder height. Works for light paper; thick paint may drip.
- A flat tray or baking sheet on a high shelf for heavy or very wet paintings.
- A tiered drying rack of the kind used in classrooms, which holds many sheets flat in a small footprint.
Thin washable tempera on paper often dries to the touch in 20 to 40 minutes in a warm room. Thick layers or puffy paint can take several hours or overnight. Humidity slows everything.
Step 7: Add a cleanup kit
Cleanup is where most stations break down, so make it as easy as setup. Keep these together in one caddy:
- A small bucket or tub for dirty brushes
- A spray bottle with plain water
- A sponge and a few rags
- Baby wipes for hands and quick spills
- A small dustpan for dried paint flakes
Teach a three-step finish: brushes in the tub, paper to the drying spot, wipe the table. For younger children, an adult rinses brushes later; older children can rinse them at the sink with lukewarm water and a drop of dish soap.
Step 8: Display finished work
A display area near the station encourages children to come back. A corkboard, a strip of wire with clips, or a few frames with quick-change fronts all work. Rotate pieces weekly and store favorites flat in a labeled folder or portfolio by date.
Painting Station Setup by Age
Children of different ages need different things from the same station. Use this as a rough guide and adjust for your own child.
| Age | Setup focus | Supplies | Supervision |
|---|---|---|---|
| 1 to 2 | Floor or high chair tray, full coverage mat | Finger paint labeled for this age group, large paper taped down | Constant, within arm’s reach |
| 3 to 4 | Easel or low table, smock on a hook | Washable tempera, chunky brushes, sponges, dot markers | Close; adult sets out paint |
| 5 to 7 | Table plus easel, reachable cart | Tempera, watercolor pans, varied brush sizes, heavier paper | Nearby; child sets up and starts |
| 8 and up | Desk or table with good light, organized storage | Watercolor, student acrylics with adult approval, sketchbook | Check-ins; child handles cleanup |
Always check the label for age guidance and safety marks such as the ASTM D-4236 conformance statement, which indicates the product has been reviewed for chronic health hazard labeling. “Washable” and “non-toxic” are different claims, so read for both if you want easy cleanup and safety.
Small-Space Ideas for a Painting Station
Not every home has a spare corner. These setups take little or no permanent space:
- Rolling cart station: A three-tier cart holds everything and rolls into a closet. Pair it with a folding mat.
- Door-mounted storage: A clear over-the-door shoe organizer holds paint bottles, brushes and markers, visible and off the floor.
- Wall-mounted paper roll: A roll holder fixed to the wall at child height, with a clipboard or board below, works as a slim vertical easel.
- Bathtub painting: For toddlers, painting on tub walls or on paper taped inside an empty tub contains mess completely. Rinse right after.
- Outdoor station: A fence-mounted board or a picnic table in warm months avoids indoor cleanup altogether.
Rules That Keep the Station Working
A few clear rules, posted with pictures at child eye level, prevent most problems:
- Smock on before paint comes out.
- Paint stays on the paper and the mat.
- One brush per color cup, or rinse between colors.
- Wet pictures go to the drying spot.
- Brushes in the tub when finished.
Keep the list to five rules or fewer. Children remember a short list; a long one gets ignored.
Common Mistakes When Setting Up a Kids’ Painting Station
- Putting out every color at once. Young children tend to mix everything together. Three colors plus white produces better results and teaches mixing.
- Using thin printer paper. It buckles and tears when wet, which frustrates children. Use heavier paper for anything with paint.
- No lids on paint cups. Tempera left open dries into a skin within a day. Non-spill cups with lids keep paint usable for weeks.
- Storage above reach. If a child has to ask for every item, the station becomes an adult-run activity.
- Skipping the drying area. Wet art on furniture is the fastest route to banning painting at home.
- Too much in the station. Glitter, glue, clay and beads crowd the space. Keep the station for painting and store other crafts separately.
Keeping Supplies in Good Condition
A station is only as good as the supplies inside it. A few habits extend their life:
- Wash brushes the same day. Dried tempera in the ferrule (the metal part) splays the bristles.
- Store brushes upright or flat, never resting on their bristles in water.
- Close bottles tightly and wipe the threads so caps do not glue shut.
- Check paint every week or two and toss anything that smells sour, which can happen with water-based paint left contaminated.
- Keep paper flat and dry; humidity curls it.
First Projects for a New Station
Start with activities that work with the basic kit and finish in one sitting. That builds the routine of setup, paint, dry and clean.
- Color mixing grid: Fold paper into six boxes and fill each with a mix of two colors.
- Sponge stamping: Cut kitchen sponges into simple shapes and print patterns.
- Simple animals: A step-by-step subject like an easy ladybug painting uses just red, black and white.
- Straw-blown paint: Drop watery paint and blow it across the paper with a straw.
- Easel free paint: A large sheet and big brushes, no subject at all, for younger children.
FAQs
What age is right for a kids’ painting station?
Children as young as 18 months can use a simple, closely supervised setup with finger paint on a floor mat. A self-serve station where the child gets supplies independently usually works from around age 3 or 4, once they can follow a few simple rules.
Is an easel or a table better for kids?
Both have value. Easels encourage big arm movements and keep paper ready on a roll, while tables suit detailed, flat projects and are steadier for very young children. If you can only choose one, pick based on space and your child’s age.
How do I keep a painting station from getting messy?
Limit the number of colors out at once, use non-spill cups with lids, put a washable mat under the whole area, and build cleanup into the routine with a dedicated caddy. A designated drying spot also stops wet art from spreading around the house.
What paint is best for a kids’ painting station?
Washable tempera or poster paint is the usual choice for young children because it cleans up with water and is easy to use. Older children can add watercolors and, with adult approval, student acrylics. Check labels for age guidance and safety statements.
Where should I put a painting station in a small apartment?
A rolling cart paired with a folding mat, an over-the-door organizer, or a wall-mounted paper roll lets you create a station that tucks away. Kitchens work well because floors are usually hard and a sink is nearby.
How often should I change the supplies?
Rotating one or two items every week or two keeps interest high without clutter. Keep the core kit (primary colors, brushes, paper) constant and swap extras like sponges, stamps or watercolor pans.
Next Step
Once the station is set up, the hard part is done: painting becomes something your child can start on their own, any day. Keep the supplies limited, the cleanup kit stocked and the drying spot clear, and adjust the setup as your child grows. When you are ready for activities to fill it, browse our full guide to fun painting techniques for children for projects matched to different ages and skill levels.