Are you ready to bring your portrait ideas to life with just a digital pen and screen? Whether you’re starting from scratch or looking to improve your skills, this guide will show you how to do digital portrait painting step by step.
You’ll discover simple techniques that make the process easier and more fun than you might expect. By the end, you’ll feel confident creating lifelike portraits that truly capture personality and emotion. So, let’s dive in and unlock your digital art potential together!
Choosing Your Tools
Choosing your tools is a vital first step in digital portrait painting. The right tools shape your experience and final artwork. Picking software, hardware, and brushes affects how naturally you paint. This section helps you find the best tools for your style and budget.
Selecting Software
Software is where your digital painting happens. Choose programs designed for artists. Popular options include Photoshop, Procreate, and Clip Studio Paint. Each offers different features and ease of use. Some software has many brushes and textures built in. Others allow custom brush creation. Try free trials to see which fits your needs. Simple interfaces help beginners start fast. Advanced tools assist detailed portraits. Update software regularly for best performance.
Picking The Right Hardware
Your hardware affects drawing comfort and accuracy. A good tablet or touchscreen is essential. Graphics tablets like Wacom offer pressure sensitivity. This controls line thickness and opacity naturally. Screen tablets let you draw directly on the display. This feels closer to traditional painting. A fast computer ensures smooth brush strokes. Large screens help see details clearly. Consider a stylus with tilt and pressure features. Ergonomic gear reduces hand fatigue during long sessions.
Understanding Brushes And Textures
Brushes and textures give your portrait a realistic look. Digital brushes mimic pencils, oils, and watercolors. Experiment with different brush shapes and sizes. Textures add depth to skin, hair, and clothes. Use textured brushes to create natural effects. Layer multiple textures for complexity. Adjust brush opacity and flow for soft blending. Save your favorite brushes for quick access. Learning brush settings improves your control and style.

Credit: www.amazon.ie
Preparing Your Workspace
Preparing your workspace is the first step in digital portrait painting. A clean and organized setup helps focus on your art. It also speeds up your workflow and reduces mistakes.
Arrange your digital tools and files before you start painting. This makes the process smooth and enjoyable. Below are key steps to get your workspace ready.
Setting Up Your Canvas
Choose the right canvas size for your portrait. A larger canvas gives more detail but needs more computer power.
Set the resolution to at least 300 dpi for clear, print-quality images. Use a color mode like RGB for screens or CMYK for print.
Start with a neutral background color or leave it transparent. This helps you see colors and shapes clearly as you paint.
Organizing Layers
Create separate layers for different parts of the portrait. For example, skin, hair, and clothing each get their own layer.
Name your layers clearly to avoid confusion. Lock layers you are not working on to prevent accidental changes.
Use folders or groups to keep layers tidy. This saves time and helps you find things fast.
Importing Reference Photos
Import clear, high-quality reference photos to guide your painting. Place them on a separate layer.
Resize and position the photo near your canvas for easy viewing. Lower the opacity of the photo layer to paint on top.
Use multiple reference images to capture different angles and lighting. This improves accuracy and realism.
Sketching The Portrait
Sketching is the first step in digital portrait painting. It sets the foundation for the entire artwork. A good sketch captures the likeness and basic structure of the face. It helps plan the composition and proportions before adding colors and details.
Start with light, loose lines. This allows easy changes and adjustments. Focus on the overall shape and key facial features. Avoid pressing too hard to keep the sketch flexible.
Basic Proportions And Shapes
Begin by drawing simple shapes to represent the head and face. An oval or egg shape works well for the head. Divide it into sections to place eyes, nose, and mouth correctly.
The eyes usually sit halfway down the head. The space between the eyes equals one eye width. The bottom of the nose is halfway between the eyes and chin. The mouth lies about one-third below the nose.
Use these proportions as guides, not strict rules. Adjust based on your subject’s unique features.
Using The Sight-size Method
The sight-size method helps compare sizes and angles accurately. Position your canvas and reference side by side. Step back to view both from a distance.
Look at the reference and measure key points with your pencil or stylus. Check the height and width of features. Mark these measurements lightly on your sketch.
This method improves accuracy and helps capture correct proportions. It trains your eye to see relationships between facial features.
Refining The Outline
After blocking in shapes and proportions, refine the sketch lines. Darken important lines like the jaw, eyes, and lips. Erase unnecessary or overlapping marks.
Smooth out the curves and edges. Add subtle details like eyelids, nostrils, and hairline. Keep the lines clean but expressive to maintain a lively feel.
A clear outline guides the next steps of shading and coloring. Take your time to create a solid and confident sketch.

Credit: www.youtube.com
Blocking In Colors
Blocking in colors is the first step in shaping your digital portrait. It helps set the foundation for the overall look. You start by laying down simple color areas. This stage is not about details. Focus on big shapes and main color zones. It guides the later steps of shading and refining.
Choosing A Color Palette
Pick a limited range of colors for your portrait. Use natural skin tones mixed with a few accent shades. Keep colors balanced between warm and cool. This choice affects the mood and realism of your painting. Test colors on a separate layer to see how they work together.
Establishing Light And Shadow
Decide the main light source direction early. Paint shadows and highlights roughly to show volume. This step creates depth and form in the face. Use contrasting colors lightly to mark these areas. It helps the portrait feel three-dimensional from the start.
Creating Base Tones
Fill in the large areas of skin with flat base tones. Avoid blending or fine details at this stage. Use soft brushes with medium opacity for smooth coverage. These base tones act as a canvas for later color adjustments. Keep tones consistent with your chosen palette.
Adding Details
Adding details to your digital portrait painting brings life and realism to your artwork. This stage focuses on refining key elements. It transforms a basic sketch into a vivid and expressive portrait. Pay attention to every small part. Details help convey the personality and mood of the subject.
Painting Facial Features
Start by sharpening the eyes, nose, and mouth. Use small brushes to add highlights and shadows. Capture the sparkle in the eyes and the curve of the lips. Shape the nostrils and add subtle shading around the nose. Avoid harsh lines; blend smoothly for natural skin texture. Details like eyelashes and eyebrows add character. Keep checking the proportions to maintain balance.
Rendering Hair And Textures
Hair needs layers of strokes to look real. Use different brush sizes to paint strands and volume. Start with a base color and add lighter tones for highlights. Darker shades create depth and shadows. Textures like skin pores or fabric folds add realism. Use textured brushes or custom patterns to mimic these effects. Work slowly, building up details bit by bit.
Enhancing Depth And Volume
Depth makes the portrait look three-dimensional. Apply shading to show light direction clearly. Use darker shades in recessed areas and lighter shades on raised parts. Soft blending helps smooth transitions between tones. Adding subtle color variations can enhance volume. Shadows under the chin and around the neck help separate the face from the background. This technique gives your portrait a lifelike feel.
Refining And Blending
Refining and blending are key steps in digital portrait painting. They bring smoothness and realism to your artwork. This stage helps merge colors and tones naturally. It also enhances the depth and emotion of the portrait. Taking time to refine details can make a big difference.
Smoothing Transitions
Smoothing transitions creates soft edges between colors. Use a soft brush or blending tool in your software. Work gently to avoid harsh lines. Blend colors in small circles or strokes. This technique helps skin tones look natural and even. Avoid over-blending, which can remove texture and detail.
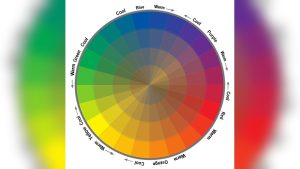
Balancing Warm And Cool Colors
Balancing warm and cool colors adds depth to the portrait. Warm colors, like red and orange, bring life and energy. Cool colors, such as blue and green, create shadows and calm areas. Mix these colors carefully for a realistic skin tone. Use cool shades in shadows and warm tones in highlights. This balance gives the portrait a natural look.
Adjusting Contrast And Highlights
Adjust contrast to make your portrait stand out. Increase contrast to highlight facial features. Use brighter highlights on areas hit by light. Shadows should be deeper but not too dark. This contrast adds dimension and focus. Check your portrait at different zoom levels to see the effect clearly.
Final Touches
Final touches bring your digital portrait painting to life. This stage refines details and enhances the overall look. Small adjustments can make a big difference in quality and impact. Focus on subtle improvements that highlight your subject and style.
Adding Background Elements
Background elements create mood and depth. Choose simple shapes or soft textures to keep attention on the face. Avoid busy or bright details that distract viewers. Use colors that complement the portrait tones. Light gradients or blurred effects work well for subtle backgrounds.
Applying Filters And Effects
Filters and effects enhance the painting’s atmosphere. Soft blur can smooth harsh edges. Color balance tweaks add warmth or coolness. Use these effects gently to maintain natural looks. Try sharpening key features to draw focus. Test different filters but keep the portrait’s character intact.
Preparing For Export
Proper export settings preserve your artwork’s quality. Save a high-resolution copy for printing or sharing. Choose widely supported file types like PNG or JPEG. Check color profiles to ensure accurate display on screens. Rename files clearly for easy identification later. Always keep a layered version for future edits.
Tips For Efficiency
Efficiency saves time and energy during digital portrait painting. It allows you to focus on creativity without getting stuck in small tasks. Adopting smart habits can improve your workflow and keep you motivated.
These tips will help you work faster while maintaining quality. They focus on practical steps anyone can apply, regardless of experience level.
Using Shortcuts And Presets
Keyboard shortcuts speed up common actions like undo, brush size change, and color picking. Learning a few essential shortcuts reduces mouse movements and pauses.
Presets such as custom brushes or color palettes save setup time. Create or download brushes that fit your style. Save colors you use often to avoid searching for them.
Organize presets logically for quick access. This way, you spend less time navigating menus and more time painting.
Layer Management Strategies
Use layers to separate parts of your painting. Keep skin, hair, and background on different layers. This makes it easier to edit without affecting other areas.
Name your layers clearly. Group related layers together to keep your file tidy. Lock layers you do not want to change accidentally.
Regularly clean up unused layers to keep the file light. Good layer management prevents confusion and speeds up your process.
Prioritizing High-impact Areas
Focus on areas that draw the most attention, like eyes, lips, and facial structure. Detail these parts first to set the tone of the portrait.
Simplify or leave less important areas with fewer details. This approach saves time and keeps the viewer’s focus on key features.
Use rough shapes and colors for background and clothing initially. You can refine these later if needed, but the face should always come first.
Common Challenges
Digital portrait painting offers creative freedom but brings certain challenges. Many artists struggle with common issues that affect the quality and flow of their work. Understanding these challenges helps improve skills and produce better portraits. Below are some frequent difficulties faced in digital portrait painting.
Avoiding Overworking Details
Adding too many details can make a portrait look cluttered. Overworking areas wastes time and reduces the artwork’s freshness. It is important to know when to stop refining. Focus on key features and leave some parts softer. This balance keeps the portrait lively and natural.
Handling Color Accuracy
Colors often appear different on screens and print. Achieving realistic skin tones is tricky without proper color management. Use reference photos and color palettes to guide choices. Calibrate your monitor for true color display. Simple adjustments help maintain consistent and believable hues.
Managing Proportional Errors
Incorrect proportions distort the subject’s likeness. Small mistakes in facial structure affect the whole portrait. Measure key distances like eye spacing and nose length carefully. Use guides or grids to check proportions regularly. Correcting errors early saves effort later and improves realism.
Credit: tips.clip-studio.com
Frequently Asked Questions
What Is The 70/30 Rule In Art?
The 70/30 rule in art means dedicating 70% of effort to the main subject and 30% to background or details. It balances focus and composition effectively.
What Is The 80/20 Rule In Painting?
The 80/20 rule in painting means focusing 80% effort on key elements that impact the artwork most, saving time and enhancing quality.
How To Create A Digital Portrait?
Start by selecting a clear photo for reference. Use digital painting software like Procreate. Create layers to sketch, add colors, and detail. Focus on facial features, shading, and highlights. Refine with blending tools. Save and export your final digital portrait for sharing or printing.
How To Start Digital Painting For Beginners?
Start digital painting by choosing simple software and a basic tablet or mouse. Practice sketching daily and learn layer basics. Explore tutorials to improve techniques. Focus on shapes, colors, and shading. Experiment regularly to develop your unique style and confidence.
Conclusion
Digital portrait painting takes time and patience to improve. Start with simple shapes and basic colors. Practice daily to build your skills step by step. Use layers to fix mistakes without stress. Study real faces to understand light and shadow.
Enjoy the process and keep trying new techniques. Soon, your digital portraits will look more lifelike. Remember, every artist begins with small efforts. Keep creating and learning, and your art will grow.