Looking to add a splash of color and creativity to your home? Making your own DIY acrylic pour coasters is a fun and easy way to create unique, eye-catching pieces that brighten up any space.
You don’t need to be an artist to master this simple technique—just a few supplies, a bit of patience, and your imagination are all it takes. Ready to impress your friends or craft a perfect personalized gift? Keep reading, and I’ll guide you step-by-step through making stunning acrylic pour coasters that you’ll be proud to use and show off.
Materials Needed
Creating DIY acrylic pour coasters is a fun and rewarding project. To start, gather all the necessary materials. Having the right supplies ensures smooth pouring and vibrant results. This section covers everything needed for your acrylic pour coaster journey.
Acrylic Paints And Pouring Medium
Choose high-quality acrylic paints with bright, vivid colors. Select a pouring medium to mix with the paint. The pouring medium helps the paint flow easily and blend smoothly. It prevents cracking and makes the design shine. Mix paint and pouring medium in the right ratio for best results.
Coaster Bases
Pick coaster bases that suit your style and project needs. Popular options include ceramic tiles, wooden squares, or round MDF discs. Ensure the surface is smooth and clean. This helps the paint adhere well and creates a flat canvas for pouring. Size should be comfortable for everyday use.
Mixing Tools And Cups
Use disposable cups for mixing paint and pouring medium. Choose clear plastic or paper cups to see the colors clearly. Stir sticks or wooden craft sticks work well for mixing. Have extra cups ready for layering different paint colors. Keep tools simple and easy to clean or toss.
Protective Gear And Workspace Setup
Wear gloves to protect your hands from paint stains. Use an apron or old clothes to avoid spills on your outfit. Cover your workspace with plastic or newspaper for easy cleanup. Work in a well-ventilated area to avoid fumes. Keep paper towels nearby for quick messes.
Preparing Coaster Surfaces
Preparing the surfaces of your coasters is a vital step in the acrylic pour process. Clean and smooth surfaces help the paint flow evenly. Proper preparation ensures your coaster art looks vibrant and lasts longer. Below are simple steps to get your coaster surfaces ready for pouring.
Cleaning And Priming
Start by cleaning each coaster with warm, soapy water. Remove dirt, dust, and oils that block paint adhesion. Dry the coasters completely with a soft cloth. After drying, apply a thin layer of primer. Use a white or clear acrylic gesso primer. This layer helps the paint stick better. Let the primer dry fully before moving on.
Taping Edges
Use painter’s tape to cover the edges of your coasters. This prevents paint from dripping onto unwanted areas. Make sure the tape sticks firmly without gaps. Press the tape down along the edges for a clean border. Remove the tape only after your paint has dried to avoid smudging.
Setting Up For Pouring
Place your coasters on a flat, level surface. Cover the work area with a plastic sheet or newspaper to catch spills. Elevate the coasters slightly using small cups or blocks. This allows excess paint to drip off without sticking. Prepare your paint cups and mixing tools nearby for easy access.
Mixing Paints
Mixing paints is a crucial step in creating beautiful DIY acrylic pour coasters. The right paint mixture affects the flow, color blending, and final look. Knowing how to measure, mix, and combine colors helps you get consistent results. Follow simple steps to prepare your paints before pouring them onto the coasters.
Measuring Paint And Medium
Start by measuring equal parts of acrylic paint and pouring medium. Use a small cup or container for each color. Pour one part paint and one part medium into the cup. This balance makes the paint flow smoothly without being too thick or too thin. Stir gently but well to blend them completely.
Keep your measurements consistent for all colors. This ensures even drying and a uniform finish on each coaster.
Achieving The Right Consistency
The perfect consistency looks like warm honey or melted chocolate. It should pour easily but not be watery. Test the mixture by lifting your stir stick. The paint should drip slowly in thick ribbons. If it is too thick, add a little more medium. If too thin, add a bit more paint.
Getting this balance helps the colors mix and spread nicely on your coaster base. Avoid lumps or clumps by mixing thoroughly.
Color Combinations And Techniques
Choose colors that complement or contrast well. Bright colors stand out on dark coasters. Soft pastels create a calm effect. Try layering colors by pouring one on top of another. This creates interesting swirls and cells as they blend.
Experiment with techniques like dirty pour, flip cup, or puddle pour to see different effects. Keep your colors separate until ready to pour. Mix small batches to avoid wasting paint.

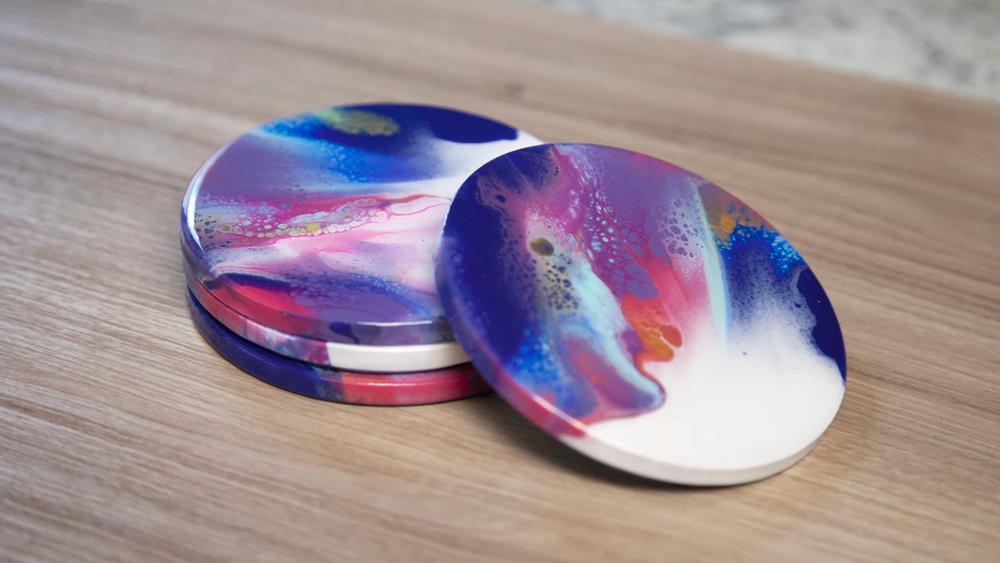
Credit: www.amazon.com
Pouring Techniques
Acrylic pouring is an exciting way to create unique coasters. Different pouring techniques produce varied effects. Each method changes how the colors flow and mix on the surface. Learning these techniques helps you make beautiful and creative designs. Try each to find your favorite style.
Dirty Pour Method
The Dirty Pour method uses multiple colors mixed in one cup. Pour all paint colors into a single cup without mixing them. Then, pour the combined paint onto the coaster surface. This creates interesting patterns with colors blending naturally. It is simple and perfect for beginners.
Flip Cup Pour
For the Flip Cup Pour, fill a cup with layered paint colors. Place the cup upside down on the coaster. Lift the cup slowly to let the paint spread out. This technique creates bold, round patterns with vibrant color mixes. It adds a dramatic look to your coasters.
Swirl And Swipe Methods
The Swirl method involves pouring paint in circular motions. You can swirl different colors together on the coaster. The Swipe method uses a tool to drag paint across the surface. Use a palette knife or paper towel for swiping. Both methods create beautiful waves and blended effects.
Creating Patterns
Creating patterns on your DIY acrylic pour coasters brings life and uniqueness to each piece. Patterns form the visual story told by the colors as they blend and interact. Understanding how to control and guide the paint helps achieve beautiful, eye-catching designs.
Experimenting with different techniques lets you explore endless possibilities. Patterns can be simple or complex, depending on how you work with the paint. Let’s explore ways to create stunning patterns with easy steps.
Manipulating Paint Flow
Controlling how paint moves on the coaster surface shapes your patterns. Tilting the coaster gently allows paint to flow in certain directions. Pour paint slowly or quickly for varied effects. Using a steady hand helps guide the flow precisely. This method creates smooth, natural patterns that look fluid and soft.
Using Tools For Effects
Tools like sticks, combs, or brushes add texture and detail. Dragging a stick through wet paint creates lines and swirls. Combs produce repeated, wave-like patterns. Brushes can blend or separate colors for unique designs. These tools let you add personality to your coasters with simple movements.
Layering Colors
Adding paint in layers builds depth and contrast in patterns. Pour one color, then let it spread slightly before adding another. Each layer interacts differently, creating new shapes and effects. Waiting a little between layers prevents colors from mixing too much. This technique gives your coasters a rich, vibrant look.
Drying And Curing
Drying and curing are key steps in making DIY acrylic pour coasters. Proper drying ensures your coasters harden well and last long. Curing finalizes the strength and shine of the paint. Take care during this phase to keep your artwork flawless.
Optimal Drying Conditions
Keep your coasters in a warm, dry place. Ideal temperature is around 70°F (21°C). Avoid direct sunlight to prevent uneven drying or color fading. Air circulation helps, but avoid strong drafts. A clean, flat surface supports even drying.
Avoiding Dust And Bubbles
Cover coasters with a box or clean container to block dust. Dust can stick to wet paint and ruin the finish. To reduce bubbles, pour paint slowly and avoid shaking cups. Use a toothpick to gently pop any bubbles that form on the surface.
Timeframes To Expect
Drying usually takes 24 to 48 hours at room temperature. Full curing may require 7 days for maximum hardness. Do not stack or use coasters until fully cured. Patience ensures durable, glossy, and smooth coasters ready for use.
Sealing Coasters
Sealing coasters is an important step in your DIY acrylic pour project. It protects the artwork and makes the coasters durable. A good seal keeps moisture and stains away. It also gives a shiny, smooth finish. This makes your coasters look professional and last longer.
Choosing The Right Resin Or Varnish
Pick a clear resin or varnish that suits coasters. Epoxy resin is popular because it is strong and waterproof. Some varnishes also protect well but may need more coats. Look for products that dry clear and resist yellowing. Make sure the product is safe for surfaces that hold drinks.
Application Tips
Apply the sealant in a clean, dust-free area. Use a foam brush or a small roller for even coverage. Pour resin slowly to avoid bubbles. Spread it gently over the coaster surface. Let the first layer dry fully before adding another. Usually, two to three coats give the best protection.
Safety Precautions
Work in a well-ventilated space to avoid fumes. Wear gloves to protect your skin from resin or varnish. Avoid direct contact with eyes and mouth. Keep materials away from children and pets. Follow all safety instructions on the product label carefully.

Credit: www.beadinggem.com
Adding Finishing Touches
Adding finishing touches to your DIY acrylic pour coasters makes them look professional and lasts longer. These small steps protect your artwork and improve coaster functionality. Simple additions like backing, sanding, and polishing can transform your coasters.
Take your time with each step to ensure the best result. Each finishing touch adds value and beauty to your handmade coasters.
Attaching Cork Or Felt Backing
Cork or felt backing protects surfaces from scratches. Cut the backing to match your coaster size. Use strong adhesive glue to stick it firmly on the coaster’s bottom. Press down for a few minutes to secure it well. This step also stops coasters from slipping on smooth tables.
Sanding Edges
Sanding smooths any rough or sharp edges. Use fine-grit sandpaper to gently sand around the coaster edges. Move in small circles for an even finish. Sanding removes any uneven spots or paint drips. It makes your coasters safe to handle and more polished in appearance.
Polishing For Shine
Polishing enhances the shine and depth of your acrylic pour art. Use a soft cloth to buff the coaster surface lightly. Apply a small amount of clear wax or polish designed for acrylic. Buff again until you see a glossy finish. Polishing protects the paint and adds a beautiful glow.
Troubleshooting Common Issues
Creating your own acrylic pour coasters is fun and rewarding. Yet, some common problems may arise during the process. Knowing how to fix these issues saves time and materials. Here are simple solutions for typical troubles in acrylic pouring.
Cracking And Peeling
Cracks appear if the paint dries too fast or is too thick. Use a pouring medium to thin the paint properly. Avoid applying thick layers in one go. Peeling happens when the surface is not clean or dry before pouring. Clean coasters with alcohol to remove dust and oil. Let the paint cure fully before handling the coasters.
Color Bleeding
Colors may bleed into each other and lose their sharp edges. This happens if the paint mixes too much or the colors are too wet. Use less paint and allow some drying time between layers. Choose colors that work well together and do not blend into mud. Pour carefully to keep colors separated and vibrant.
Uneven Surfaces
Uneven surfaces can result from an unlevel workspace or air bubbles in the paint. Always check that your table or surface is flat. Use a torch or heat gun to remove bubbles after pouring. Spread the paint gently with a stick or brush if needed. Let coasters dry on a flat surface to keep them smooth.
Creative Variations
Creative variations make DIY acrylic pour coasters unique and exciting. They allow you to explore new styles and textures. These ideas transform simple coasters into art pieces. Experimenting with different materials and techniques adds depth and shine.
Try these creative variations to make your coasters stand out. Each method offers a fresh way to express your creativity. Small changes can lead to stunning results.
Using Metallics And Additives
Metallic paints add shimmer and luxury to your coasters. Gold, silver, or copper create eye-catching effects. Mix metallic pigments with your acrylic paints before pouring. Additives like silicone oil create cells and interesting patterns. These details give your coasters a professional look. Use small amounts for subtle or bold effects.
Incorporating Resin Inclusions
Resin inclusions add texture and personality to your coasters. Embed small objects like dried flowers, glitter, or beads. Place these items carefully before pouring resin. The clear resin preserves and highlights the inclusions. This technique adds a three-dimensional element. It makes each coaster one of a kind.
Mixing With Other Art Forms
Combine acrylic pouring with other art forms for unique coasters. Try stamping or stenciling on dried paint layers. Use fine liners to draw delicate details. Add splashes of watercolor or ink for contrast. Layering different techniques creates depth and interest. This mix of styles makes your coasters truly special.
Care And Maintenance
Proper care and maintenance keep your DIY acrylic pour coasters looking fresh and vibrant. These coasters are beautiful but need gentle handling. Simple steps help avoid damage and extend their life. Follow these guidelines to enjoy your art for a long time.
Cleaning Tips
Use a soft cloth or sponge to clean your coasters. Avoid abrasive materials that can scratch the surface. Mild soap and warm water work best. Do not soak coasters in water for long periods. Dry them immediately with a soft towel to prevent water marks.
Avoiding Damage
Keep coasters away from direct sunlight to prevent color fading. Avoid placing hot items directly on the surface. Use a protective finish or sealant to add extra strength. Handle coasters gently to prevent chipping or cracking. Store them flat and avoid stacking heavy objects on top.
Long-term Durability
Apply a clear acrylic sealant every few months to maintain shine and protection. Re-seal any worn or scratched areas promptly. Keep coasters in a dry place to prevent moisture damage. Regular cleaning and careful use increase their lifespan. Your coasters will stay beautiful with simple care.
Gift Ideas And Uses
DIY acrylic pour coasters offer many creative gift ideas and practical uses. These vibrant coasters are easy to personalize and make thoughtful presents. They also add a unique touch to any home. Many artists even sell their coasters to earn extra income.
Personalized Gifts
Custom acrylic pour coasters make special gifts for friends and family. You can choose colors to match their style or favorite themes. Adding initials or small designs makes each coaster unique. Handmade gifts show care and thoughtfulness. They are perfect for birthdays, holidays, or housewarming parties.
Home Decor Applications
Use acrylic pour coasters to brighten up your living spaces. Their bright colors and patterns add charm to coffee tables and dining areas. They protect surfaces from stains and heat while serving as art pieces. Group several coasters for an eye-catching display. These coasters blend function with creative decor.
Selling Your Coasters
Many crafters earn money by selling acrylic pour coasters. Start by creating a small collection with varied designs. Use online platforms or local craft fairs to reach buyers. High-quality finishes and unique styles attract more customers. Selling your coasters can turn a fun hobby into a small business.
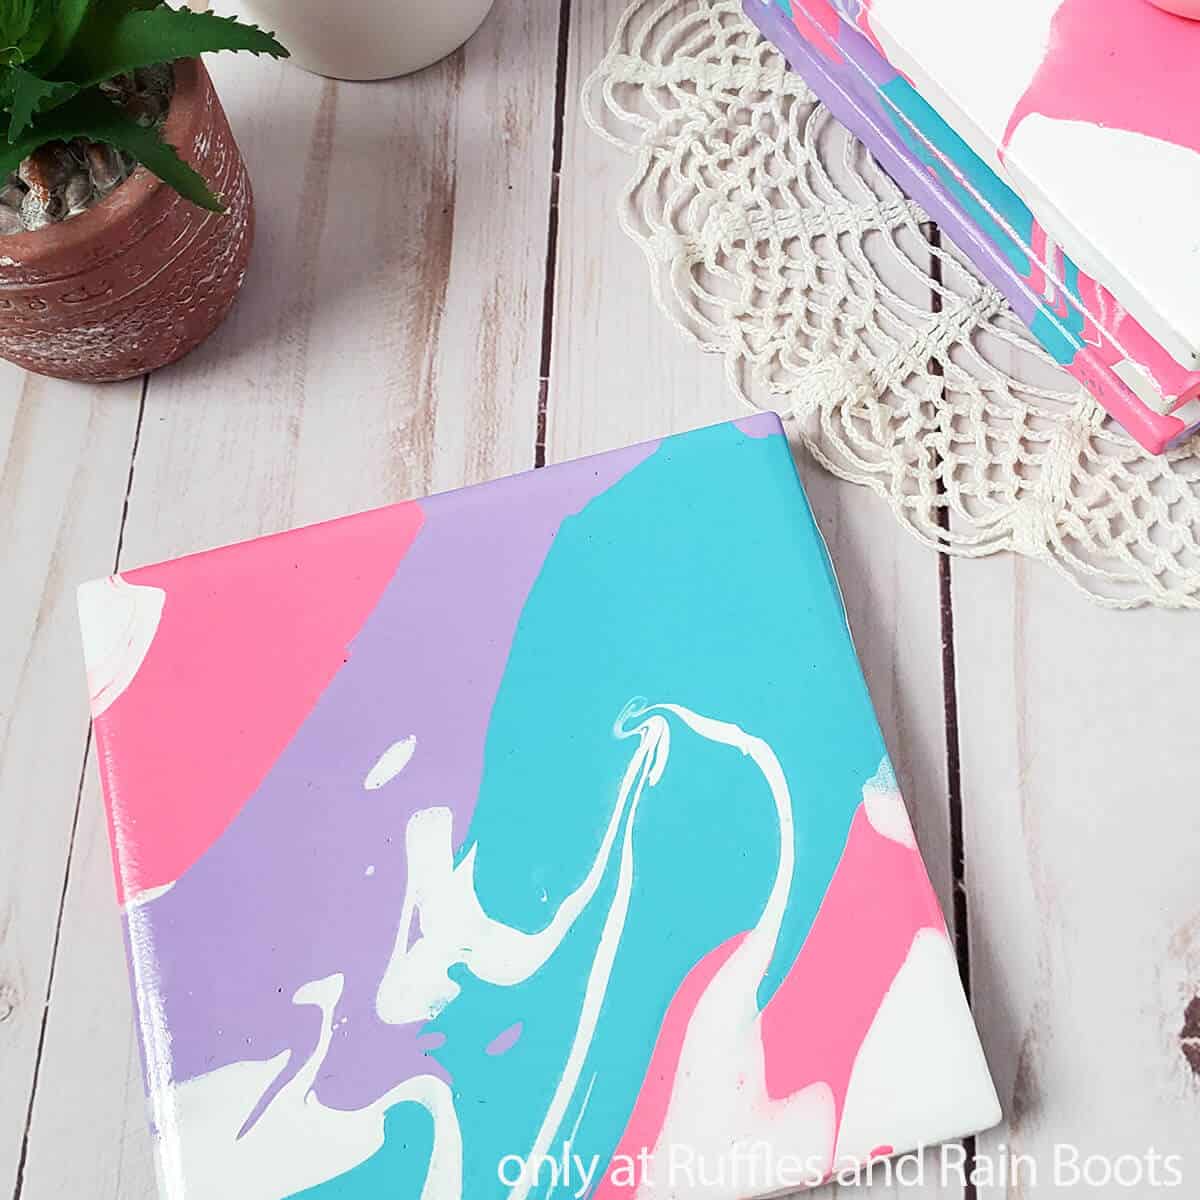
Credit: rufflesandrainboots.com
Frequently Asked Questions
What Materials Are Needed For Diy Acrylic Pour Coasters?
You need acrylic paints, pouring medium, coasters (wood or ceramic), silicone cups, stir sticks, and a sealant. Optional items include gloves and a plastic sheet for protection.
How Do I Prepare Coasters For Acrylic Pouring?
Clean the coasters thoroughly and apply painter’s tape on the edges. This protects them and creates a clean border for your design.
What Is The Best Pouring Technique For Coasters?
The “dirty pour” and “swipe” methods are popular. They blend colors beautifully and create unique patterns on small coaster surfaces.
How Long Does Acrylic Pour Paint Take To Dry?
Drying time varies but typically takes 24 to 48 hours. Ensure they are in a dust-free, level area for best results.
Conclusion
Creating your own acrylic pour coasters is a fun, creative project. You can customize colors and patterns to fit your style. The process requires only a few simple materials and steps. Each coaster turns out unique, adding charm to your home.
Practice helps improve your technique and results. Enjoy making beautiful, functional art pieces for yourself or as gifts. Start today and bring some color to your space!