
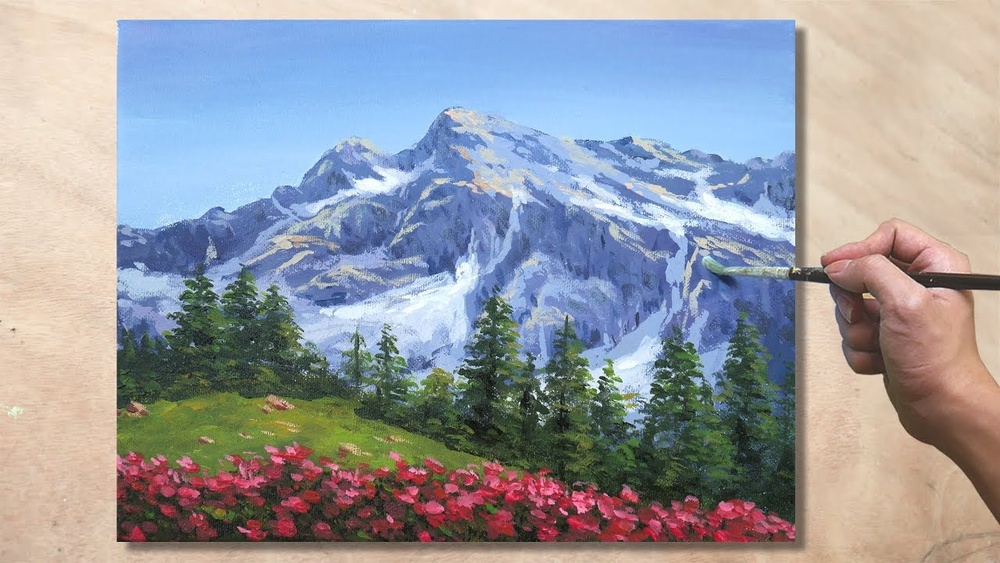
Quick answer: To paint mountains with acrylic, work from back to front: paint the sky, then the farthest range in pale, blue-gray, low-contrast color, then each closer range darker, warmer and more detailed. On every mountain, pick a light direction and paint one side of each ridge lighter and the other darker, using an angled flat or palette knife to pull diagonal strokes that follow the slope. Finish the foreground with trees or rocks in your darkest values to push the mountains back.
Mountains look massive in a painting for one reason: the viewer believes there is miles of air between them. That illusion comes from atmospheric perspective, not from detail. A distant peak painted with crisp edges and bold color looks like a small hill nearby, no matter how carefully you shape it.
This guide explains how to paint mountains with acrylic paint using a layered, back-to-front method. It covers color mixing for distance, brush and knife techniques, a full step-by-step range, snowy peaks for beginners, rocky cliffs, and the mistakes that flatten mountain scenes.
Atmospheric Perspective: The Core Principle
Air contains moisture and particles that scatter light. The more air between you and a mountain, the more its appearance shifts. In painting terms, as mountains recede they become:
| Property | Near mountains | Far mountains |
|---|---|---|
| Value | Darker darks, full range | Lighter, closer to the sky value |
| Contrast | Strong light-shadow difference | Very little difference |
| Color | Warmer, more saturated (greens, browns, ochres) | Cooler, grayer, bluer or violet |
| Edges | Sharp, defined | Soft, fading |
| Detail | Rocks, trees, crevices visible | Simple silhouette only |
Plan at least three ranges: far, middle and near. Each one steps forward on every row of that table.
Supplies for Mountain Paintings
- Colors: titanium white, ultramarine blue, phthalo blue (optional), burnt umber, burnt sienna, yellow ochre, cadmium yellow, alizarin crimson or quinacridone red, dioxazine purple (optional), sap green
- Brushes: 1-inch flat for sky, 1/2-inch angled flat for ridges, size 6 filbert, size 2 round, liner, fan brush for trees
- Palette knife: a small trowel or diamond-shaped painting knife for crisp ridges and snow
- Surface: canvas or canvas panel, 11×14 or 12×16 inches works well for landscapes
- Extras: stay-wet palette, spray bottle, paper towels, chalk pencil
Mountain scenes use a lot of white and blue, and those two tubes empty fast. Brands vary in how opaque their white is and how strong their blue tints are, which affects how many coats distant ranges need. For a side-by-side look at lines, see our guide to acrylic paint brands with strong whites and blues.
Mixing Colors for Distance
The easiest way to keep ranges consistent is to start with your sky color and add progressively more “mountain color” to it.
- Sky base: white plus a touch of ultramarine, slightly warmer near the horizon with a hint of yellow ochre or alizarin.
- Far range: sky base plus a little ultramarine and a dot of alizarin or purple. It should be only slightly darker than the sky.
- Middle range: far range plus more ultramarine and a touch of burnt umber. Noticeably darker, still cool.
- Near range: burnt umber, ultramarine and sap green or burnt sienna, with much less white. Warmer and darker.
- Foreground: darkest values with rich greens, browns and ochres.
For each range, also mix a lighter version for its sunlit side. The light side of a far mountain may be nearly the same value as the sky; the light side of a near mountain can be quite bright and warm.
How to Paint Mountains With Acrylic Paint: Step-by-Step
This demonstration paints three mountain ranges with a lake or meadow foreground on a 12×16-inch canvas, lit from the left. Plan for 90 minutes to two hours.
Step 1: Paint the Sky
Paint a gradient from a deeper blue at the top to a pale, warm tone near the horizon. Keep the horizon area light; distant mountains need a light backdrop to read. Let it dry.
Step 2: Sketch the Ridgelines
Lightly draw three overlapping mountain silhouettes with a chalk pencil. Vary their heights and peak positions. Avoid placing the tallest peak dead center or having ridgelines run parallel; staggered, overlapping shapes look more natural.
Step 3: Paint the Far Range
Fill the farthest silhouette with the far range mix. Using an angled brush, add a slightly lighter version on the left-facing slopes and a slightly darker one on the right. Keep the difference subtle. Soften the base of the range into a pale haze.
Step 4: Mist Between Ranges
While the far range is drying, or after, glaze or dry-brush a pale, sky-colored mist along its base. This separates it clearly from the next range.
Step 5: Paint the Middle Range
Fill the middle silhouette with the middle range mix. With an angled flat or a palette knife, pull diagonal strokes following the slope direction. On the sunlit side, add lighter strokes along ridges; on the shadow side, add darker, cooler strokes. Suggest a few gullies with angled lines running down from the peaks.
Step 6: Paint the Near Range
Paint the closest mountains with the darkest, warmest mix. Now you can add more detail: rock faces, bands of strata, patches of green slope, tree lines. Edges should be sharper and contrast stronger than in the other ranges.
Step 7: Add Forest at the Base
With a fan brush or small round, tap in dark pine silhouettes along the base of the near range. Make trees smaller and simpler as they climb the slope.
Step 8: Paint the Foreground
Paint a lake reflection or meadow. For a lake, mirror the mountain shapes downward in slightly darker values and soften them with horizontal strokes. For a meadow, use warm greens and ochres with a few dark accents.
Step 9: Final Highlights
Add a few bright highlights on the sunlit ridges of the near range and on snowcaps, if any. These final touches make the light direction clear.
Palette Knife Technique for Mountains
A painting knife creates crisp, rocky textures that brushes struggle to match.
- Load the edge of the knife with a thin ridge of paint by dragging it through a flat puddle.
- Place the edge at the top of the ridge and pull downward and outward at an angle, following the slope.
- Use very light pressure; let the paint break over the surface to create texture.
- Apply light colors on the sunlit side and dark colors on the shadow side, keeping a defined ridgeline between them.
The knife is especially effective for the middle and near ranges and for snow, where crisp edges and broken texture read as rock and ice.
How to Paint Snowy Mountains With Acrylics for Beginners
Snow-capped peaks are one of the most popular mountain subjects and are approachable even on a first attempt.
- Paint the mountain in a mid-dark blue-gray. Snow needs a darker shape underneath to stand out.
- Decide the light direction. Assume light from the upper left.
- Shadow snow first: Mix white with a little ultramarine and a touch of purple. Paint the right-facing slopes of the snowcap in this cool tone.
- Lit snow: Use white with a tiny touch of yellow ochre or cadmium yellow for warmth. Pull it down the left-facing slopes with a knife or angled brush, starting at the ridge and dragging downward.
- Let rock show through. Snow does not cover everything. Leave streaks of the dark mountain showing through on steep faces and along gullies.
- Snowline: Make the bottom edge of the snow irregular, breaking into patches and streaks.
The contrast between warm lit snow and cool shadow snow is what makes the peak look three-dimensional. Pure white on both sides flattens it.
Rocky Cliffs and Desert Mountains
Not every mountain is blue and snowy. Desert mesas and rocky cliffs use warmer palettes.
- Red rock: burnt sienna, cadmium red and yellow ochre, with shadows in burnt umber and ultramarine or purple.
- Strata: paint horizontal or tilted bands of slightly different values to suggest rock layers.
- Cliff faces: use vertical, broken strokes and knife scrapes for fractured rock.
- Distance still applies: far desert mountains still turn cooler and lighter, often lavender or dusty blue.
Painting Mountain Light at Different Times of Day
| Time | Sky | Mountain color |
|---|---|---|
| Midday | Clear blue | Cool shadows, neutral light sides, strong contrast up close |
| Sunrise / sunset | Warm yellows, oranges, pinks | Peaks lit with pink or orange (alpenglow); shadows purple |
| Overcast | Gray | Low contrast, muted colors, soft edges |
| Night | Deep blue, stars | Dark silhouettes; snow picks up faint blue moonlight |
Fluid acrylics and inks can glaze sunset tones over dry mountains to shift the mood without repainting. Our fluid acrylic review covers how these thinner paints handle glazing.
Composition: Where to Place the Peaks
Mountains are large, heavy shapes, so placement strongly affects the balance of the painting. Put the horizon or the base of the ranges in the lower third or upper third of the canvas rather than the middle, depending on whether the sky or the land is the star. Place the tallest peak off-center, roughly a third of the way in from one side. Let ridgelines overlap at different angles so the eye zigzags into the scene instead of sliding across a single straight line. A lake, river or path in the foreground that leads toward the main peak is one of the most reliable ways to pull viewers into a mountain landscape.
Common Mistakes When Painting Mountains
- All ranges the same color. Without value and color shifts, the scene collapses into one flat plane.
- Too much detail in the distance. Distant mountains are simple silhouettes.
- Symmetrical, pointy peaks. Real mountains are irregular, with asymmetrical slopes and secondary peaks.
- Inconsistent light direction. All sunlit slopes should face the same way.
- Vertical strokes on slopes. Strokes should follow the angle of the mountain.
- Pure white snow everywhere. Use warm and cool whites, and let rock break through.
- Foreground too light. A dark foreground pushes mountains back.
Tips by Skill Level
Beginner
Paint three flat silhouettes in three values against a gradient sky, with no detail at all. This exercise alone teaches atmospheric perspective.
Intermediate
Add light and shadow sides, snowcaps and a reflective lake. Introduce the palette knife for ridges.
Advanced
Explore dramatic lighting such as alpenglow, storm clouds and shafts of light. Paint cloud shadows moving across slopes.
FAQs
How to paint mountains acrylic for beginners?
Paint the sky first, then three mountain ranges from back to front, each one darker and warmer than the one behind it. Add a light side and shadow side to each mountain and keep the distant range very pale and simple.
What colors do I need to paint mountains?
Titanium white, ultramarine blue, burnt umber, burnt sienna, yellow ochre and a red or purple cover most mountain scenes. Sap green helps with forests and meadows.
Should I use a brush or a palette knife for mountains?
Both work. Brushes give softer, more atmospheric results, especially for distant ranges. A palette knife creates crisp ridges and rocky texture for near mountains and snow.
How do I make mountains look far away?
Make them lighter, cooler, bluer and lower in contrast, with soft edges and no detail. A hint of mist at their base also helps separate them from closer ranges.
How do I paint snow on mountains?
Paint the mountain darker first, then add cool blue-white snow on shadow slopes and warm white on sunlit slopes, pulling paint down from the ridge. Let streaks of rock show through.
Why do my mountains look flat?
Flat mountains usually lack a consistent light and shadow side, or all ranges share the same value. Separate ranges by value and give each slope a clear light side.
Final Thoughts
Painting mountains with acrylic comes down to sequence and restraint. Paint back to front, shift every range in value, color and detail, keep a consistent light direction and save your darkest, sharpest marks for the foreground. Once those principles click, snowy peaks, desert mesas and sunset ranges all follow the same structure.
Landscape work goes through a lot of white and blue, so it pays to use paint that covers well. Compare options in our guide to the best acrylic paints for landscape painters.




