
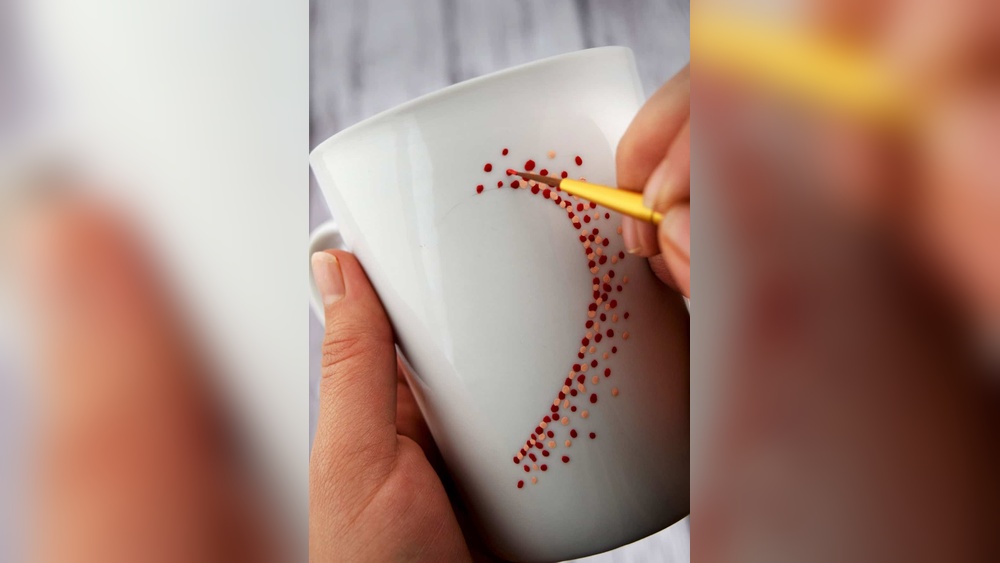
A hand-painted mug is one of those gifts people actually use every day. It’s also one of the easiest craft projects to get wrong. Designs drawn with regular markers wash off in the first rinse, paint applied without proper prep scratches away, and some products simply aren’t meant for surfaces that touch your mouth. The good news is that with the right paint, careful cleaning and a proper cure, DIY painted mugs can hold up well to regular use. This guide covers how to do DIY painted mugs at home, from choosing between paint pens and brush-on ceramic paint to baking, curing and keeping designs food-safe.
Quick answer: To paint mugs at home, clean a glazed ceramic or porcelain mug with soap and rubbing alcohol, then apply a paint made for ceramics, such as oil-based paint pens or porcelain/enamel paint. Keep paint off the inside and below the lip area (about 3/4 inch from the rim). Let the design dry, then cure it according to the product label, which often means baking in a home oven that starts cold, or air-curing for several weeks. Hand washing helps designs last longer.
Your paint choice determines durability more than anything else. Our guide to the best paint for DIY mugs compares paint pens and ceramic paints so you can match the product to your design.
Choose Your Mug and Paint
The Right Mug
- Glazed white or light ceramic and porcelain mugs are the easiest canvas. Colors show true and designs look crisp.
- Smooth, glossy surfaces are what most ceramic paints are designed for.
- Avoid mugs with metallic trim if you’ll bake them, since metallic decorations can react in the oven.
- Check that the mug is oven-safe if your paint requires baking. Most plain ceramic mugs are, but decorated or thrifted mugs may not be.
- Inexpensive dollar-store mugs work for practice, but very thin or low-quality mugs may be more prone to cracking when heated.
Paint Options Compared
| Product type | Best for | Curing | Pros | Cons |
|---|---|---|---|---|
| Oil-based paint pens | Lettering, line art, doodles | Often baked; follow the label | Precise, easy for beginners, opaque | Limited for large color areas; tips need priming |
| Porcelain/ceramic paint (water-based) | Brushwork, color fills, detailed designs | Often oven-baked or air-cured over days or weeks | Wide color range, blendable, brush-friendly | Requires careful layering and cure |
| Enamel paints for glass and ceramic | Bold, glossy designs | Air-dry or bake depending on brand | Glossy, durable finish | Can show brush strokes; some need longer cures |
| Regular permanent markers | Not recommended | Not designed for ceramic | Easy to find | Typically washes or wears off quickly |
| Standard acrylic craft paint | Decorative mugs that won’t be washed | Air-dry | Cheap, many colors | Usually not durable on glazed ceramic in daily use |
Always read your paint’s label. Curing temperatures, times and claims about dishwasher or food contact vary between products.
Materials You’ll Need
- Plain glazed ceramic or porcelain mugs
- Ceramic paint pens and/or porcelain or enamel paint
- Small brushes: fine round, liner and small flat (synthetic)
- Rubbing alcohol and cotton pads or a lint-free cloth
- Painter’s tape, vinyl stickers or stencils
- Graphite transfer paper or a pencil for sketching
- Cotton swabs and a craft knife or toothpick for corrections
- Paper towels and a palette for brush-on paint
- Oven and baking sheet (if baking is required)
How to Do DIY Painted Mugs at Home: Step by Step
Step 1: Wash and Degrease
Wash the mug in hot, soapy water and dry it completely. Then wipe the outside with rubbing alcohol to remove fingerprints and oils that can stop paint from bonding. After this, handle the mug by the inside or the handle only.
Step 2: Plan Your Design
Sketch your design on paper first, sized to the mug. Measure the mug’s height and circumference to plan wraparound designs. Mark a “no-paint zone” about 3/4 inch below the rim, since that’s where lips touch, and plan to keep the inside unpainted.
Step 3: Transfer the Design
Choose a method:
- Freehand: lightly draw with a pencil or a washable marker designed for glass; most marks wipe off later with alcohol.
- Graphite transfer: tape transfer paper and your printed design to the mug, then trace over the lines with a pencil.
- Stencils and vinyl: apply adhesive stencils firmly so paint can’t seep underneath.
- Tape resist: use painter’s tape to mask shapes, stripes or geometric patterns.
Step 4: Paint
With paint pens: shake well, prime the tip on scrap paper until paint flows, then draw with steady, even pressure. Let lines dry before going over them again to avoid lifting.
With brush-on paint: apply thin layers rather than one thick layer. Let each coat become touch-dry (often 15 minutes to an hour, depending on the product) before adding another. Thick paint can bubble, crack or run when baked.
Step 5: Clean Up Mistakes
While the paint is wet, wipe errors with a damp cotton swab or one dipped in rubbing alcohol. Once dry, gently scrape small mistakes with a craft knife or toothpick. Remove tape and stencils while the paint is still slightly soft for clean edges.
Step 6: Dry Before Curing
Most products need the design to air-dry before baking, commonly around 24 hours, though some specify less or more. This lets solvents and water evaporate so the paint doesn’t bubble in the oven.
Step 7: Cure the Paint
Follow the exact instructions for your product. Common approaches include:
- Oven curing: place the mug on a baking sheet in a cold oven, set the temperature the label specifies (many ceramic paints call for somewhere in the 300 to 350°F range), bake for the stated time, then turn the oven off and let the mug cool inside. Starting and ending cold reduces thermal shock that could crack the mug.
- Air curing: some paints cure without heat over several days to a few weeks. Avoid washing or using the mug until the cure time has passed.
Overbaking can discolor light paint colors, especially whites, while underbaking leaves the paint soft.
Food Safety and Durability
Hand-painted mugs need a little extra care compared with factory-glazed ones.
- Keep paint off food and lip contact areas. Leave the inside and the top 3/4 inch of the outside unpainted, unless your product is specifically labeled for food contact.
- Read the label for food and dishwasher claims. Some paints state they’re dishwasher-safe after a full cure; others recommend hand washing only. Labels vary, so don’t assume.
- Hand wash to extend life. Even durable designs fade faster with harsh dishwasher detergents and high heat.
- Avoid abrasive scrubbers on painted areas.
- Use painted mugs as decor or pen holders if you’re unsure about a product’s suitability for daily drinking.
For the most food-safe and permanent results, paint-your-own-pottery studios use underglazes and clear glazes that are fired in a kiln at much higher temperatures than a home oven. It’s a great option for gifts that will be used heavily.
DIY Painted Mug Design Ideas
Easy Designs for Beginners
- Polka dots: stamp dots with a pencil eraser dipped in paint, or dab with a paint pen.
- Dipped look: tape a line around the bottom third and paint below it in a solid color.
- Simple lettering: names, initials or a short word like “coffee” or “tea.”
- Stripes: tape off horizontal or diagonal stripes and fill them in.
- Hearts and stars: scattered small shapes in one or two colors.
Intermediate Designs
- Line-art botanicals: leaves and flowers drawn with a fine paint pen.
- Geometric patterns: triangles, diamonds or chevrons using tape.
- Constellations: dots and thin lines in gold or white on a dark mug.
- Doodle wrap: continuous doodles of coffee beans, cups, clouds or hobbies.
- Speckled finish: flick thin paint with a toothbrush for a stoneware look.
Advanced Designs
- Watercolor-style florals: thin porcelain paint layered for soft petals.
- Portraits of pets: simplified outlines with a few color fills.
- Landscape wraparounds: mountains, waves or skylines that circle the mug.
- Hand-lettered quotes: brush lettering requires practice but looks stunning.
DIY Painted Mugs for Gifts
Personalized mugs suit nearly any occasion. Some ideas:
- Teachers: an apple, books or a class-signed design using fingerprint art.
- Grandparents: grandchildren’s handprints or drawings traced onto the mug.
- Holidays: snowflakes, hearts, pumpkins or spring flowers.
- Coworkers: funny workplace phrases or their favorite drink.
- Weddings and showers: matching mugs with names and dates.
Pair the mug with a packet of tea or coffee and a note recommending hand washing to protect the design.
Troubleshooting DIY Painted Mugs
| Problem | Likely cause | Fix |
|---|---|---|
| Design scratches or washes off | Surface not degreased; paint not designed for ceramic; incomplete cure | Clean with alcohol, use ceramic-specific paint, follow full cure instructions |
| Bubbles after baking | Thick paint or not enough drying time | Apply thin layers and let dry fully before baking |
| White paint turned yellow | Overbaking or too high a temperature | Follow exact temperature and time; consider air curing for light colors |
| Streaky color | Brush strokes in thick paint | Use a soft brush and multiple thin coats |
| Mug cracked in oven | Thermal shock | Start in a cold oven and let the mug cool inside after baking |
| Paint pen blobs | Over-pressing or unprimed tip | Prime on paper first; use light, steady pressure |
Common Mistakes to Avoid
- Using regular permanent markers. Most aren’t made to bond with glazed ceramic.
- Touching the surface after cleaning. Skin oils interfere with adhesion.
- Painting the rim or inside. Keep paint away from food and mouth contact unless the product is labeled for it.
- Rushing the cure. Using or washing the mug too soon can ruin the design.
- Putting the mug in a hot oven. Sudden temperature changes can crack ceramic.
Paint Pen Techniques for Clean Results
Paint pens are the most beginner-friendly way to decorate mugs, but a few techniques make a big difference in how professional the results look.
- Work on a stable mug. Lay the mug on its side on a folded towel, or slide it onto a paper towel tube held in your non-drawing hand so you can rotate it without touching the paint.
- Draw in short sections. Curved surfaces distort long lines. Draw a few inches, rotate, and continue.
- Use the lightest pressure that keeps paint flowing. Pressing hard floods the tip and creates blobs.
- Layer colors from light to dark. Let each color dry before outlining with a darker pen.
- Keep a scrap tile nearby. Test each pen’s flow on a spare ceramic tile or plate before touching the mug.
- Thicken lettering gradually. Write the word in thin lines first, then go back to thicken the downstrokes for a faux-calligraphy look.
Caring for Hand-Painted Mugs
Once your mug is cured, a little care extends its life. Wash it by hand with a soft sponge and mild dish soap, rinse and dry it promptly. Avoid soaking painted mugs for long periods or leaving them in standing water. If the paint’s label allows microwave use, check it carefully; otherwise, heat drinks separately. Store mugs so painted surfaces don’t rub against each other in the cabinet.
FAQs
What paint is best for DIY mugs?
Paints made specifically for ceramics, such as oil-based paint pens and porcelain or enamel paints, are the best choices. Regular acrylic craft paint and standard markers generally don’t hold up on glazed mugs.
Do I need to bake painted mugs?
Many ceramic paints and paint pens recommend oven curing, while others air-cure over time. Follow the instructions for the product you use.
Are hand-painted mugs dishwasher-safe?
Some products claim dishwasher resistance after a full cure, but hand washing generally keeps designs looking good longer. Check your paint’s label.
Is it safe to drink from a painted mug?
It’s best to keep paint off the inside and away from the lip area. Unless a product is labeled for food contact, treat painted areas as decorative and avoid contact with food and mouths.
Why did my painted mug design wash off?
Common causes are skipping the alcohol cleaning step, using paint not designed for ceramics or not curing the paint fully before washing.
What temperature do you bake painted mugs at?
It depends on the product. Many ceramic paints specify a temperature in the 300 to 350°F range for 30 to 40 minutes, but always follow your label, and start with a cold oven.
Next Step
DIY painted mugs last when you start with a clean, glazed surface, use paint made for ceramics, keep designs away from lips and interiors, and cure everything properly. From simple polka dots to detailed florals, a little prep makes all the difference. To pick a paint that bonds well and holds up to regular use, see our comparison of the top paints and paint pens for custom mugs.


One Comment