If you want your painting project to look professional and neat, learning how to load a paint brush correctly is a must. Many people make the mistake of overloading or underloading their brushes, leading to messy drips, uneven coverage, and wasted paint.
But with the right technique, you can control the paint flow, achieve smooth strokes, and save time cleaning up. In this guide, you’ll discover simple steps to master brush loading that will instantly improve your painting results. Keep reading, and you’ll never struggle with paint brushes the same way again!
Credit: paintworksmag.com
Choosing The Right Brush
Choosing the right brush is important for a smooth painting job. A good brush helps you control the paint better. It also saves time and reduces mess. Knowing about brush types, sizes, and materials makes your work easier. This guide explains how to pick the best brush for your project.
Types Of Paint Brushes
Flat brushes have a straight edge and hold a lot of paint. They work well for large, flat surfaces like walls. Angled brushes have slanted bristles. They are great for corners and edges. Round brushes are good for small areas and detail work. Each type fits different painting needs.
Brush Sizes For Different Projects
Small brushes, like 1 to 2 inches, suit trim and detail work. Medium brushes, 2 to 3 inches, are best for doors and cabinets. Large brushes, 3 to 4 inches or more, cover big walls fast. Choose the size based on the area you paint. The right size helps you paint cleanly and quickly.
Materials And Bristle Types
Synthetic bristles work well with water-based paints. They keep their shape and are easy to clean. Natural bristles are best for oil-based paints. They hold more paint and give a smooth finish. Brush handles can be wood or plastic. Pick a handle that feels comfortable in your hand.
Preparing Your Brush
Preparing your paint brush is an important step before loading it with paint. A well-prepared brush holds paint better and delivers a smoother finish. Taking time to clean, condition, and trim your brush will improve your painting experience and results.
Cleaning New Brushes
New brushes often contain dust or loose bristles. Rinse the brush gently under warm water to remove any debris. Use mild soap if needed, then shake off excess water. Clean brushes prevent unwanted particles from mixing with your paint.
Conditioning Bristles
Conditioning softens the bristles and helps them hold paint evenly. Dip the brush in water or paint thinner, depending on the paint type. Work the liquid into the bristles with your fingers. This step reduces stiff bristles and improves paint flow.
Trimming For Precision
Sometimes, trimming bristles gives better control and cleaner lines. Use sharp scissors to carefully trim any uneven or stray bristles. Avoid cutting too much; just shape the brush tip for your specific task. A precise brush makes detailed painting easier and neater.
Selecting The Paint
Selecting the right paint is the first step to loading a brush properly. The paint’s quality and type affect how it sticks to the bristles. Choosing paint with the right consistency helps you control the brush better. Thinners and additives can improve flow and drying time. Mixing colors carefully ensures the shade matches your vision. This section covers key points about selecting paint for smooth application.
Choosing Paint Consistency
Paint consistency matters for brush loading. Thick paint can clump on the brush and cause streaks. Thin paint may drip and not cover well. Aim for a medium thickness that spreads easily. Stir paint well before use. If it feels too thick, add small amounts of water or thinner. Test the paint on a scrap surface to check flow. Correct consistency helps the brush hold paint evenly.
Using Paint Thinners Or Additives
Thinners make paint easier to apply. Add only a little at a time. Too much thinner weakens the paint’s coverage. Use additives to improve drying speed or texture. Some additives prevent brush marks or improve adhesion. Always follow manufacturer instructions for mixing. Use clean tools to blend thinners or additives. Proper mixing keeps paint smooth and ready for the brush.
Color Mixing Tips
Mix colors carefully to get the right shade. Use a clean container to combine paints. Stir slowly and evenly to avoid bubbles. Mix enough paint for the whole job to keep color uniform. Test the mixed color on a hidden spot. Adjust with small amounts of color if needed. Proper color mixing avoids patches and ensures a clean finish.
Loading The Brush
Applying the paint is the key step after loading your brush. It sets the tone for a smooth and even finish. Using the right method helps the paint spread well. This section covers how to start strokes, keep a wet edge, and use brush stroke techniques effectively.
Starting Strokes
Begin your stroke at the edge of the surface. Use gentle pressure to avoid paint splatter. Pull the brush in one smooth motion. Avoid pressing too hard to keep the bristles intact. Start with longer strokes for large areas. For corners, use shorter, controlled strokes.
Maintaining A Wet Edge
Keep the paint edge wet to avoid marks. Work in small sections to blend strokes. Overlap each stroke slightly with the previous one. This technique prevents visible lines in the paint. Stop and reload your brush before the paint dries. A wet edge ensures a smooth, even coat.
Brush Stroke Techniques
Use different strokes for different effects. Straight strokes create a flat, uniform finish. Crosshatch strokes add texture and depth. Feather strokes soften edges and blend paint. Always move the brush in the same direction. Clean strokes reduce streaks and uneven layers.
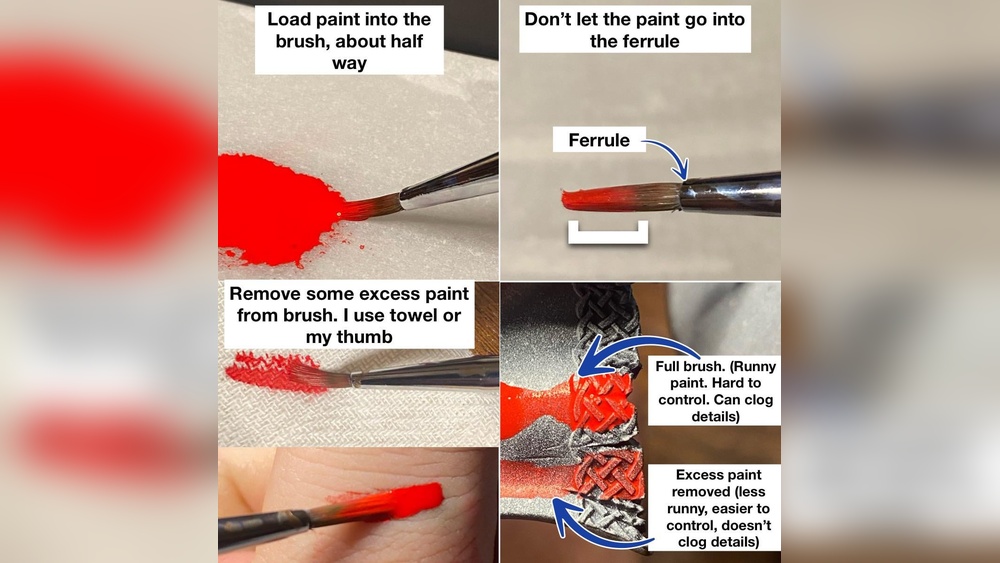
Removing Excess Paint
Handling different surfaces requires adjusting how you load your paint brush. Each surface type demands a unique approach to ensure smooth and even coverage. Correct brush loading saves time and enhances the paint finish. It also prevents drips and uneven patches. Below are tips for loading your brush on various surfaces.
Smooth Walls
For smooth walls, dip the brush only one-third into the paint. Avoid overloading to prevent drips. Gently tap the brush on the paint can’s edge to remove excess paint. Use long, even strokes for a flawless finish. Smooth walls show brush marks easily, so maintain a wet edge while painting.
Textured Surfaces
Textured surfaces need more paint on the brush to fill grooves. Dip deeper, about halfway into the paint. Load the brush evenly to avoid clumps. Use a dabbing motion to push paint into crevices. Avoid wiping the brush too much on the can edge. This helps cover rough textures fully.
Trim And Detail Work
Trim and detail work require precision and control. Dip the brush lightly, about one-quarter of the bristles. Remove excess paint by tapping, not wiping. Use a small angled brush for sharp edges and corners. Paint slowly and follow the lines carefully. This method prevents drips and keeps details clean.

Credit: www.youtube.com
Applying The Paint
Cleaning and storing paint brushes is vital for maintaining their quality and performance. Proper care keeps bristles soft and prevents damage. Clean brushes right after use. Store them correctly to avoid misshaping. This saves money and improves your painting results.
Proper Cleaning Methods
Start by removing excess paint with a cloth or paper towel. Use warm, soapy water for water-based paints. For oil-based paints, use mineral spirits or paint thinner. Gently work the cleaner through the bristles. Rinse thoroughly until the water runs clear. Avoid soaking brushes for long periods. This can loosen the bristles and damage the handle.
Drying And Storage Tips
Shake off excess water from the brush. Use a clean cloth to blot dry. Reshape the bristles carefully with your fingers. Hang brushes with bristles facing down to dry. This prevents water from seeping into the handle. Store brushes flat or upright with bristles up. Keep them in a dry, dust-free place. Avoid storing brushes in airtight containers when wet.
Extending Brush Life
Clean brushes immediately after use every time. Avoid leaving paint to dry on bristles. Use brush combs to remove stubborn paint particles. Condition natural bristle brushes with brush oil occasionally. Keep brushes separate from other tools to avoid damage. Regular care preserves brush shape and stiffness. This ensures smooth, even paint application for many jobs.
Handling Different Surfaces
Loading a paint brush correctly is important for a smooth finish. Many painters make simple mistakes that cause uneven paint or drips. Avoiding these common errors saves time and improves your results. Here are key mistakes to watch for and how to fix them.
Overloading Paint
Too much paint on the brush causes drips and uneven strokes. It is best to dip the brush only one-third into the paint. Remove excess paint by tapping the brush on the side of the can. This step keeps the paint controlled and easy to spread.
Uneven Brush Pressure
Pressing too hard or too lightly changes how the paint applies. Use gentle, even pressure for smooth coverage. Heavy pressure pushes paint out and creates streaks. Light pressure may leave gaps. Practice steady strokes to keep a uniform finish.
Skipping Preparation Steps
Not preparing the brush or paint can cause problems. Always shake or stir paint well before use. Rinse the brush if it is new to remove loose bristles. Proper preparation prevents clumps and helps the paint flow evenly.
Cleaning And Storing Brushes
Loading a paint brush correctly is key to smooth, even painting. Expert tips help avoid common mistakes and improve your technique. These tips focus on control and efficiency, ensuring flawless results every time. Follow simple steps that anyone can apply for better painting outcomes.
Choosing The Right Technique
Dip the brush into paint only one-third of the bristle length. Avoid overloading to prevent drips and uneven strokes. Use a gentle tap on the side of the paint can to remove excess paint. This technique keeps the brush balanced and ready for smooth application.
Working In Sections
Divide the surface into small areas before painting. Load the brush fresh for each section to maintain an even coat. Paint steadily and finish one section before moving on. This approach prevents drying marks and blends the paint seamlessly.
Maintaining Consistency
Keep the same pressure on the brush throughout the stroke. Use long, steady strokes for a uniform finish. Reload the brush as needed but avoid adding too much paint at once. Consistent loading helps achieve a neat, professional look on any surface.

Credit: www.youtube.com
Frequently Asked Questions
How To Properly Load A Paint Brush?
Dip the brush into paint about one-third of the bristle length. Tap off excess paint on the can’s edge. Avoid overloading to prevent drips. Apply smooth, even strokes for consistent coverage. Reload frequently for best results.
Should You Cut In First Or Roll First?
Cut in first along edges and corners for precise lines. Then roll paint on larger wall areas for even coverage. This prevents patchy, uneven finishes and ensures a smooth, professional look. Always work one wall at a time for best results.
How Do I Get A Perfect Line Between My Wall And Ceiling?
Use painter’s tape firmly pressed at the ceiling edge. Seal with a thin bead of caulk. Paint the ceiling color over tape, let it dry. Paint the wall color up to the tape line. Remove tape while paint is slightly wet for a sharp, clean line.
What Are The Most Common Painting Mistakes?
Common painting mistakes include skipping surface prep, using low-quality brushes, applying uneven coats, ignoring drying times, and poor edge cutting techniques.
Conclusion
Loading a paint brush properly makes painting easier and neater. Dip the brush only one-third into the paint for best control. Remove excess paint by scraping it on the can’s edge. This avoids drips and uneven strokes. Take your time and keep the brush clean during the job.
Good brush loading helps you paint smoother and finish faster. Practice these simple steps to improve your painting results today.