Imagine capturing the calm waves, golden sand, and bright sky all on your own canvas. Painting a beach scene with acrylics is easier than you think, even if you’re new to painting.
You’ll learn simple steps to bring your beach memories to life with color and texture. By the end, you’ll have a beautiful artwork that feels like a little escape to the shore. Ready to create your own beach paradise? Let’s dive in!
Choosing Your Materials
Choosing the right materials is the first step to painting a beautiful beach scene with acrylics. Good materials make painting easier and more fun. They help you show the colors and details of the beach well. This section explains what paints, brushes, and canvas to select for your project.
Selecting Acrylic Paints
Pick acrylic paints with bright, clean colors. Choose basic colors like blue, white, yellow, and brown. These help you create the sky, sand, and water. Look for paints that cover well and dry fast. Avoid cheap paints that feel thin or watery. Quality paints give better results and last longer.
Picking The Right Brushes
Use different brush shapes for various effects. Flat brushes cover big areas like the sky or sand. Round brushes help with details like waves and shells. Choose brushes with synthetic bristles. They work well with acrylic paint and are easy to clean. Have a few sizes from small to large for more control.
Preparing Your Canvas
Start with a clean, stretched canvas. Use a size that feels comfortable to hold and work on. Apply a layer of gesso if the canvas is raw. Gesso creates a smooth surface and stops paint from soaking in. Let it dry before you start painting. A prepared canvas helps paint stick better and look brighter.
Setting Up Your Workspace
Setting up your workspace is the first step to painting a beautiful beach scene with acrylics. A neat and well-lit area helps you focus on your art. It keeps your tools ready and your mind calm. A good environment makes painting easier and more fun.
Organizing Tools And Supplies
Arrange all your brushes, paints, and palettes in one place. Use containers or trays to keep them tidy. Keep water and rags nearby for cleaning brushes. Organizing supplies saves time and avoids mess. You can quickly find the colors and tools you need.
Ensuring Proper Lighting
Choose a bright spot with natural light if possible. Sunlight shows true colors and helps with details. If natural light is not enough, use a white light lamp. Avoid yellow or dim lights. Good lighting prevents eye strain and helps you see the paint clearly.
Creating A Comfortable Environment
Pick a quiet, peaceful place to paint. Sit on a comfortable chair with good back support. Keep your workspace at a good temperature. Play soft music if it helps you relax. A calm environment keeps your focus and makes painting more enjoyable.
Sketching The Beach Scene
Sketching the beach scene is the first step in painting with acrylics. It helps you plan the composition and shapes. A good sketch creates a strong base for your painting. You can change things easily at this stage. Focus on the big shapes before details. Use light pencil lines to avoid marks showing later.
Outlining Major Elements
Start by drawing the largest shapes. Sketch the shoreline, ocean, and sky area. Mark where the waves meet the sand. Add simple shapes for rocks, trees, or buildings. Keep these lines soft and loose. This guides your painting without crowding the scene.
Positioning The Horizon Line
The horizon line divides the sky and water. Place it carefully to balance your scene. A higher horizon shows more beach and foreground. A lower one shows more sky and clouds. Use a ruler or straight edge for a clean line. This helps keep your perspective correct.
Adding Foreground Details
Add smaller shapes near the bottom of your sketch. Draw shells, seaweed, or footprints in the sand. These details add interest and depth. Keep them simple and avoid too much clutter. Foreground details help lead the viewer into your painting.
Mixing Beach Colors
Mixing the right colors brings your beach painting to life. The ocean, sand, and sky each need different tones. Knowing how to mix these colors helps create a realistic scene. This section guides you through blending ocean blues, sandy tones, and sunset skies with acrylics.
Creating Ocean Blues
Start with a base of blue paint. Use ultramarine or cobalt blue for depth. Add a small amount of white to lighten the color. Mix in a touch of green to mimic sea water. For darker shades, blend in a little black or dark blue. Keep colors fresh and vibrant by mixing small batches.
Mixing Sandy Tones
Begin with a warm base color like yellow ochre or raw sienna. Add white to soften the tone for sunlit sand. Mix in a bit of brown or burnt sienna for shadows. Use tiny amounts of red or orange to give warmth. Adjust the mix until it matches the sand you see in your scene.
Blending Sunset And Sky Colors
Use soft blues and purples for the sky’s upper parts. Add pinks, oranges, and yellows near the horizon. Blend these colors gently for smooth transitions. White helps to lighten and soften the sunset hues. Mix small amounts of red and blue for subtle purple shades. Capture the calm and warm feeling of a beach sunset.
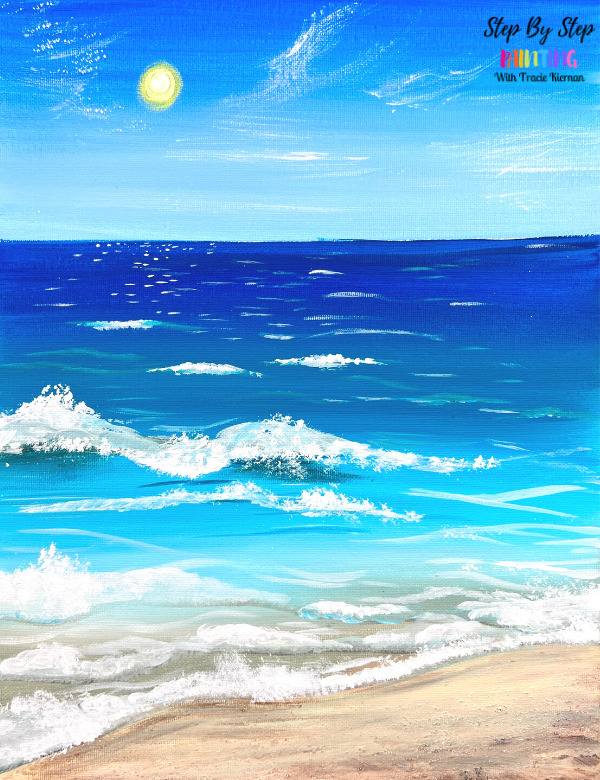
Painting The Sky
Painting the sky in a beach scene sets the mood and atmosphere. It can show a bright sunny day or a soft sunset. The sky often takes up a large part of your painting. This means it needs special care to look natural and beautiful.
Layering Color Gradients
Start with a clean brush and mix your colors well. Use light blue at the top of the sky. Add white or pale yellow near the horizon. Blend the colors smoothly to create a gradient. Work quickly while the paint is wet. This helps the colors mix softly. Use horizontal strokes to mimic the sky’s natural look. Don’t press too hard; keep your brush light and gentle. Let the gradient dry before adding more layers. This builds depth and realism in your sky.
Adding Clouds And Highlights
Choose a smaller brush for clouds. Use white or light gray paint. Dab the brush gently to form soft cloud shapes. Avoid hard edges; clouds look fluffy and round. Add a little blue or pink for cloud shadows. This gives them volume and life. Use a clean brush to blend cloud edges lightly. Add highlights where the sun hits the clouds. This creates a glowing effect. Keep clouds scattered and natural, not too perfect. This makes your beach sky feel alive and fresh.

Credit: www.youtube.com
Crafting The Ocean
The ocean is the heart of any beach scene. Painting it well brings life to your artwork. Use colors, shapes, and textures to show the ocean’s depth and motion. Think about how light hits the water and how waves move.
Start with calm water or rough waves depending on your scene. Each brushstroke adds energy and realism. Let’s explore ways to make the ocean look real and beautiful with acrylic paint.
Building Depth With Layers
Begin with a base layer of blue and green tones. Use darker shades at the bottom for deep water. Add lighter colors near the shore to show shallow areas. Paint in thin layers and let each dry before adding the next. This builds a sense of depth and space. Blend colors softly to avoid harsh lines.
Adding Waves And Reflections
Use white or light blue to create wave crests. Paint small, curved shapes to show wave movement. Add highlights where light hits the water surface. Reflections mirror the sky and nearby objects. Use soft brush strokes and gentle color shifts for reflection effects. This makes the ocean look shiny and alive.
Using Texture For Movement
Texture gives the ocean a feeling of motion. Use a dry brush or palette knife to add rough, uneven strokes. This mimics water ripples and foam. Try dabbing paint to create bubble-like spots. Avoid smooth, flat surfaces. Texture helps the viewer feel the ocean’s energy and flow.
Forming The Beach
Forming the beach is an important step in painting a beach scene with acrylics. This stage sets the foundation for the entire artwork. It brings the sandy shore to life and creates a natural look. Focus on colors, shadows, and small details to make the beach feel real.
Start by layering simple sand tones. Then, add shadows and highlights to show depth. Finish with tiny details like shells and footprints. These steps help the beach feel inviting and believable.
Applying Base Sand Colors
Begin by mixing warm beige, light brown, and soft yellow. Use a flat brush to spread these colors across the lower part of your canvas. Apply smooth, even strokes to cover the area. Blend colors gently to avoid harsh lines. This creates a soft, sandy texture that looks natural.
Incorporating Shadows And Highlights
Add shadows with a slightly darker brown or gray. Apply these under any objects or where the sand curves. Use a smaller brush to keep shadows sharp and clear. For highlights, mix white with a touch of yellow. Lightly brush these on raised areas of sand. Shadows and highlights give your beach shape and depth.
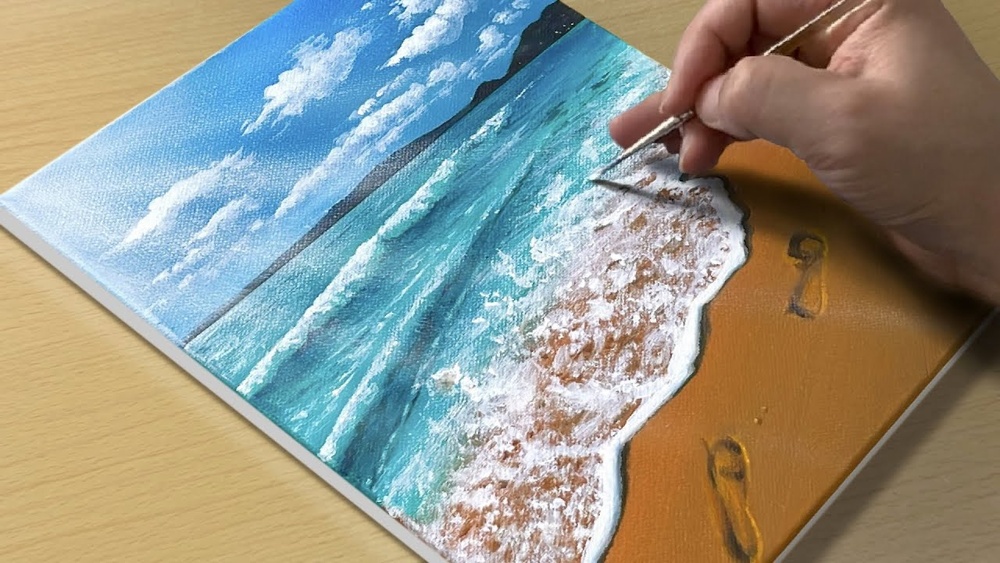
Adding Details Like Shells And Footprints
Use a fine brush to paint tiny shells in different colors. Place them randomly but naturally on the sand. For footprints, paint small oval shapes in a line. Use darker tones inside the prints to make them look pressed. These little details add character and make your beach scene come alive.
Credit: stepbysteppainting.net
Enhancing With Final Touches
Enhancing your beach scene with final touches brings it to life. These last steps add depth and realism. They make your painting stand out.
Highlighting Key Areas
Focus on areas where light hits the scene. Use a lighter color to paint highlights on the waves, sand, and shells. This creates a shiny effect and shows where the sun touches. Small white or pale strokes can mimic sparkling water. Bright spots on rocks or beach umbrellas catch the eye.
Balancing Contrast And Color
Check your painting for balance. Darken shadows and brighten light areas to add depth. Use blues, purples, or browns for shadows in sand and water. Make sure colors do not blend too much. Clear contrasts make the scene more real and interesting. Adjust the color temperature: warm tones for sunlit spots, cool tones for shaded parts.
Sealing Your Painting
Seal your acrylic painting to protect it. Use a clear varnish or spray designed for acrylics. This protects colors from fading and dust. Choose matte or glossy finish based on your preference. Apply thin, even layers and let each dry completely. Proper sealing keeps your beach scene bright and safe for years.
Common Mistakes To Avoid
Painting a beach scene with acrylics can be fun and relaxing. Yet, some mistakes can spoil your work. Avoiding these common errors will help your painting look better and more natural.
These errors often happen to beginners and even some experienced artists. Fixing them early makes your painting process smoother and more enjoyable.
Overworking The Paint
Overworking means painting the same area too much. This can make colors dull and muddy. Acrylic paint dries fast. Keep your brush moves light and confident. Stop painting an area once it looks right.
Ignoring Light Source
Light gives your painting depth and realism. Without a clear light source, your beach scene looks flat. Decide where the sun is before painting. Shade and highlight accordingly to show shapes and distance.
Neglecting Layer Drying Time
Acrylic paint needs time to dry between layers. Painting wet layers on top causes colors to mix wrongly. Wait a few minutes or longer before adding new layers. This keeps colors clean and bright.
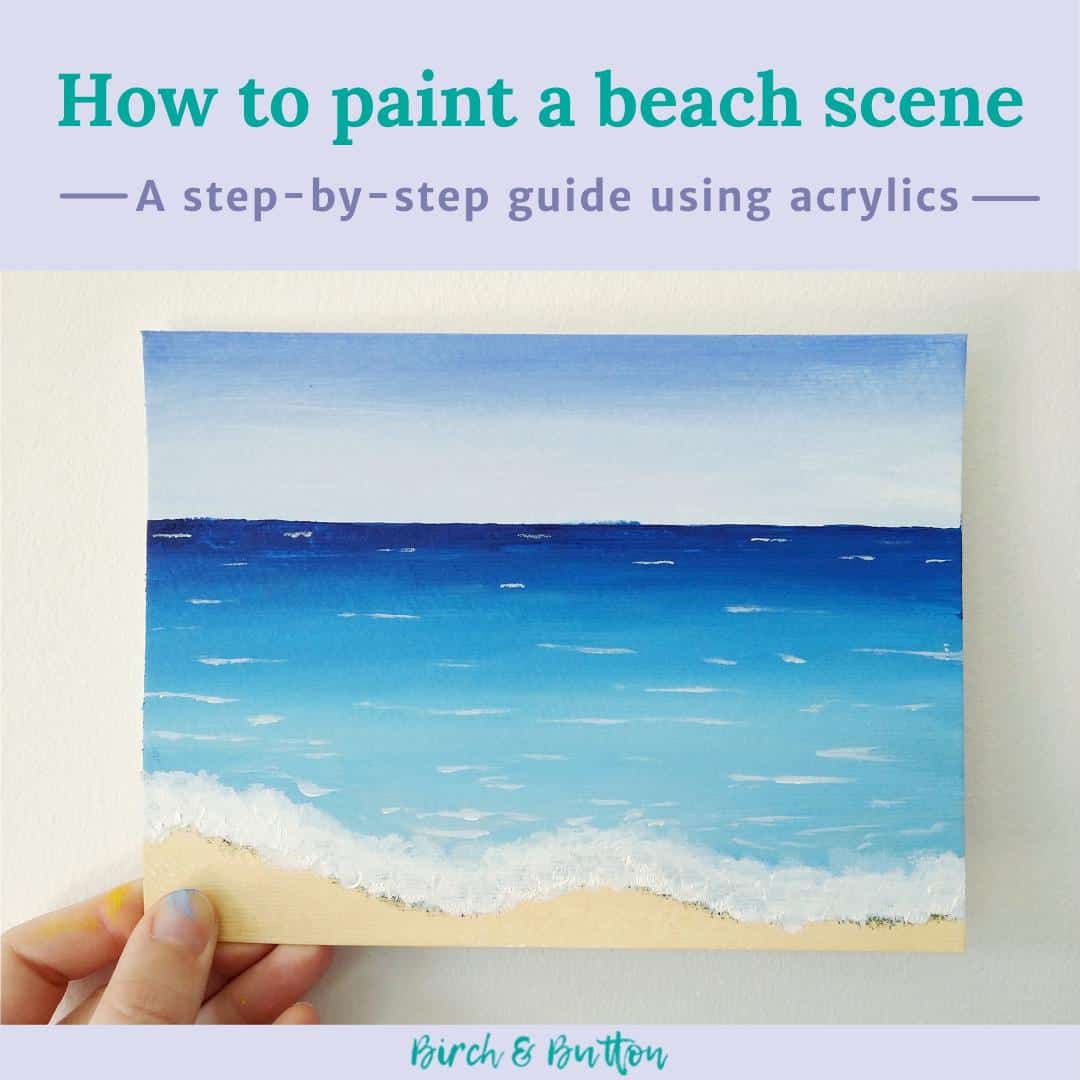
Credit: birchandbutton.com
Tips For Improving Your Technique
Improving your technique is key to painting a beautiful beach scene with acrylics. Small changes in how you use your tools and observe your subject can make a big difference. Practice, try new methods, and learn from real life to enhance your skills.
Focus on developing control and confidence with your brush and other painting tools. Study photos for better understanding of colors and shapes. These tips help you paint with more detail and feeling.
Practicing Brush Strokes
Brush strokes create texture and movement in your painting. Practice different strokes on scrap paper or canvas. Use short, quick strokes for waves and longer strokes for the sky. Try varying pressure to create light and dark effects. Consistent practice helps you control the brush better.
Experimenting With Palette Knives
Palette knives add texture and bold shapes. Use them to apply thick paint for sand or rocks. Scrape paint lightly for soft clouds or water reflections. Experiment with different angles and pressure. This tool gives your painting a fresh and lively look.
Studying Beach Photography
Photos show real light, color, and details at the beach. Study photos to understand how sunlight changes during the day. Notice shadows and color blends in water and sand. Use photos to practice mixing colors and planning your painting. This helps you paint more realistic scenes.
Frequently Asked Questions
What Basic Supplies Do I Need To Paint A Beach Scene?
You need acrylic paints, brushes, canvas, palette, water container, and paper towels. Choose blues, tans, whites, and greens for beach colors. A flat brush and a fan brush help with waves and sand textures.
How Do I Create Realistic Water In Acrylic Painting?
Use layered blues and greens with white highlights for waves. Blend colors smoothly. Add reflections with light strokes. Use a fan brush to create wave textures and white acrylic for foam details.
What Technique Helps Paint Sand Texture Effectively?
Dry brushing with a stiff brush creates sandy texture. Use light tans and yellows. Dab paint lightly to mimic grains. Layer different shades for depth and realism in the sand.
How To Paint A Vibrant Sunset On The Beach?
Start with a gradient from yellow to deep orange and red. Blend colors smoothly. Add silhouettes of palm trees or birds for contrast. Use bright highlights on water to reflect the sunset’s glow.
Conclusion
Painting a beach scene with acrylics can be fun and relaxing. Start with simple shapes and soft colors. Take your time blending the sky and water. Add details like sand and shells last. Practice helps you improve with each painting.
Enjoy the process, not just the result. Your beach scene will come alive with your effort. Keep experimenting and have fun with your art!